A typical web server hosting an eCommerce store or a high-traffic website receives hundreds of queries in a typical operational cycle. In most cases, many of these queries are similar in nature and often involve a related set of pages.
The server processes these requests and sends responses to the clients. This repetitive processing consumes a significant portion of server resources that could be otherwise dedicated to processing unique requests.
A very practical solution for this challenge is to set up an intermediary in-memory storage that serves these repetitive requests. In this setup, only the unique requests that are previously requested are passed on to the server. This significantly reduces server resource consumption and vastly improves the page load time for the clients by eliminating the time required to move data to and back to the original server.
Redis is an open-source, in-memory data store offering flexibility and robust performance. It functions as a versatile key-value database that offers remarkably consistent performance under increasing load.
In addition to its exceptional performance and adaptability, Redis is compatible with all popular languages and frameworks, wide availability, and automated partitioning capabilities.
In this tutorial, we will discuss the process of installing Redis on Ubuntu 18.04 and 20.04.
Table Of Contents
Installing and Securing Redis on Ubuntu
We recommend following these steps to install Redis on Ubuntu and then configure it for smooth operation. We will cover critical aspects such as implementing password authentication and binding Redis to localhost.
Important: Our test machine has Ubuntu 20.04. However, you can apply these steps to Ubuntu 18.04 without any major modifications.
The Prerequisites
Before going through the steps outlined below, make sure you have the following:
- A system running Ubuntu 20.04 (or Ubuntu 18.04).
- A user account with root or sudo privileges.
Step #1: Install Redis on the Ubuntu Server
Start by downloading the Redis package and installing it on the server.
Update the current Ubuntu package repository with the following command:
# sudo apt update
Next, use the following command to install Redis on the server:
# sudo apt install redis-server
Step #2: Configure Redis On The Server
After the installation has finished, proceed to edit the Redis configuration file (redis.conf). You can do this by opening the file using your favorite text editor (we’ll use Nano in this demonstration):
# sudo nano /etc/redis/redis.conf
Locate the line that contains the supervised directive. By default, this line is set to no. Now, since we wish to manage Redis as a service, we will modify this directive to systemd, which is Ubuntu’s native init system.
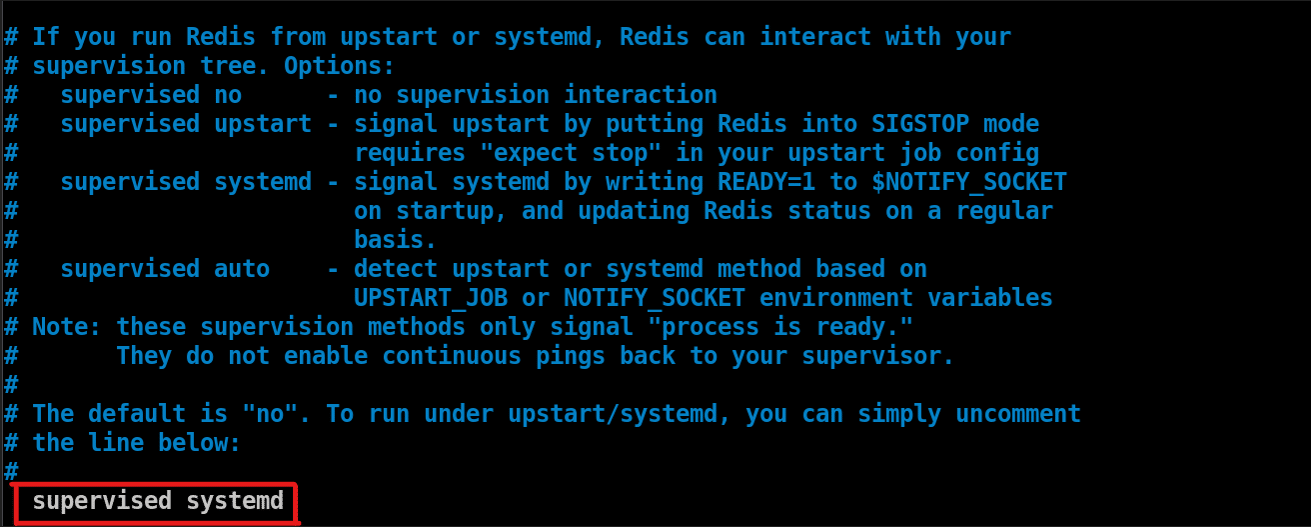
Save the changes and close the editor.
Changing the configuration file doesn’t mean the changes will go into effect immediately. We need to restart the Redis service by executing the following command to ensure the changes take effect:
# sudo systemctl restart redis.service
Step #3: Verify the Redis Installation
After the basic changes to the Redis configuration file, we now need to verify that the Redis is ready for operation. This is a multi-step process where we will check if the service is running, test the connection to the server, and verify our ability to set a key-value pair.
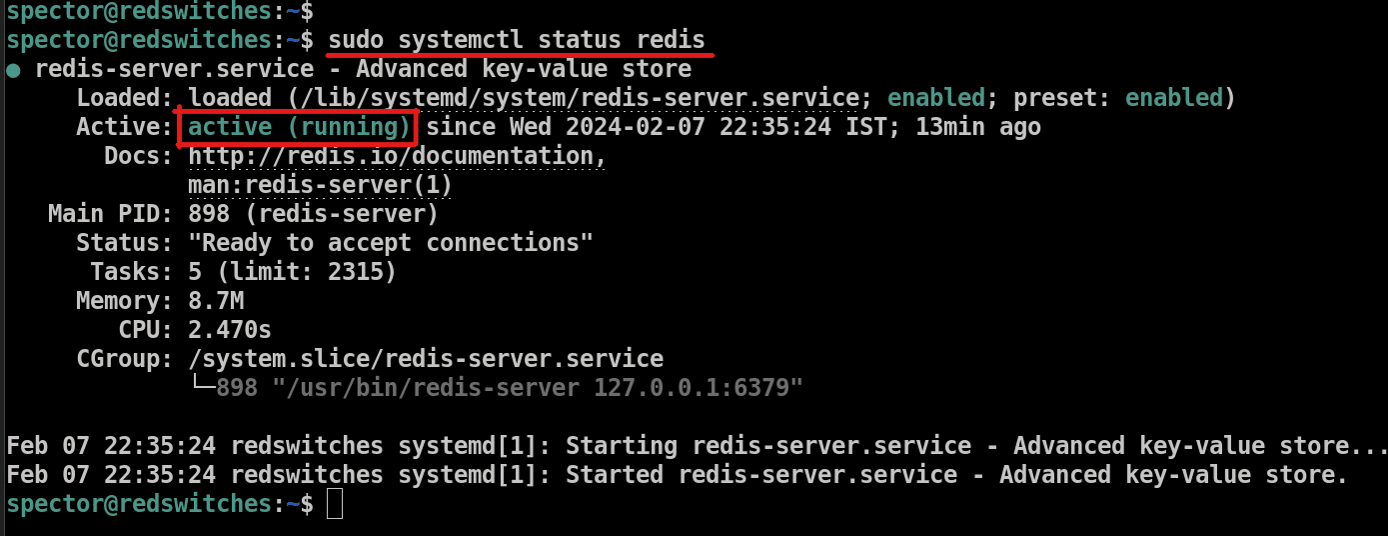
Verify the Status of the Redis Service
Check the Redis service’s status by running the following command:
# sudo systemctl status redis
The result should confirm that the service is currently active and operational.
Verify Connection to the Redis Server
You should also confirm the connection to the Redis server with the redis-cli tool.
Launch the tool by running the following command in the terminal:
# redis-cli
This will bring you to the redis-cli command prompt (usually the server IP address).
At this prompt, execute the following command to test the connection to the Redis server:
> ping
The expected response from the output should be:
PONG

Test the Configuration by Setting Key-Value Pairs
As Redis technically functions as an in-memory key-value NoSQL database, it’s important to verify if it can retrieve values associated with specific keys.
Before going further, make sure that you are in the Redis CLI tool.
Start by creating a key using the set command. In this instance, we’ll label the key as key1 and assign it the value You have successfully set up a key-value pair!
To achieve this, execute the following command:
> set key1 "You have successfully set up a key-value pair!"
After pressing Enter, the prompt will respond with OK.
Next, verify whether you have successfully assigned the specified value to the key by using the get command:
> get key1
The expected output should display the message you initially assigned as the value:

Finally, exit the Redis shell by the following command:
> quit
Step #4: Secure the Redis Server
Now that Redis has been up and running on your Ubuntu server and you have tested the connectivity to the Redis server, let’s implement some basic security. This involves the following steps:
Establish Redis Authentication
Redis provides an authentication feature as an added layer of security, but it’s not enabled by default. To activate this feature, you’ll need to make changes to the Redis configuration file.
Begin by opening the Redis configuration file for editing in your preferred text editor. We will open the file in Nano with the following command:
# sudo nano /etc/redis/redis.conf
Next, find the requirepass directive within the SECURITY section and uncomment it by removing the # symbol.
After uncommenting the line, replace ‘foobared’ with your preferred strong password.
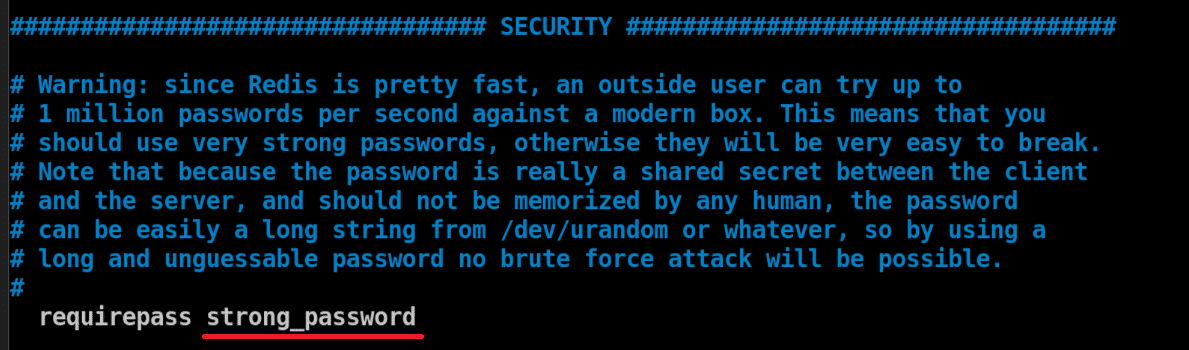
Save the changes and exit the editor.
Finally, restart the Redis service:
# sudo systemctl restart redis.service
Note that after you have set up Redis to require authentication, it will reject any query unless the necessary secure password is provided.
For instance, if you switch to the redis-cli command prompt and attempt to execute the ping test, the output will include the message: (error) NOAUTH Authentication required.
In such a scenario, the only way to commence working with Redis is by supplying the password specified in the configuration file.
For this, execute the following command:
# auth [your_password]
If the output displays ‘OK,’ you are ready to proceed.
Bind Redis to Localhost
If you’ve installed Redis following the previously mentioned steps, it should only be reachable from localhost. This restriction of access enhances network security.
Nevertheless, if you’ve altered the default settings and wish to further restrict connections to localhost, follow these steps:
Begin by opening the Redis configuration file for editing:
# sudo nano /etc/redis/redis.conf
Scroll down to locate the NETWORK section within the file. Uncomment the line bind 127.0.0.1 ::1 by removing the # symbol:
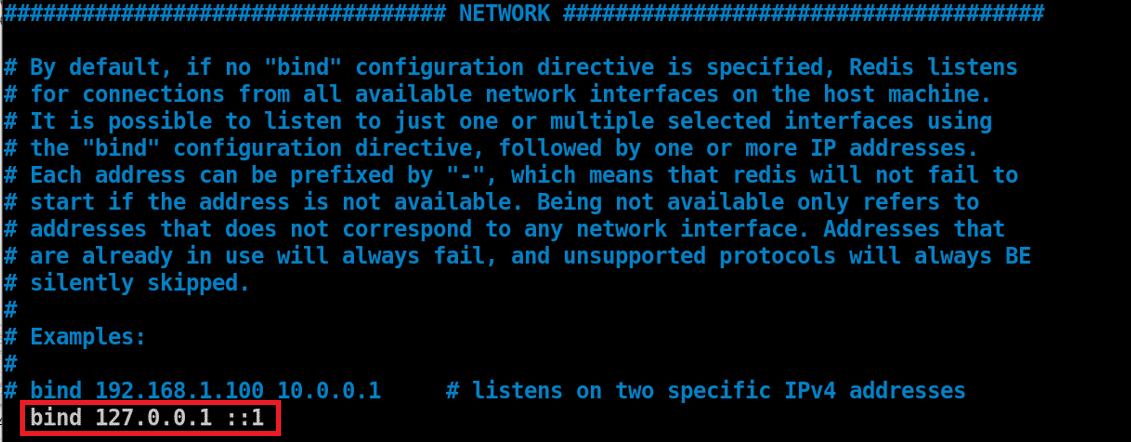
After saving and closing the file, remember to restart the service using the following command:
# sudo systemctl restart redis
By following these steps, you have effectively configured Redis to bind to localhost, limiting access to external connections.
Rename or Disable Risky Commands
To enhance data protection, you can choose to either disable certain commands or rename them in a way that makes them difficult to guess. This additional security layer can be valuable in preventing regular users from utilizing commands that might pose a threat to the system’s integrity.
To disable or rename these commands, you’ll need to edit the Redis configuration file:
# sudo nano /etc/redis/redis.conf
Within the SECURITY section, scroll down to the # Command renaming section. Here, you’ll find examples demonstrating how to rename or disable commands.
As an illustration, if you wish to rename the CONFIG command, you can add the following line:
rename-command CONFIG [new_command_name]
In this instance, the config command has been renamed to sys_admin_config_836, which is a name that a typical user would find difficult to guess.
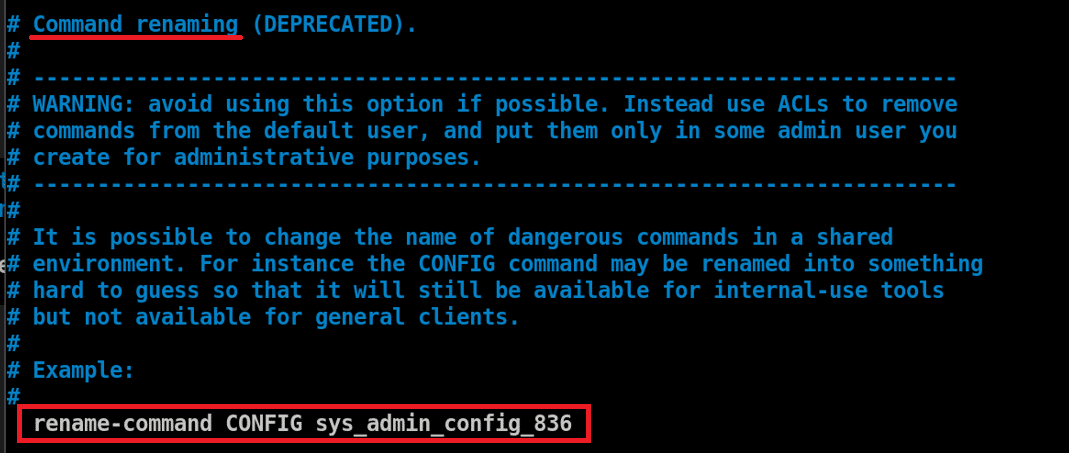
To eliminate specific commands, you can effectively disable (kill) them by renaming the dangerous command to an empty string.
For instance, if you intend to disable the config command, include the following line:
rename-command CONFIG ""

After implementing these modifications, be sure to save the changes and then restart the Redis service.
Also Read: How To Install Redis on macOS: 2 Scenarios
Conclusion
We discussed how to install and configure a Redis server on Ubuntu 20.04. Redis, renowned for its speed and versatility, is now active on your server, and you can leverage its features to deliver awesomely fast experiences to your visitors.
Redis is just one of the many server components you can deploy at your RedSwitches bare metal server. We offer the best dedicated server pricing and deliver instant dedicated servers, usually on the same day the order gets approved. Whether you need a dedicated server, a traffic-friendly 10Gbps dedicated server, or a powerful bare metal server, we are your trusted hosting partner.
FAQs
Q. How do I install Redis on Ubuntu 20.04 and 18.04?
To install Redis on Ubuntu 20.04 and 18.04, you can follow these steps: – Open the terminal and update the server package list with sudo apt update. – Then, install Redis by running sudo apt install the redis-server. – Verify the installation by checking the Redis server status with sudo systemctl status redis.
Q. How can I configure Redis on Ubuntu?
To configure the Redis server on Ubuntu, you can modify the Redis configuration file located at /etc/redis/redis.conf. You can set up options such as the port number, IP address, and other settings as needed.
Q. Is Redis an open-source in-memory data structure store?
Indeed, Redis is an open-source, in-memory data structure store widely utilized as a message broker, cache, and for a range of other functionalities.
Q. How to secure Redis on Ubuntu 20.04 and 18.04?
You can secure Redis on Ubuntu 20.04 and 18.04 by following these steps: – Disable dangerous commands. – Rename the config file and change the port for added security.
Q. What is the redis-cli command used for?
The redis-cli command is used to interact with the Redis database. You can use it to run Redis commands and manage the Redis server from the command line.
Q. How can I ensure the security of my Redis database with a strong password?
To enhance the security of your Redis database, it’s crucial to set up a strong password using the ‘requirepass’ directive in the Redis configuration file. This password will act as a safeguard against unauthorized access.
Q. What should I do if I encounter an error message while installing Redis from the APT repository?
If you encounter an error message during the basic installation process, it’s essential to review it carefully. Ensure that your APT repository is correctly configured and you have the necessary root access or sudo privileges to resolve any dependency issues.
Q. Can I change the default port number for Redis during the installation process?
Yes, you can change the default port number for Redis while configuring it on Ubuntu. This provides an additional layer of security, as it makes it more challenging for potential attackers to access your Redis server.
Q. What are the recommended basic configuration tasks for Redis to ensure optimal performance?
To achieve optimal performance, consider configuring Redis by specifying the maximum memory limit, configuring persistence options, and fine-tuning other settings according to your application’s requirements.
Q. How can I verify that Redis is working correctly after installation?
After the installation, you can verify that Redis is functioning correctly by using the ‘ping’ command in the redis-cli. A successful response indicates that your Redis server is operational and ready to use.
Q. What commands can I use in the redis-cli to manage and query data stored in Redis?
The redis-cli offers a wide range of commands to interact with the database, including data insertion, retrieval, and management commands. Popular commands include ‘SET’ for setting key-value pairs and ‘GET’ for retrieving values based on keys.
Q. What are the benefits of using Redis as an in-memory database?
Redis’s in-memory database architecture offers several advantages, including lightning-fast data retrieval, efficient caching solution, support for complex data structures, and its role as a versatile message broker, making it an excellent choice for various applications.
