Many of us first started using an NVIDIA GPU when we installed a game on our system and realized that a GPU offers significantly higher performance in rendering game graphics.
Fast forward to now, and NVIDIA GPUs are not just for playing games – they are used for projects like creating 3D images, cryptocurrency mining, and advanced tasks like machine learning and artificial intelligence.
Another critical aspect of the popularity of NVIDIA GPUs is their multitasking capabilities. These units are really good at doing many tasks at the same time, much better than the regular CPUs.
But before you can use these GPUs on your Ubuntu machine, you need to install the relevant NVIDIA drivers on Ubuntu 20.04.
In this guide, we will discuss three methods of installing NVIDIA drivers on Ubuntu. We will also discuss how you can uninstall these drivers to ensure a clean removal of the driver packages.
Table Of Contents
How to Install NVIDIA Drivers on Ubuntu 20.04
Let’s see the prerequisites for installing NVIDIA Drivers on Ubuntu:
The Prerequisites
- A Ubuntu 20.04 machine.
- A user account with root or sudo permissions.
- An NVIDIA GPU in the system
Method #1: NVIDIA Driver Installation Using the GUI
When you use Ubuntu, the system already has free Nouveau drivers for the NVIDIA GPU.
However, these drivers may not make the graphics card work at its best, and they might even make your computer act strangely. We recommend drivers made by NVIDIA. Although these drivers are not free, they work better and are more dependable.
You can install these NVIDIA drivers through the Software & Updates app. We recommend this method to users who prefer the GUI over the command line.
Step #1: Open Software and Updates
- Go to the Applications menu and enter software and updates in the search bar.
- Choose the Software and Updates application.
Step #2: Select the Additional Drivers tab
Wait for the application to fetch a list of extra drivers you can use for your GPU.
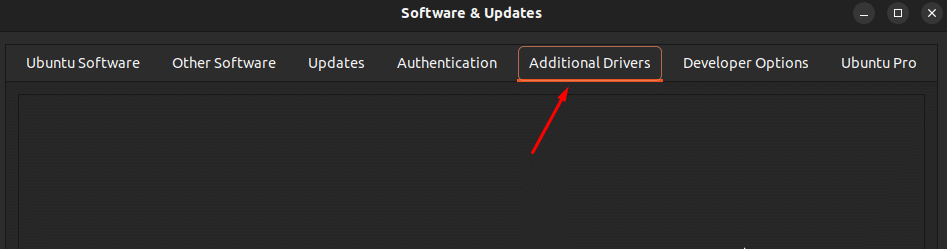
The default choice is the driver that’s already installed on your computer. Note that If no drivers are installed by default, you will not see anything in the tab.
Step #3: Choose a Driver
Choose the most recent NVIDIA driver labeled as proprietary, tested from the list. This is the latest stable driver released by NVIDIA Corporation specifically for your GPU.
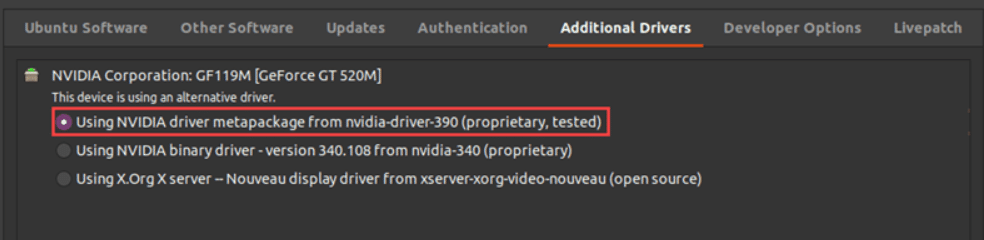
- Click Apply Changes.
- Type in your password and wait for the installation process.
Step #4: Restart the Machine
Reboot your machine so that the system loads up the installed drivers instead of the default ones.
Method #2: Install NVIDIA Driver via the Command Line
Installing NVIDIA drivers via the command line is a great alternative to the GUI-based method.
Step #1: Search for NVIDIA Drivers
Access the terminal by pressing Ctrl+Alt+T or find it by searching for the terminal in the Applications menu.
Run the below command:
# apt search nvidia-driver
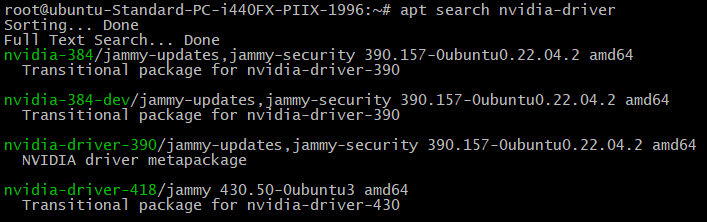
The output of the command will list the drivers you can install for your GPU.
Step #2: Update the System Package Repository
Like any other package, before you install the driver, update the system’s package repository. Use the following commands in sequence:
# sudo apt update
# sudo apt upgrade
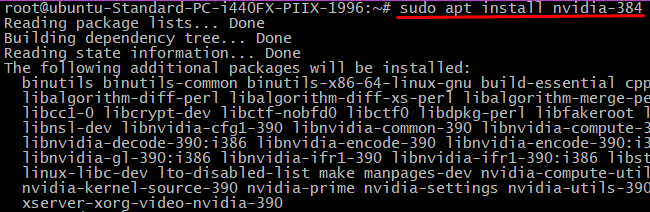
Step #3: Install the Appropriate Driver for Your GPU
Pick a driver to install from the list of available GPU drivers. The recommended choice is the newest tested proprietary version. Note down the name of the driver so you can use it in later commands.
Next, run the following command to install the selected driver. Note that for this demonstration, we installed NVIDIA-driver-384, the latest tested proprietary driver for the GPU on our test system.
# sudo apt install [driver_name]
Step #4: Reboot the Machine
Use the following command to reboot your machine:
# sudo reboot
Method #3: Install NVIDIA Beta Drivers via the PPA Repository
The PPA repository lets developers share software that are not in the official Ubuntu repository. As such, it is a great way of installing the newest beta drivers.
Important: Since these drivers are in beta, they can make your system unstable and cause problems in image and video rendering.
Step #1: Add the PPA GPU Drivers Repository to the System
Include the graphics drivers repository in the system using this command:
# sudo add-apt-repository ppa:graphics-drivers/ppa
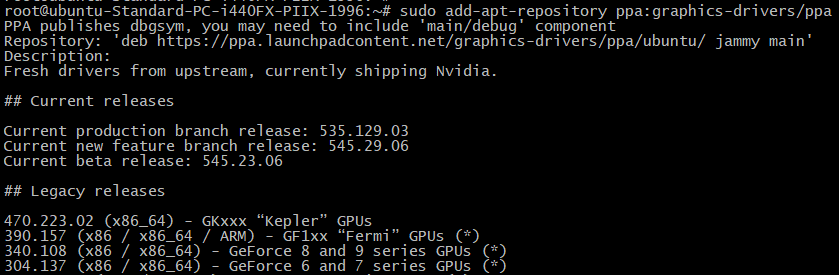
Type in your password and press Enter when prompted to confirm adding the repository.
Step #2: Find Your GPU Model and See the Available Drivers
To check your GPU model and see a list of drivers you can use, enter the following command:
# ubuntu-drivers devices
The result will display your GPU model and the drivers available for that particular GPU.
Step #3: Install NVIDIA Driver
Note down the name of the driver and then run the following command to install it:
# sudo apt install [driver_name]
As you can see, we installed the driver version NVIDIA-384 on our test system.
Alternatively, you can let the system install the suggested driver for you by running the following command:
# sudo ubuntu-drivers autoinstall
![]()
There were no modifications in this instance because the suggested driver is already in place.
Step #4: Restart the System
Restart your machine so the changes can occur. Use the standard reboot command for your system.
Also Read: Install Ubuntu 20.04 LTS Focal Fossa In 5 Easy Steps
How to Uninstall NVIDIA Drivers
If you wish to remove the NVIDIA driver, it’s best to uninstall it completely using the –purge option with the apt command. The process has the following steps:
Step #1: View the Installed Packages
Use the following command to see which NVIDIA packages are installed on your system:
# dpkg -l | grep -i nvidia
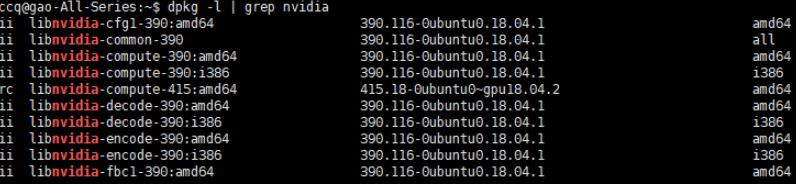
The result will show a list of all NVIDIA packages currently on the system.
Note: You might also want to remove the ubuntu-desktop package because it’s linked to the nvidia-common package. However, you might need to reinstall it later if you delete it now.
Step #2: Purge NVIDIA Packages
Run the below command:
# sudo apt-get remove --purge '^nvidia-.*'
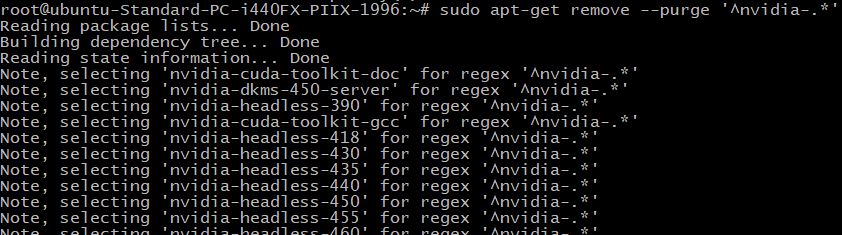
The command deletes all NVIDIA packages from the system.
If the ubuntu-desktop package gets deleted, reinstall it using this command:
# sudo apt-get install ubuntu-desktop.
Step #3: Reboot the System
Restart your system using the command sudo reboot. When you do this, the system will, by default, use the open-source Nouveau driver when starting up.
Conclusion
Installing NVIDIA drivers on Ubuntu 20.04 can significantly enhance your graphics performance. Whether you prefer using the GUI Software & Updates app, the terminal, or the PPA repository, you have various options. Remember to pick the driver that suits your GPU.
If you ever need dedicated hosting for your powerful tasks, consider RedSwitches as your hosting provider. With our reliable services, you can ensure a smooth experience while utilizing NVIDIA drivers for your graphics-processing needs.
We offer the best dedicated server pricing and deliver instant dedicated servers, usually on the same day the order gets approved. Whether you need a dedicated server, a traffic-friendly 10Gbps dedicated server, or a powerful bare metal server, we are your trusted hosting partner.
FAQs
Q. What are the different ways to install NVIDIA drivers on Ubuntu 20.04?
There are three main ways to install NVIDIA drivers on Ubuntu 20.04: using the default Ubuntu repositories, downloading and installing from the NVIDIA website, and using the “Additional Drivers” tool.
Q. How do I install the latest proprietary NVIDIA drivers on Ubuntu 20.04?
You can install the latest proprietary NVIDIA drivers on Ubuntu 20.04 by downloading and installing the specific driver from the official NVIDIA website.
Q. Can I use the official NVIDIA.com driver to install NVIDIA drivers on Ubuntu 20.04?
Yes, you can use the official NVIDIA.com driver to install NVIDIA drivers on Ubuntu 20.04 by following the step-by-step instructions provided on the NVIDIA website.
Q. What is the recommended driver for NVIDIA cards on Ubuntu 20.04?
The recommended driver for NVIDIA cards on Ubuntu 20.04 is the proprietary NVIDIA driver, which can be installed using the official NVIDIA.com driver or through the “Additional Drivers” tool.
Q. How can I install NVIDIA drivers on Ubuntu 22.04?
To install NVIDIA drivers on Ubuntu 22.04, you can follow the same methods as for Ubuntu 20.04, including using the default Ubuntu repositories, downloading and installing from the NVIDIA website, or using the “Additional Drivers” tool.
Q. What are the steps to install proprietary NVIDIA drivers on Ubuntu 22.04?
The steps to install proprietary NVIDIA drivers on Ubuntu 22.04 are similar to those for Ubuntu 20.04 and involve downloading the specific driver from the official NVIDIA website and executing the installation commands.
Q. How can I make use of the NVIDIA X Server Settings after installing the drivers on Ubuntu?
After installing the NVIDIA drivers on Ubuntu, you can access and configure settings using the NVIDIA X Server Settings tool, which provides various options for optimizing NVIDIA GPUs.
Q. Is it possible to install the latest version of NVIDIA drivers on Ubuntu using the default Ubuntu repository?
The default Ubuntu repository may not always have the latest NVIDIA drivers, so it’s recommended to download and install the latest drivers directly from the NVIDIA website for the most up-to-date version.
Q. What should I do if I want to install the NVIDIA open source driver on Ubuntu 20.04?
By default, Ubuntu uses the proprietary NVIDIA drivers. However, if you prefer the open-source drivers, you can explore options available in the Ubuntu repository package or community-supported alternative drivers.
Q. Where can I find step-by-step instructions for installing NVIDIA drivers on Ubuntu 20.04?
Step-by-step instructions for installing NVIDIA drivers on Ubuntu 20.04 can be found on the official NVIDIA website, which provides detailed guidance for downloading and installing the drivers on Ubuntu.
