Java is a popular programming language that is used to create a wide variety of applications, from lightweight mobile applications to desktop programs.
On Ubuntu systems, you can opt for open source Java, a Java version that is freely available for anyone to use, modify, and distribute. Java Development Kit (Open JDK) and Java Runtime Environment (Open JRE) are both open-source Java packages accessible in the Ubuntu repository. This makes it an excellent option for developers who want to create innovative and cutting-edge applications.
Oracle Java, another SE variant with commercial features, is also popular. You can use a third-party source to get the official Oracle JDK. However, remember that the license only permits non-commercial usage of the tools and binaries included in the official repo.
This guide will show you how to install Java on Ubuntu 20.04. We’ll discuss how to select the correct version for your projects.
Table Of Content
- Prerequisites for Installing Java on Ubuntu
- Install Java on Ubuntu Servers
- Verify Java is Installed on Your System
- How to Set the Default Java Version
- How to Set JAVA_HOME Environment Variable
- How to Uninstall Java on Ubuntu
- Conclusion
Prerequisites for Installing Java on Ubuntu
Here’s what you need to install Java on Ubuntu:
- A server running Ubuntu 20.04
- A non-root user with sudo privileges
- Terminal or command line access
Install Java on Ubuntu Servers
The good thing is that you can install one or more Java packages on your Ubuntu server. Note that as we write this, Java 11 is the current default and LTS version.
Update Server Package Index
Before you install anything, the best thing to do is update the server package index to have the latest version of all the packages on your system. This ensures you don’t face any conflicts while installing Java on Ubuntu servers.
Use the following command to update the server packages.
# sudo apt update
Install OpenJDK
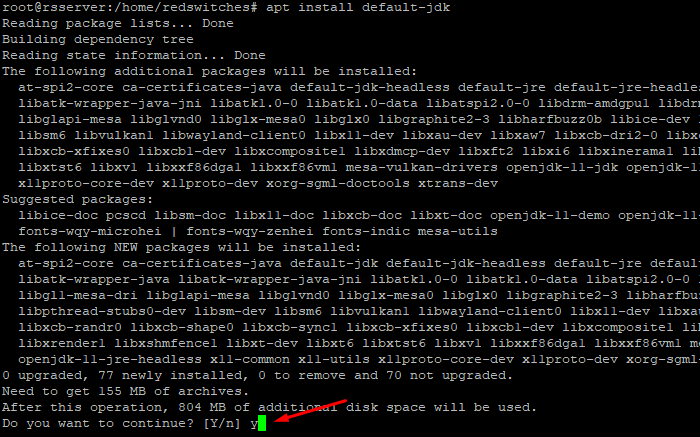
Now, you can execute the following command to install the latest Java Development Kit.
#apt install default-jdk
Install OpenJRE 11
The next step is to download and install Java RE. For this, use the following command:
# apt install default-jre

Install Oracle Java 11
If you want the standard Oracle Java on your Ubuntu machine, you must first get a third-party repository to obtain the official Oracle JDK.
We’ll now discuss installing two alternative package repositories. You may choose which one to download and install on your Ubuntu machine.
Oracle Java may be downloaded through the Webupd8 PPA.
To begin, add the necessary package repository with the following command:
#add-apt-repository ppa:webupd8team/java
When prompted, press Enter.
You may now install Java 11, the most recent LTS version by running the following command:
#apt install oracle-java11-installer
When the installation finishes, you can set this Java version as the default with the following command:
#apt install oracle-java11-set-default
Download Oracle Java from Linux Uprising PPA
If you don’t have it on your Ubuntu system, install the software-properties-common package to ease software installation from PPA. Use the following command to install the package:
#apt install software-properties-common
Next, add the repository with the following command:
# add-apt-repository ppa:linuxuprising/java
Finally, get and install Oracle Java 11 with the following command:
#apt install oracle-java11-installer
Verify Java is Installed on Your System
Before you start coding in Java or deploying your app, you need to verify whether the right packages and appropriate versions are installed on your Ubuntu server.
To find out what Java version is installed on your server, execute the following command:
# java –version
The specifics of a successful Java installation on Ubuntu are shown in the following screenshot:

How to Set the Default Java Version
The good part is that you can install multiple Java versions on your Ubuntu machine.
The challenge here is to specify which version should be used as the default.
Start by displaying all the Java versions installed on your Ubuntu machine:
# update-alternatives --config java
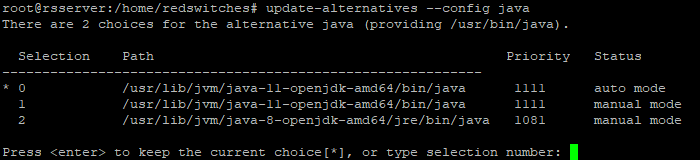
As you can see, the test system has two Java versions – number 1 (Java 11) and 2 (Java 8). At position 0, you can see the current default version.
If you wish, you can change the default version by typing its appropriate number and pressing Enter.
How to Set JAVA_HOME Environment Variable
The JAVA_HOME environment variable determines the location of your Java installation. The variable allows other apps to access Java’s installation path quickly.
To configure the JAVA_HOME variable, you must first determine where Java is installed on your Ubuntu machine. For this, use the following command:
# update-alternatives --config java
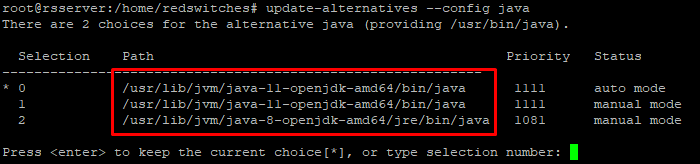
The Path section displays the locations, which in this case, are:
/usr/lib/jvm/java-11-openjdk-amd64/bin/java(where OpenJDK 11 may be located)/usr/lib/jvm/java-8-openjdk-amd64/jre/bin/java(where OpenJDK 8 may be located)
Select your preferred Java version and copy the path.
Next, open the file /etc/environment using any text editor. We prefer to use Nano for editing files, but you can use any text editor you prefer.
Scroll to the end of the file, and add the following line to define the path of JAVA_HOME as follows:
JAVA_HOME=”/your/installation/path/”
To demonstrate this, we copied the Java 11 installation path and added it as the entry into the file.

Save the file and quit the editor.
How to Uninstall Java on Ubuntu
If you need to uninstall Java packages, use the apt remove command. We’ll go into the details of removing the two versions of JDK.
To uninstall OpenJDK 11, use the following command:
# apt remove default-jdk
To remove OpenJDK 8, use the following command:
# apt remove openjdk-8-jdk
Remember that during the process, you need to press y to confirm the process’s continuation. At the end of the process, the packages are removed from your Ubuntu system.
Also Read: How to Check Java Version Installed on Linux
Conclusion
This post demonstrated how to install Java on Ubuntu 20. We also mentioned how you can change the default version and configure the home environment variable. After going through this guide, you can use Java to develop applications on the Ubuntu platform.
RedSwitches offer the best bare metal dedicated servers for your Java projects. We simplify the process of setting up Ubuntu powered dedicated servers that you can fully customize to deploy your Java projects.
FAQs
Q. Can I install multiple Java versions in Ubuntu?
All Linux distributions support Java. Installing various Java versions and switching between them is a simple operation.
Q. How to upgrade the Java version in Ubuntu?
To upgrade Java on Ubuntu, use the “$ sudo apt install openjdk-19-jdk” command, or download and install the newest version of Java from the Oracle website. After the upgrade, remember to use the “java -version” to check the Java version on your machine.
Q. Which Java version is the best for Ubuntu?
Ubuntu provides the default-jre package, which is constantly updated to include the most recent OpenJDK JRE under Long-Term Support (LTS). Because of the Java Virtual Machine’s great track record of backward compatibility, the default-jre is an excellent choice in most scenarios.
Q. What is the default JDK in Ubuntu?
Open JDK 11, an open-source variation of the JRE and JDK, is included by default in Ubuntu 20.04.
