
XAMPP is a widely used software package for setting up a local web server environment on Ubuntu systems.
Developed by Apache Friends, XAMPP simplifies the installation of Apache, MySQL, PHP, and other essential components required for web development and testing. So, instead of installing all these components individually, you can set up a fully functional web development and hosting environment in a couple of minutes.
In this tutorial, we will discuss the five steps you need to install XAMPP in Ubuntu. However, before that we will have a quick look at XAMPP.
Table Of Contents
What is XAMPP?
XAMPP is an open-source web server stack package. It offers a user-friendly solution for setting up a local server environment that’s primarily intended for web development and testing purposes.
Developers commonly leverage XAMPP to create and test dynamic web applications locally before deploying them to a live server. It caters to users across various operating systems, including Windows, Linux, and macOS.
How to Install XAMPP
Let’s go through the steps of installing XAMPP on your Ubuntu system.
The Prerequisites
Before proceeding with the installation, ensure you have the following:
- A system with a recent stable Ubuntu OS version.
- A user account with sudo or root privileges.
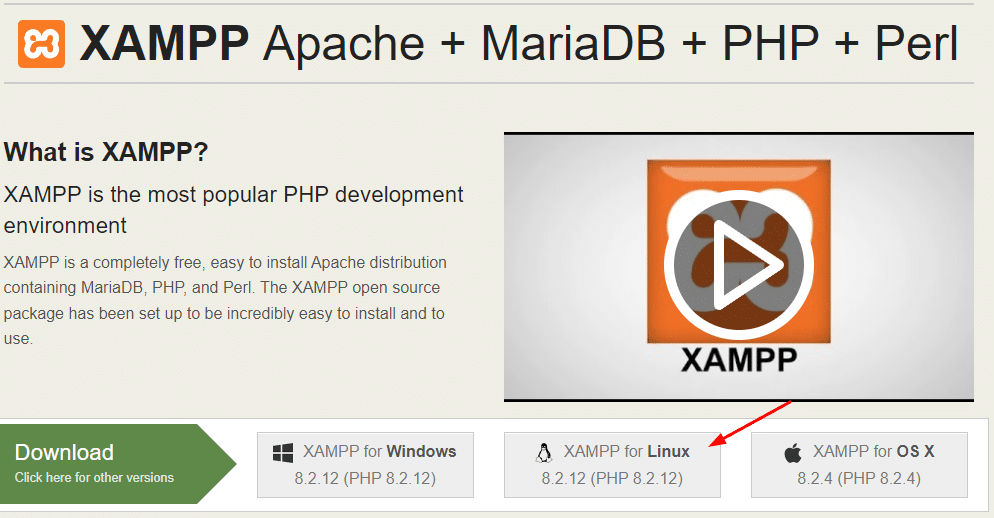
Step #1: Download the Installation Package
Open your web browser and access the official Apache Friends website.
Locate and select the XAMPP for Linux link to download the binary installation package.
Step #2: Set Installation Package Path
Because of security reasons, the downloaded installation file is not executable. You should adjust the file permissions before you can initiate the installation process.
Start by launching the terminal and going to the directory where your installation package is located. Typically, this is the Downloads directory. Use the cd command in the following syntax:
# cd /home/[username]/Downloads
Step #3: Grant Execution Permissions to the File
Now, run the following command to make the file executable:
# sudo chmod 755 [package_name]
Substitute [package_name] with the downloaded package name. You can employ the ls command to view the directory contents and copy the file’s full name.

Step #4: Confirm Permission Changes
We recommend listing the directory contents to confirm the modifications of the file permissions. Use the following command:
# ls -l [package_name]
Replace [package_name] with the complete name of the downloaded package. This command displays detailed information about the file, including its permissions.
The output should display rwxr-xr-x 1 followed by the name of the user who can now execute the file.

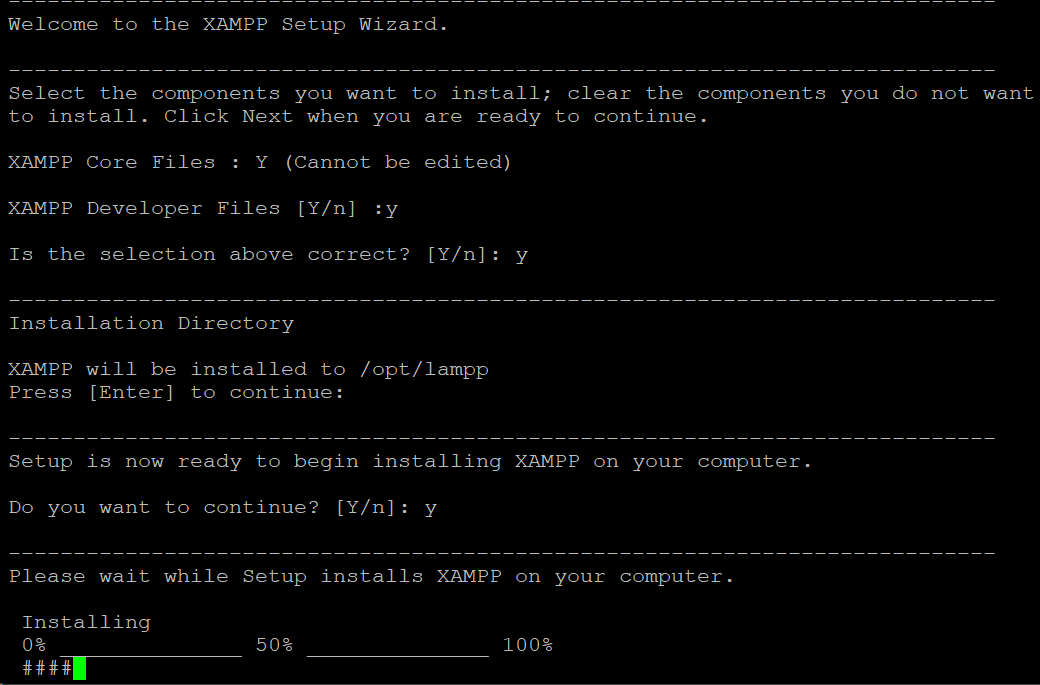
Step #5: Install XAMPP
Once you’ve configured the necessary permissions, install and configure XAMPP. Here are the major steps of this process:
Execute the installer
To execute the installer, run:
# sudo ./[package_name]
For instance:
# sudo ./xampp-linux-x64-8.2.12-0-installer.run
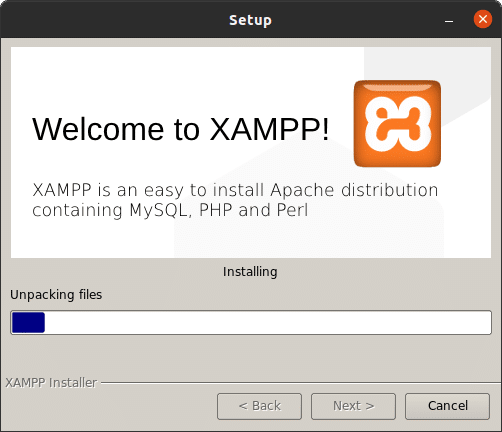
This command launches the installer, and you will see the welcome screen in a new window.
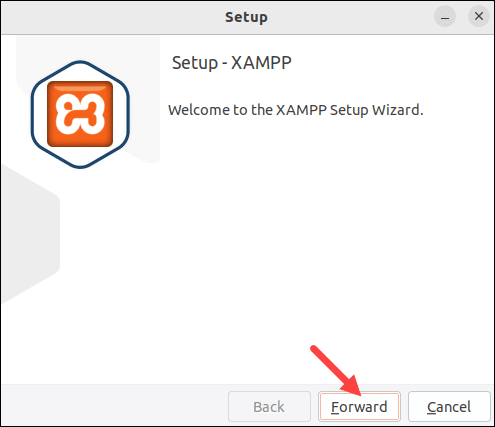
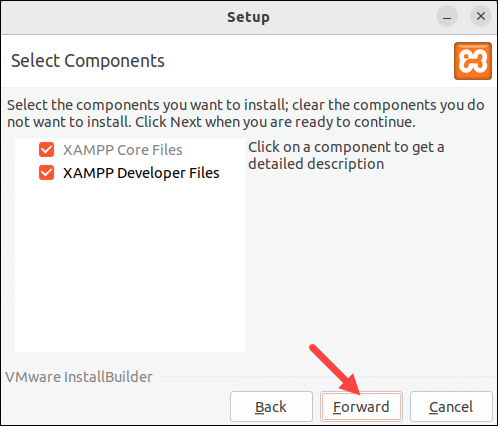
Select Installation Components
Click the Forward button.
Choose the components you wish to install from the Select Components dialog box. We recommend sticking with the default selection. Once done, click Forward to proceed with the installation process.
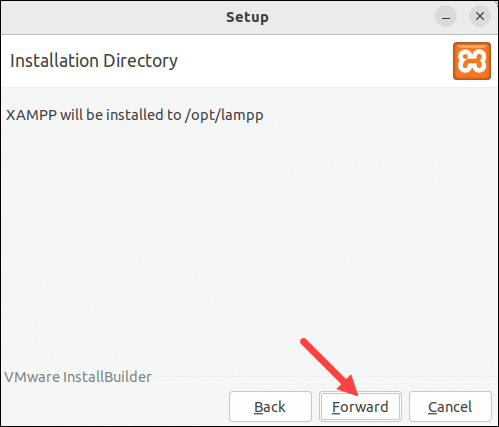
Confirm Installation Location
Following the installation, you will see another wizard that will ask you to confirm the installation location for the software. Click the Forward button to continue.
Initiate Installation
The wizard is now prepared to install XAMPP on your system. Click Forward to initiate the installation process.
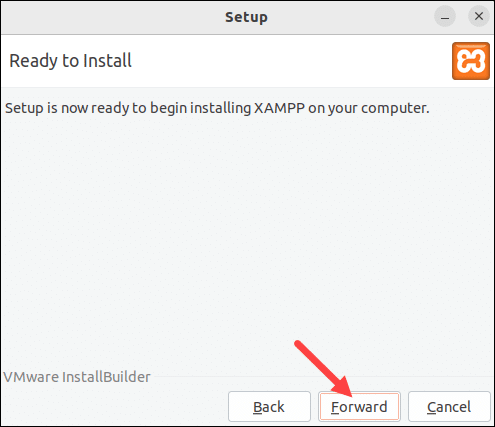
Once the installation process begins, you’ll see a progress dialog box.
Finalize the Installation
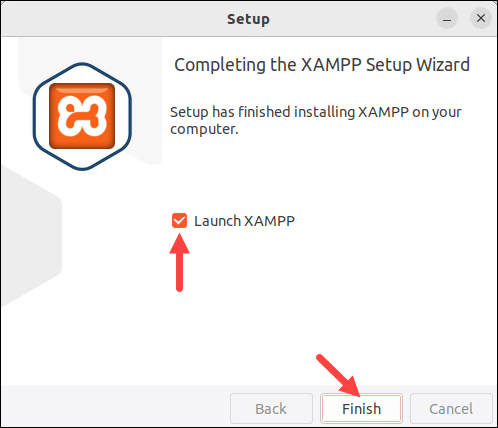
Once the setup is complete, finalize the process by clicking Finish.
If you wish to launch XAMPP immediately, ensure the Launch XAMPP box is checked.
Launch XAMPP
If you choose to launch XAMPP during the setup wizard, the XAMPP control panel will open automatically, allowing you to start managing your servers.
Alternatively, run the following command to open XAMPP:
# sudo /opt/lampp/./manager-linux-x64.run
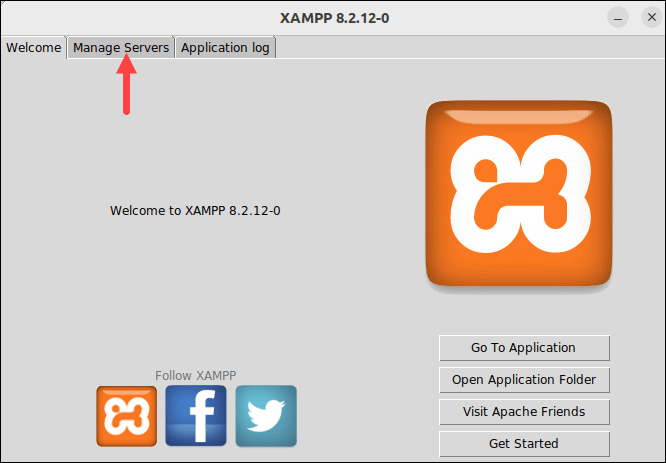
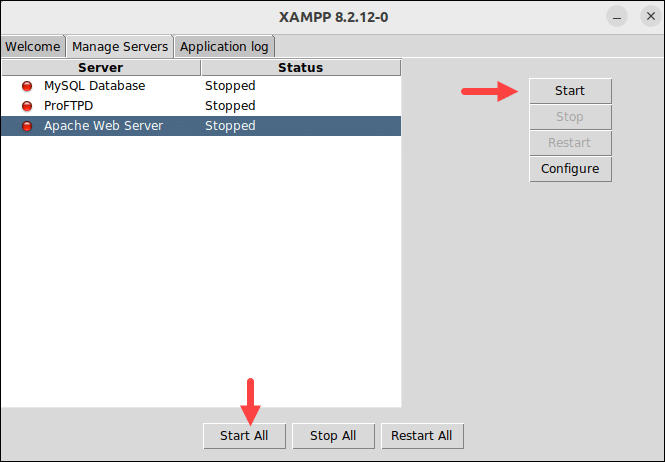
Navigate to the Manage Servers tab to view all available services along with their current status.
You can modify the status of each service by selecting Start or Stop. In addition, you can start all services simultaneously by clicking the Start All button.
Verify XAMPP Installation
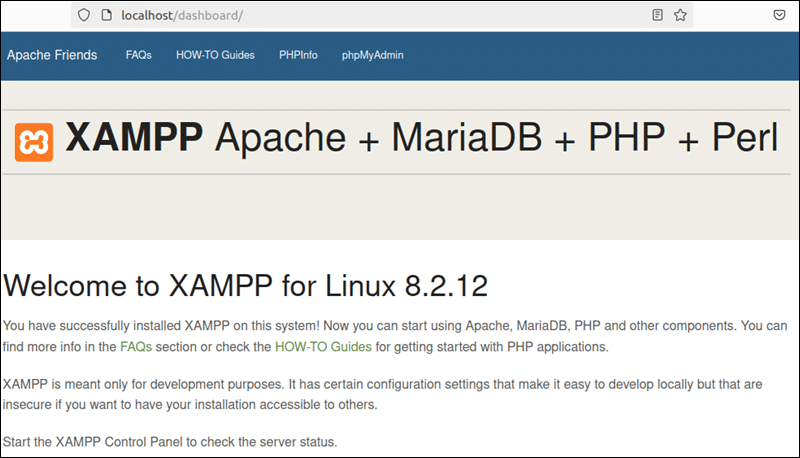
To confirm that the XAMPP stack has been successfully installed, open a web browser tab and navigate to the following URL:
http://localhost/dashboard
If the XAMPP dashboard page appears, you have successfully installed the stack.
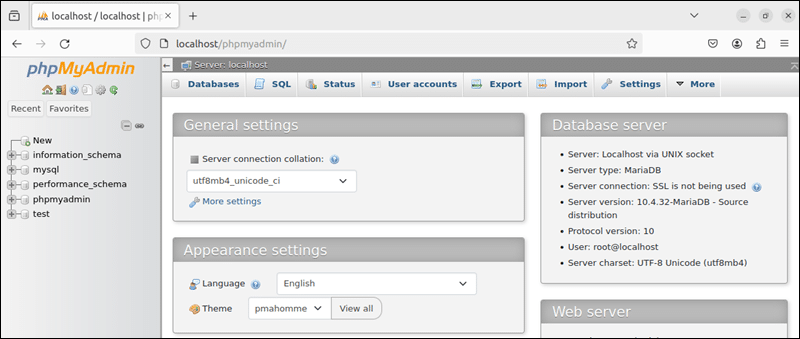
Next, you should check the MariaDB service by accessing the following URL in your web browser:
http://localhost/phpmyadmin
If the database service is functioning, you should see the following phpMyAdmin main screen:
Uninstallation of XAMPP
Uninstalling XAMPP from Ubuntu involves running an uninstallation script provided by the program.
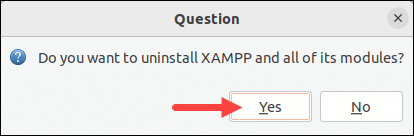
You can launch the uninstallation script by executing the following command in the terminal:
# sudo /opt/lampp/./uninstall
A dialog box appears, prompting you to confirm the uninstalling of XAMPP and all the modules. Click Yes to proceed.
Once the stack is uninstalled, you’ll receive confirmation that XAMPP has been successfully uninstalled from your Ubuntu system.
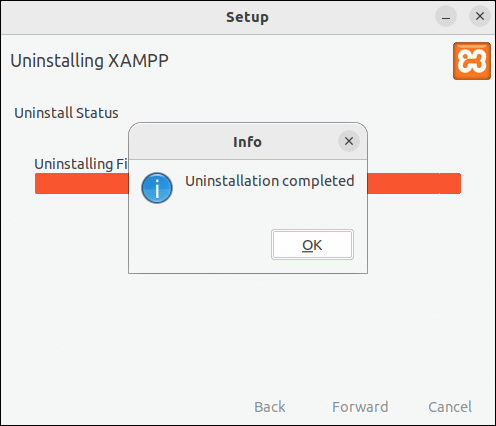
Following the uninstallation, run this command to delete the XAMPP directory and all its contents from the system:
# sudo rm -r /opt/lampp
Conclusion
We presented the comprehensive process of how to install XAMPP in Ubuntu for a seamless and efficient setup of a local web server environment. Through this guide, you can easily configure Apache, MySQL, PHP, and other essential components required for web development and testing.
However, if you encounter any challenges or require assistance with server management, don’t hesitate to reach out to RedSwitches. Our team is dedicated to providing support at every stage of the process, ensuring that you can leverage the full potential of your server setup.
At RedSwitches, we take pleasure in assisting our valued customers with their unique server needs. We are your global dedicated hosting partner, offering bare metal hosting solutions tailored to enhance your web development experience.
We offer the best-dedicated server pricing and deliver instant dedicated servers, usually on the same day the order gets approved. Whether you need a dedicated server, a traffic-friendly 10Gbps dedicated server, or a powerful bare metal server, we are your trusted hosting partner.
Whether you need guidance, troubleshooting assistance, or optimization tips, we’re here to help you achieve your goals effectively.
FAQs
Q. What is an installer file?
An installer file, in the context of XAMPP installation, is a software package that contains all the necessary components and scripts to automate the setup process of XAMPP on your system.
Q. What is the installation directory?
The installation directory refers to the location on your system where XAMPP is installed. By default, XAMPP is typically installed in the /opt/lampp directory on Ubuntu.
Q. How does the uninstallation process work?
The uninstallation process involves running a script provided by XAMPP to remove all installed components and directories associated with XAMPP from your system.
Q. What is meant by “current user” during installation?
The “current user” refers to the user account that is currently logged in and executing commands during the installation process.
Q. How do you make a file executable?
To make a file executable, you need to adjust its permissions using the chmod command in the terminal.
Q. What is the installation command for XAMPP?
The installation command for XAMPP typically involves running an installer file provided by Apache Friends. On Ubuntu, you may need to use sudo to run the installer with root privileges.
Q. How does XAMPP handle PHP files in a development environment?
XAMPP provides a server environment where PHP files can be executed and tested locally before deploying them to a live server.
Q. What role does the database server play in XAMPP?
The database server component of XAMPP, typically MySQL or MariaDB, allows developers to create and manage databases for their web applications.
Q. Does XAMPP support different versions of PHP?
Yes, XAMPP supports multiple versions of PHP, allowing developers to choose the PHP version that best suits their needs.
Q. Why is a sudo password required during installation?
The sudo password is required to grant administrative privileges for executing commands that affect system files and configurations during the XAMPP installation process.
Q. What should I do if I encounter error messages during installation?
If you encounter error messages during the installation process, refer to the XAMPP documentation or seek assistance from support forums to troubleshoot and resolve the issue.
