When a software is ready to ship, the developers usually focus on building the final deliverable product. This critical step requires attention to detail and ensuring the process takes care of all underlying dependencies.
Apache Maven is a popular build automation tool developers use to package the codebase into the final package. The tool is primarily used for Java projects. One of its greatest strengths is its ability to work with all popular OS platforms.
This comprehensive guide covers how to install Maven in Windows. We’ll guide you through the prerequisites, downloading the Maven binaries and setting up environment variables to ensure Maven commands run seamlessly on your Windows command prompt.
Table Of Contents
By the end of this guide, you’ll have a working Maven setup on your Windows machine that you can use for more efficient and better-structured Java project management.
Let’s start with a short introduction to Apache Maven.
What is Apache Maven?
Apache Maven is a feature-rich build automation and project management tool used in software development. Usually applied near the end of the project, it simplifies and streamlines the building, packaging, and deployment of the project codebase.
It was initially part of the Jakarta project (an open-source umbrella project for Java projects). When the project retired in 2011, the Apache Foundation adopted Maven as a standalone project.
Maven employs a consistent Project Object Model that simplifies the management of dependencies, plugins, and build tasks. It has become a standard in the Java ecosystem, offering developers a robust and efficient way to handle complex project workflows.
How to Install Maven on Windows
After that brief introduction, let’s dive into the details of installing Maven on Windows. We’ll start with the prerequisites of the process.
The Prerequisites
Before installing Maven, make sure you have:
- A machine with Windows OS.
- An active internet connection.
- An account with admin rights.
- Access the command line.
- An existing Java installation with a properly configured JAVA_HOME environment variable.
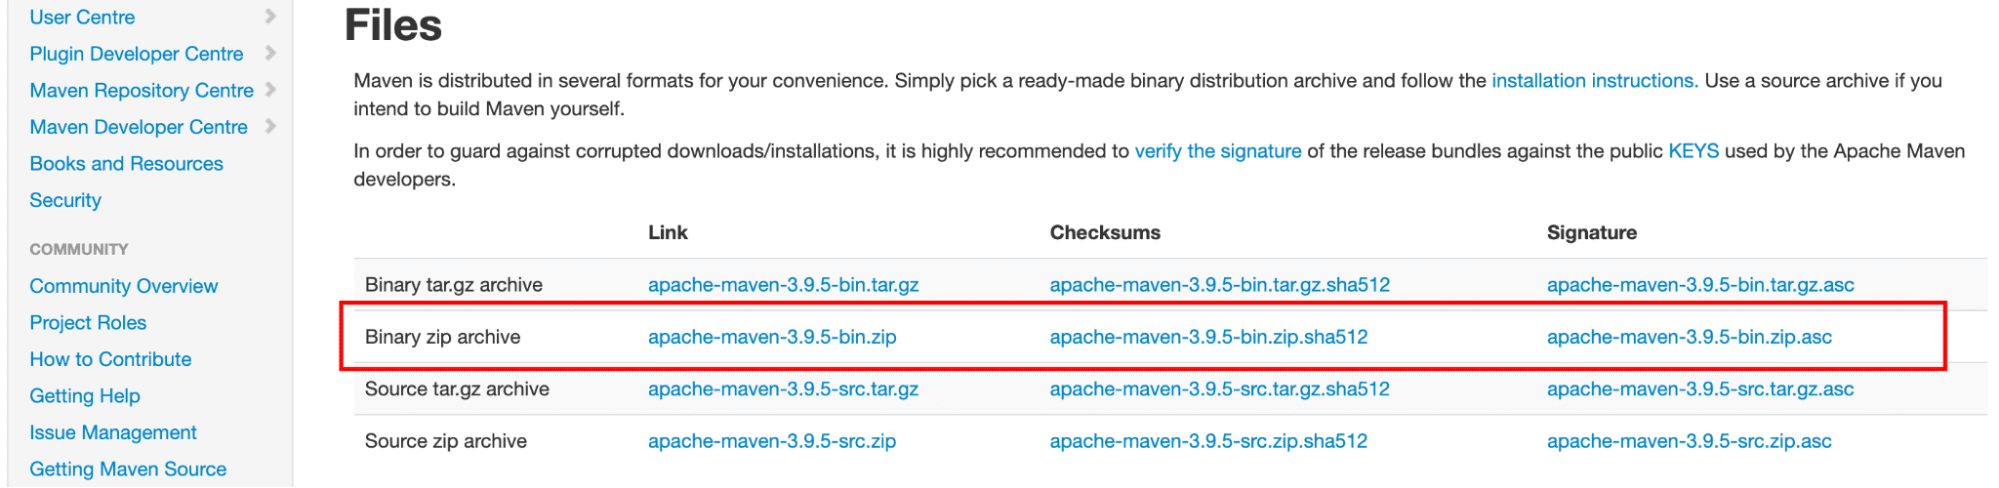
Step #1: Download the Maven ZIP Archive
Navigate to the Maven download site and select the Maven version you wish to set up. The Files area has the latest version’s archives. Select the relevant link to download the binary zip file for Maven’s most recent version.
We’ll use Maven version 3.9.5 for this tutorial.
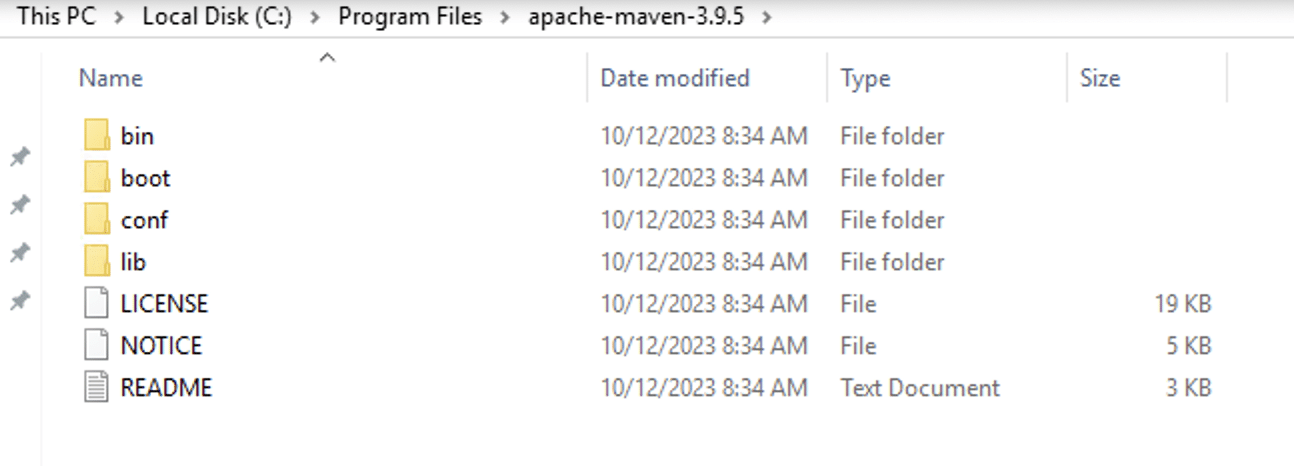
Once the download finishes, extract the downloaded Maven archive to a folder. We’ll extract the archive to C:\Program Files\apache-maven-3.9.5.
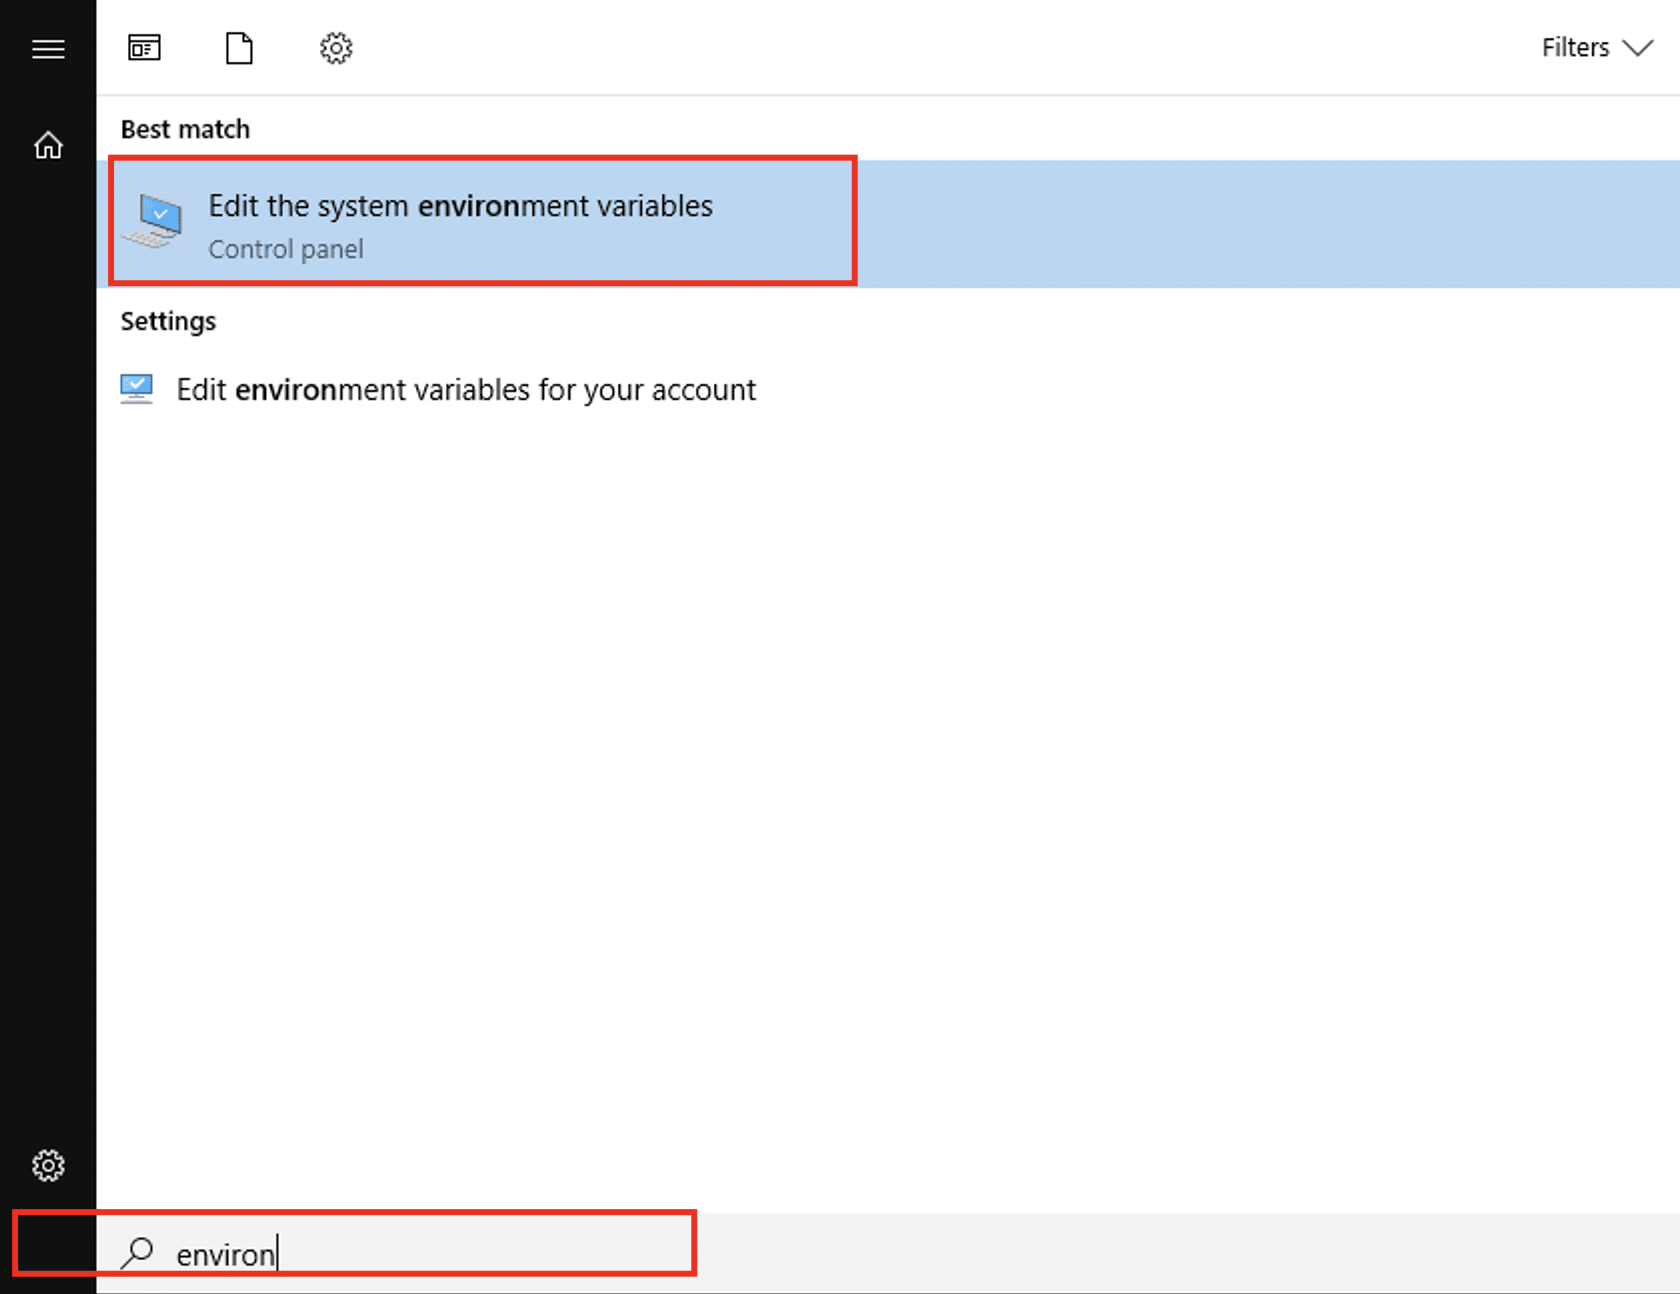
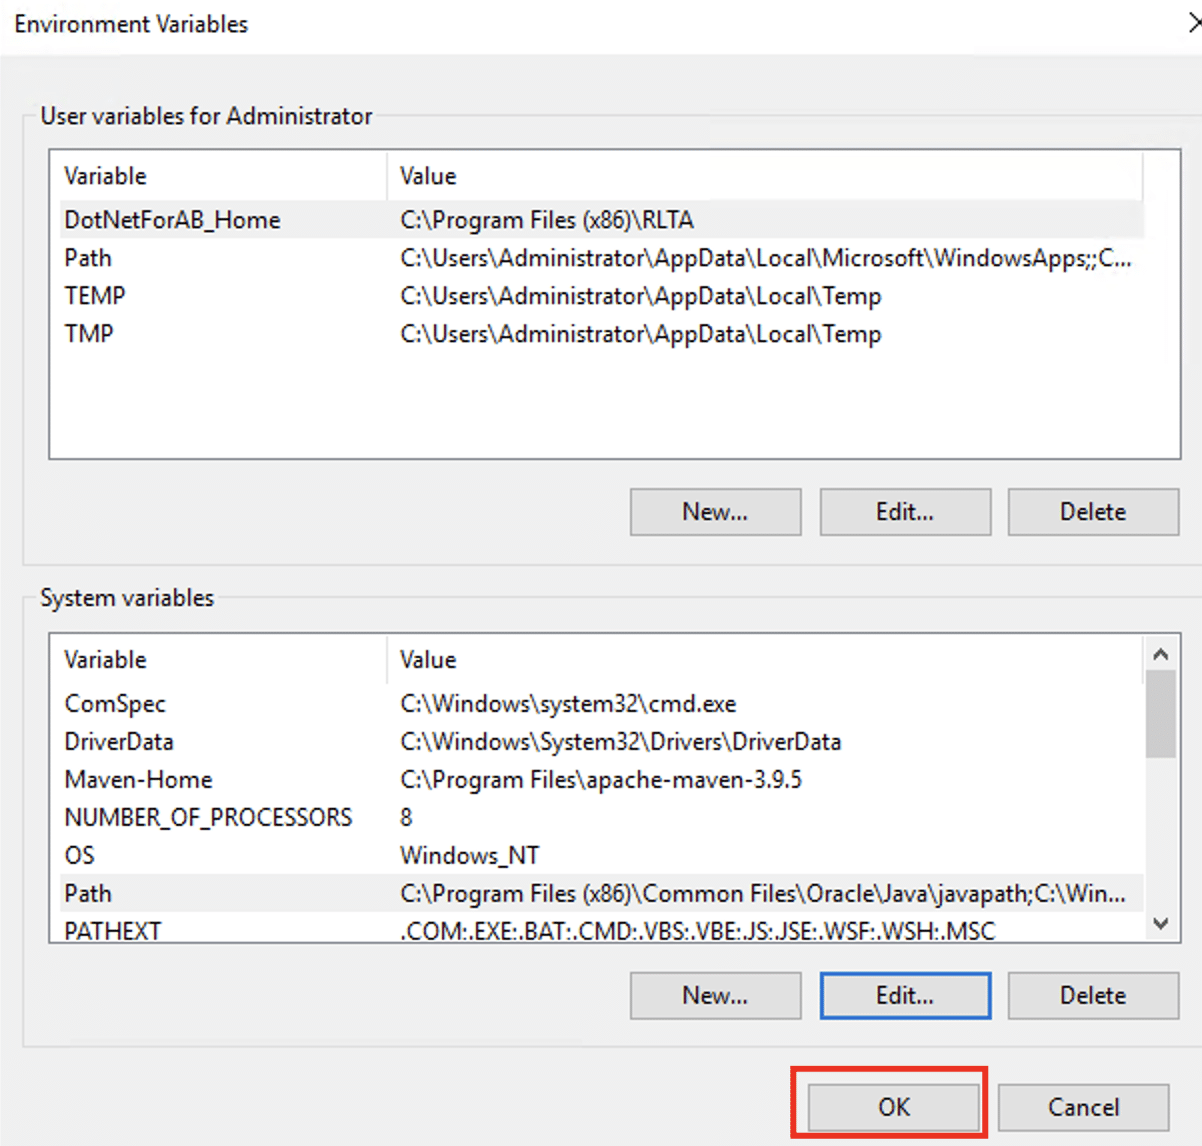
Step #2: Set up the MAVEN_HOME System Variable
The next step is to add the environment variable. For this, navigate to the Search Box to the right of the Start button and type in environment variables.
Select the option to Modify the system environment variables.
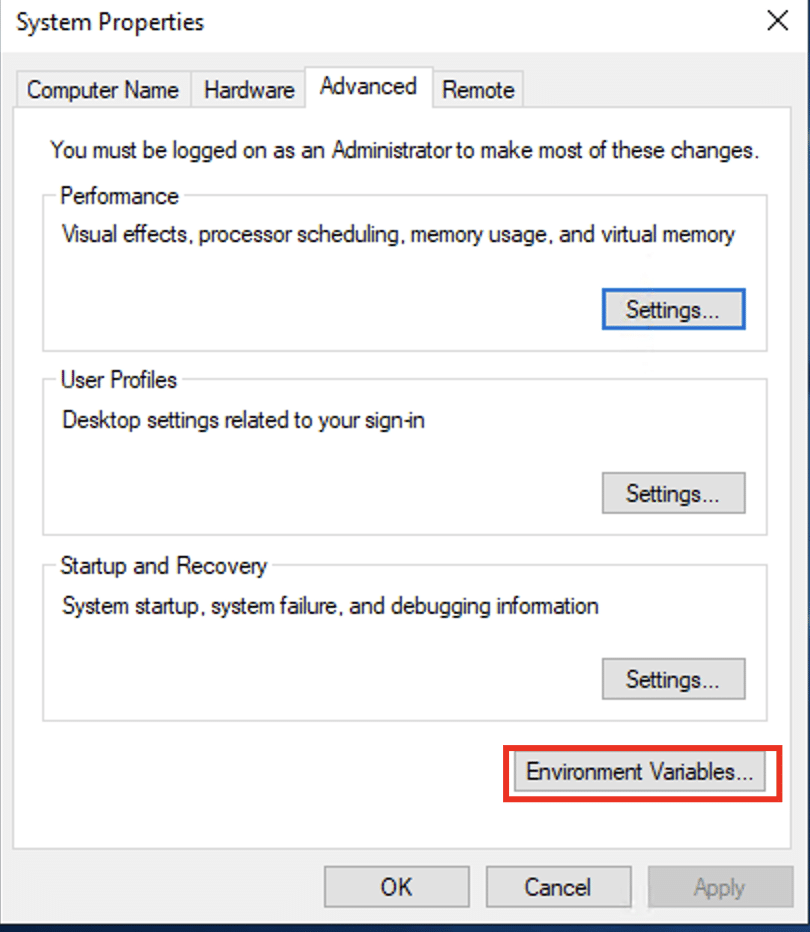
In the System Properties window, select Environment Variables from the Advanced section.
Select New in the System variables section to add a new system environment variable.
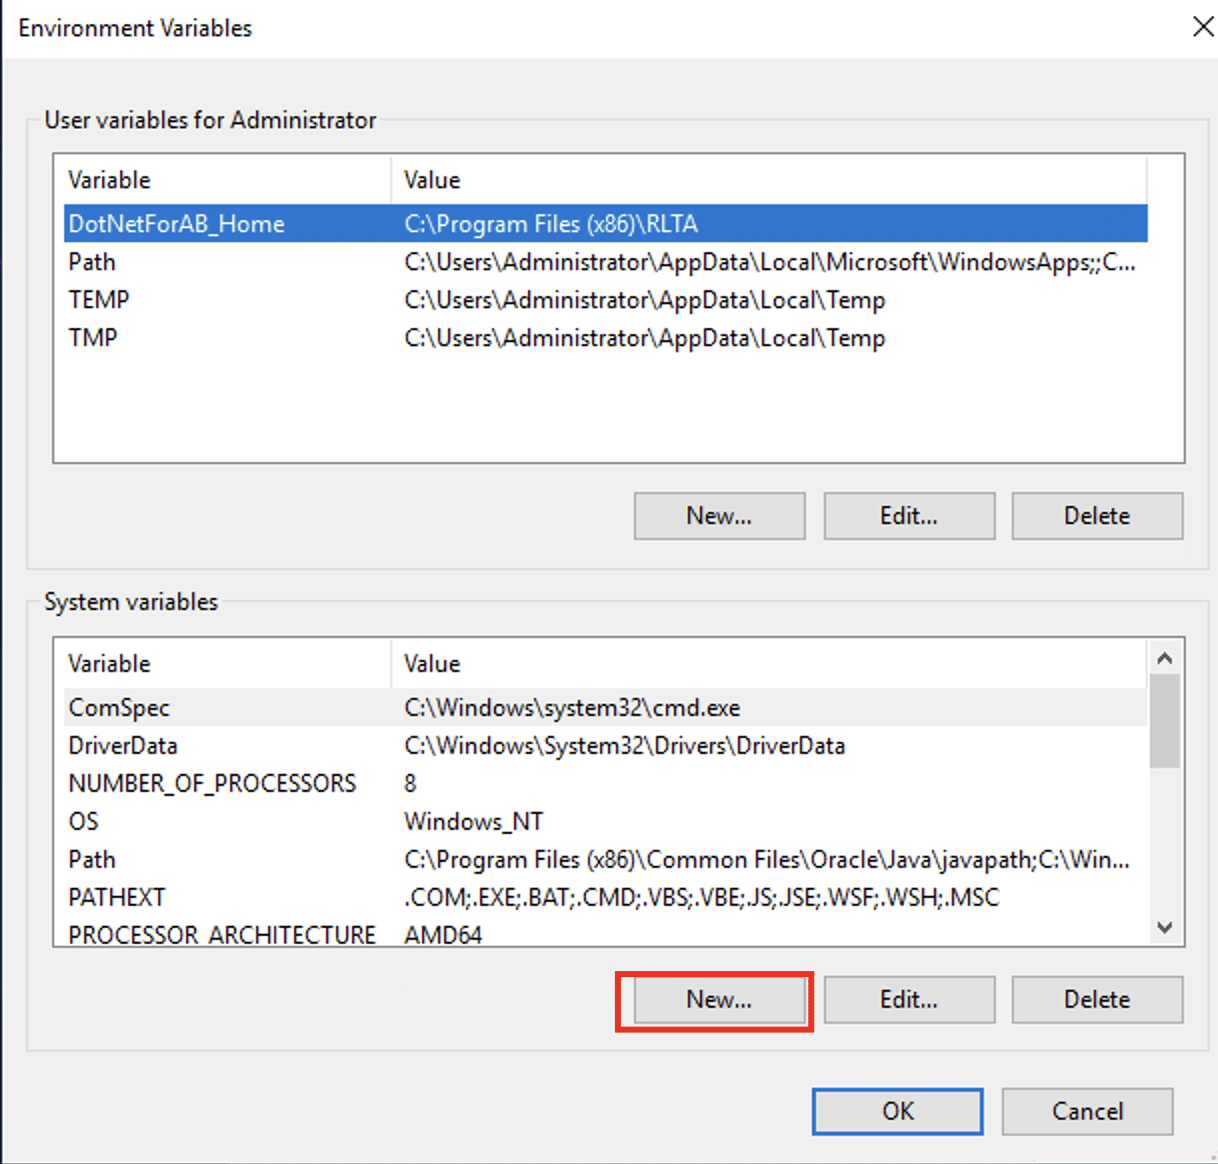
We’ll use MAVEN_HOME for the variable name and use the Maven’s folder path for the variable value. Click OK to save this new system variable.

Step #3: Insert MAVEN_HOME Folder into the PATH Variable.
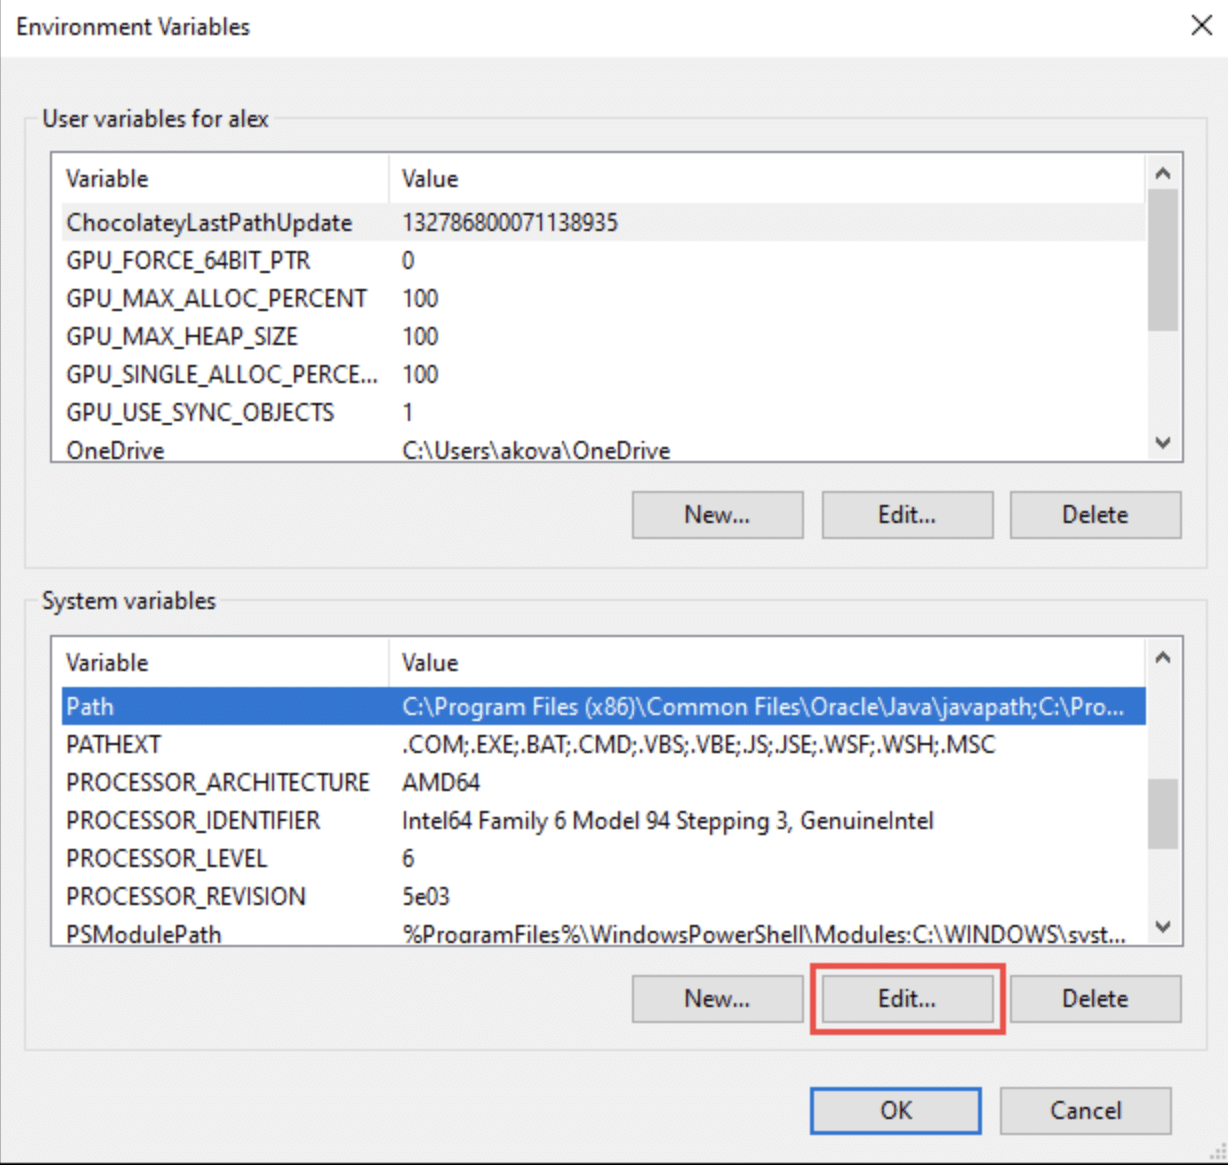
Choose the Path variable in the System variables section of the Environment Variables dialog box. Press the Edit button to modify this variable.
Tap the New button within the Edit environment variable dialog box.
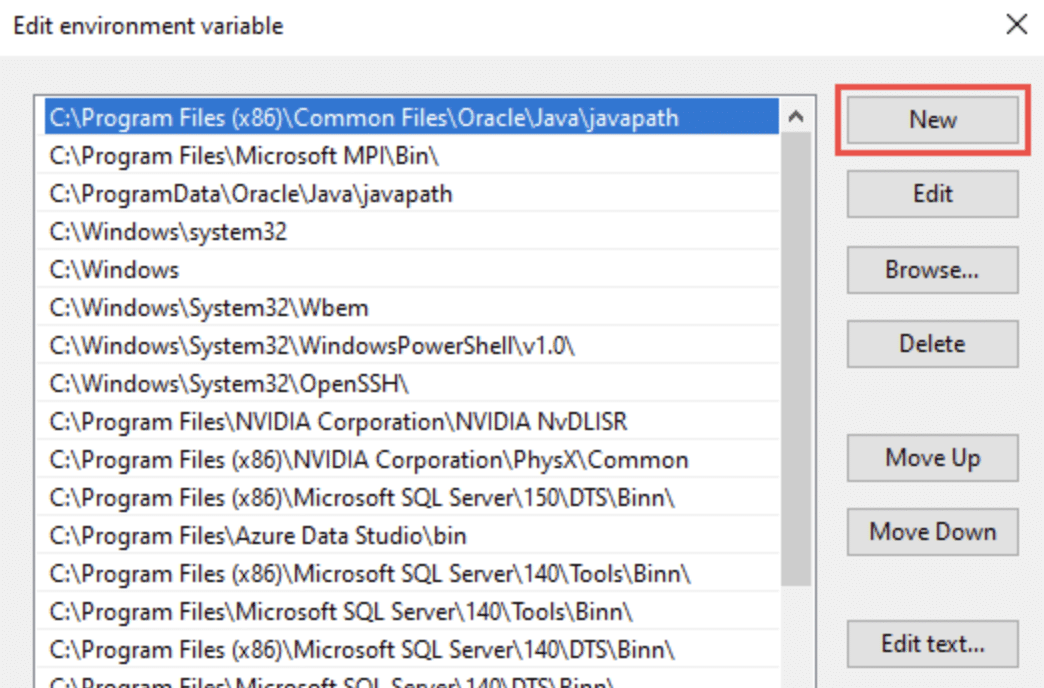
Enter %MAVEN_HOME%\bin into the field. Hit OK to store the changes.
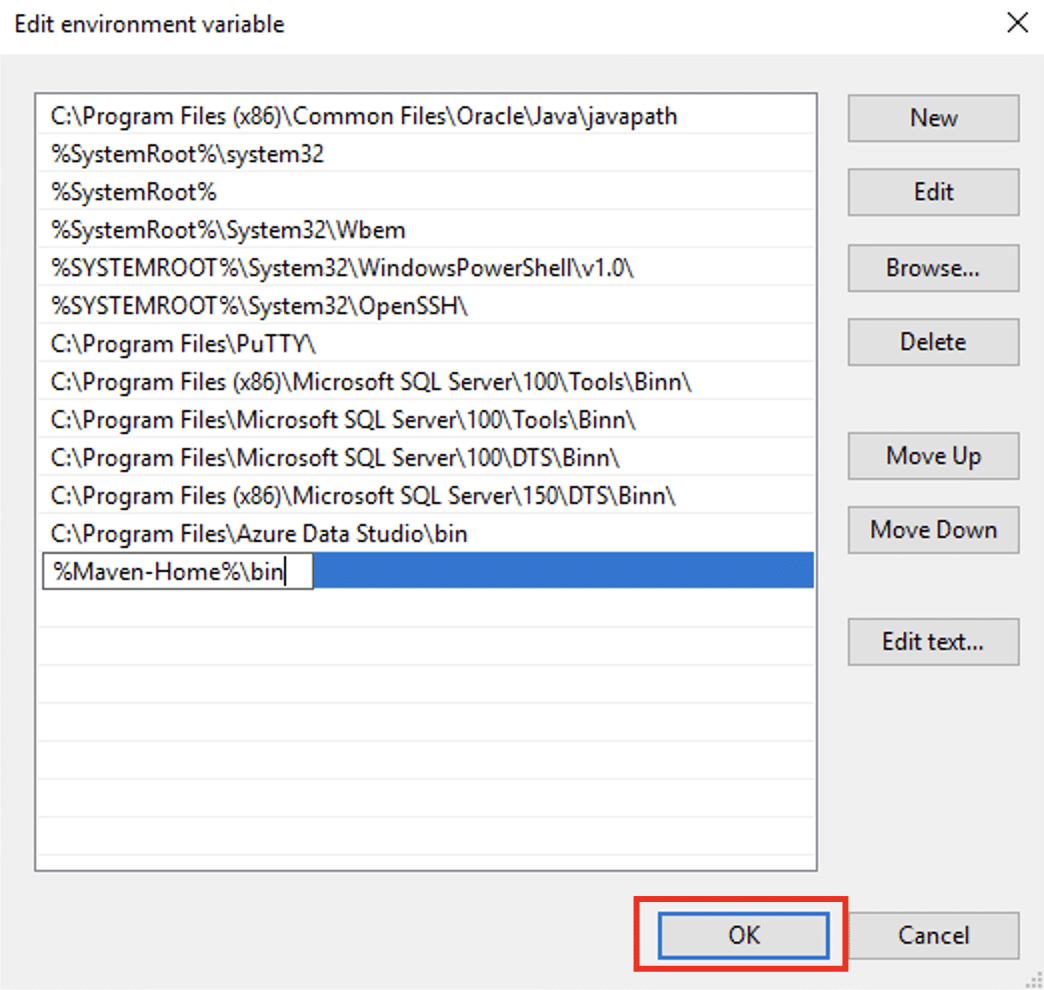
Now, hit OK to update the system variables and exit the dialog box
Step #4: Confirm Maven Setup
Once the installation process finishes, we’ll confirm that the Maven is correctly installed. For this, launch the Command Prompt by typing cmd in the Run window.
Enter the following command to authenticate the installation by getting the current Maven version:
C:> mvn -version
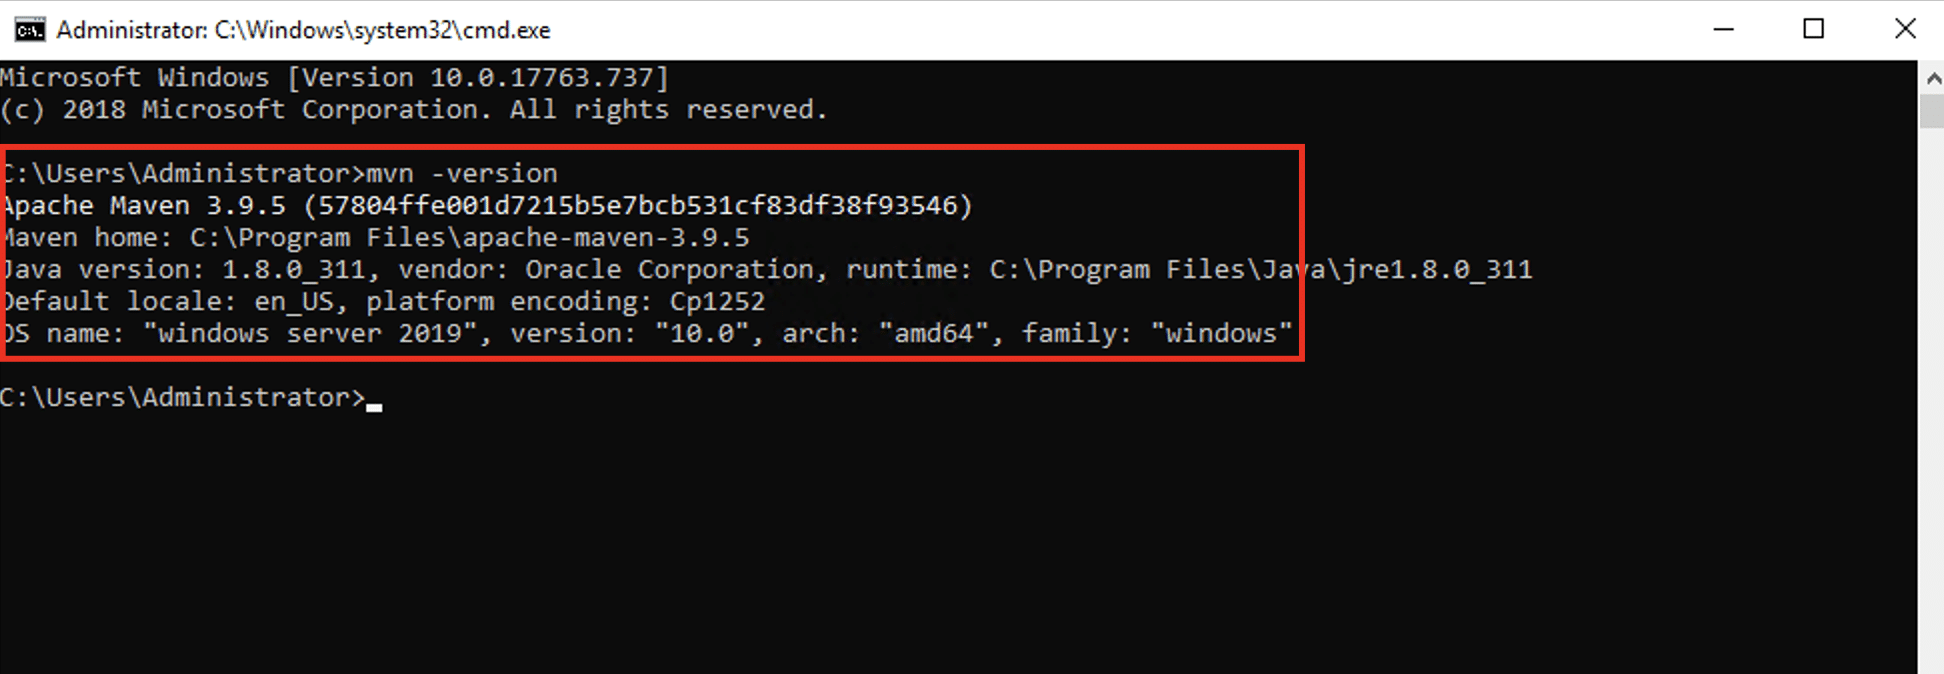
If you see the Maven version information, you have successfully installed Apache Maven on Windows.
Conclusion
Installing Apache Maven on a Windows Server is a straightforward process that involves downloading the correct Maven archive and setting the right environmental variables. This tutorial will help beginners who are not well-versed in the intricacies of system setups.
The RedSwitches support teams regularly handle such installation processes for our clients. If you’re short on time or want a streamlined, hassle-free Maven installation, get in touch with our support teams to get the job done on priority.
We offer the best dedicated server pricing and deliver instant dedicated servers, usually on the same day the order gets approved. Whether you need a dedicated server, a traffic-friendly 10Gbps dedicated server, or a powerful bare metal server, we are your trusted hosting partner.
FAQs
Q. What is Maven, and why do I need it?
Maven is a build automation and project management tool used primarily for Java-based projects. It helps manage project dependencies, build processes, and project documentation. Developers use Maven to streamline and automate the project build lifecycle, making development and deployment more efficient.
Q. How do I download Maven for Windows?
Visit the official Apache Maven website (https://maven.apache.org/download.cgi) and choose the appropriate version for Windows. Download the ZIP file and extract it to the desired location on your computer.
Q. What are the system requirements for installing Maven on Windows?
Maven is a Java-based tool, so you must have Java 8 or later (JDK) installed and properly configured in your system’s PATH variable.
Q. Can I install Maven using a package manager on Windows?
You can install Maven on Windows with package managers like Chocolatey. Use the appropriate Chocolatey command to install Maven (choco install maven), and Chocolatey will handle the installation and configuration.
Q. How do I update Maven to the latest version on Windows?
To update Maven to the latest version, download the latest Maven ZIP file from the official website, extract it to the target folder, and update the M2_HOME and PATH environment variables to point to the new Maven installation.
Q. How can I verify if Maven is installed and working correctly on my Windows machine?
Open the Command prompt and run mvn -version. This command will display the installed Maven version and other relevant information, confirming that Maven is installed and configured correctly.
Q. Can I have multiple versions of Maven installed on my Windows machine?
Yes, you can have multiple versions of Maven installed on your Windows machine. To manage multiple versions, ensure you update the M2_HOME and PATH environment variables accordingly for each version.
Q. How to run Maven in Windows?
To run Maven in Windows, open the Command Prompt and type mvn followed by the desired Maven command. Maven will then execute the specified command.
Q. Can I use Maven on macOS?
Yes, you can use Maven on macOS. The installation process is similar to Windows. Simply download the binary zip archive, extract it to a directory of your choice, and configure the necessary environment variables.
Q. Where is Maven installed on Windows?
By default, Maven is installed in the folder you specified during the installation process. The bin folder of the Maven installation contains the executable files and should be added to your system’s PATH variable.
Q. How do I uninstall Maven from my Windows machine?
To uninstall Maven, simply remove the Maven installation folder and remove the M2_HOME and Maven bin folder from the PATH environment variable.
