Do you know that the term root has a very specific meaning in a Linux environment?
All the files and directories in a Linux environment are arranged in a tree structure. And like the roots of a tree, the root directory (/) acts as the starting point of the Linux file structure.
Physically, the child files and directories can be spread across multiple storage devices and file systems. The Linux filesystem presents a unified view of this system and allows you to work with files and directories without worrying about the challenges posed by physical media devices.
Now, you must be wondering how to add external devices (such as a USB) and file systems to a Linux environment.
This article will introduce the Linux mount command and how you can use it to add devices and filesystems to your Linux machine. We’ll also see how you can use unmount, a related command that disconnects a file system from the system.
Let’s start with a short introduction to filesystems in a Linux environment.
Table Of Contents
- List Supported Filesystems in a Linux Environment
- The Fundamentals of mount Command
- 6 Use Cases of the Linux Mount Command
- Conclusion
- FAQs
List Supported Filesystems in a Linux Environment
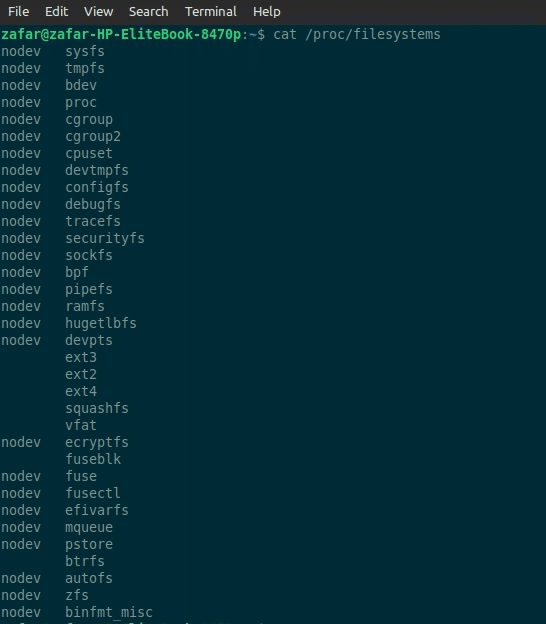
You can easily view all supported filesystems by printing out the contents of the filesystems file. This file contains the names and related information about the supported filesystems. Run the following command to print the contents of the file quickly:
# cat /etc/filesystems
You can view the filesystem(s) on the system in a more friendly format with the findmnt command that lists all mounted filesystems in the tree structure:
# findmnt
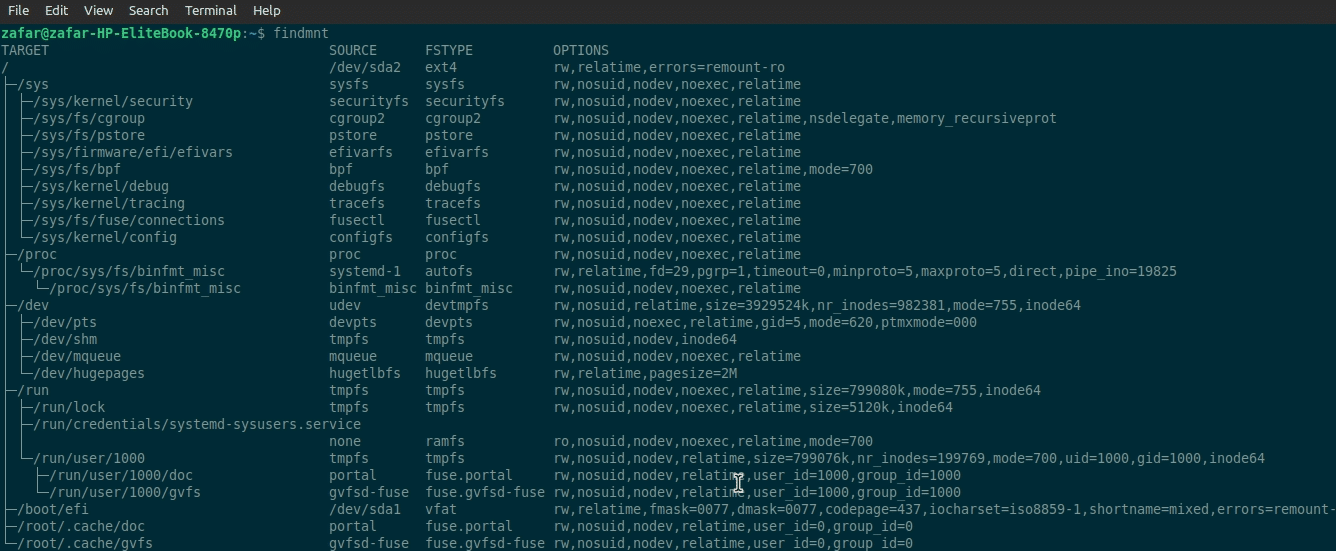
You can pass a specific filesystem’s name as a parameter to the findmnt command or use grep to extract information about the source and options.

Now that you know how to view your system’s available filesystem options, let’s discuss the basics of the mount command.
The Fundamentals of mount Command
Depending on your requirements, mounting a filesystem can be a temporary or permanent operation. In most cases, the system administrator uses the mount command. However, regular users can also use the command by combining it with the sudo command.
The syntax of the command is:
# mount [file-system-type] [Device] [Directory]
This command is used to tell the kernel to attach the filesystem on the specified device at the specified directory. As a result, the filesystem (essentially the device containing the filesystem) becomes available in the specified local directory. If you don’t mention a directory, the command refers to the /etc/fstab file for a filesystem option.
The mount Command Options
The mount command is very flexible, and you can use the following options and flags to extend the capabilities of the command and modify the outcomes of the standard mount operations.
| -v | Enables the verbose mode with details of each operation. |
| -a | Mounts the filesystems mentioned in the /etc/fstab file. |
| -F | Initiates a new instance of the mount operation for each device. It must be used with the -a option. |
| -l | Adds a label to each device and lists down all mounted filesystems. |
| -L [label] | Mounts the partition with the specified [label]. |
| -M | Relocates a subtree to another location. |
| -O [options] | Limits the filesystem set that -a applies to. The [options] is a comma-separated list in the options field of the /etc/fstab file. |
| -r | Mounts the filesystem in the read-only mode. |
| -R | Remounts a subtree in a different location. The contents are available at multiple locations. |
| -t | Indicates the filesystem type. |
| -T | Specify an alternative /etc/fstab file. |
The mount Command Exit Codes
Since the mount command interfaces directly with the kernel, you may find minor differences in the command’s response and output on different kernel versions. That’s why you need to pay special attention to the exit status of the command to understand the success or failure of the mount operation.
Like all Bash commands, the successful operation of the mount command returns a status code 0. However, here are the exit codes you should consider when working with the mount command:
| 1 | Indicates insufficient permissions or problems with the mount command syntax. |
| 2 | Indicates that a system error has occurred. |
| 4 | Indicates an issue with the mount operations. |
| 8 | Indicates that the user interrupted an ongoing mount operation. |
| 16 | Indicates a problem about writing to or locking the /etc/mtab file. |
| 32 | Indicates a mount failure. |
| 64 | Indicates that at least one mount operation succeeded out of multiple operations. |
Mounting Filesystems as Non-administrator Users
Traditionally, only users with administrative or sudo privileges are allowed to use the mount command. This is an expected behavior because of the security considerations of adding external filesystems to the machine.
However, in many practical scenarios, system administrators need to allow non-root users to mount filesystems.
System administrators can edit the /etc/fstab file to allow these users to mount specific filesystems to predetermined directories.
Start by opening the /etc/fstab file in your preferred editor. Next, find the <options> field and add the following command syntax:
<file system> <mount point> <filesystem type> <options>
For instance, use the following statement to allow all users to mount a USB device as a read-only filesystem at the /media/usb1 directory:
/media/usb1 /ext4 ro, user, auto
Change the Mount Directory
Since the mount directory is just another directory on the system, you can “move” a mounted filesystem to a new directory without affecting its operation or the physical location of files.
The command uses the —move option and has the following syntax:
# mount –move [current mount directory] [new mount directory]
Unmount a Filesystem
There are situations when you need to “unmount” a filesystem.
This process involves detaching the filesystem from the system filesystem with the unmount command. You can pass the device name or the mount directory to the command.
The syntax of the command is as follows:
# unmount [Device or Mount Directory]
Note that the command will fail if the filesystem (or the device) is in use. As such, you need to make sure that the filesystem is not in use before you run the command.
We recommend using the fuser command to see the IDs of the processes that are currently using the filesystem. The syntax of this command is as follows:
# fuser -m [mount directory]
You can then use the kill command or a similar option to halt these processes and then run the unmount command.
Unmount When the Filesystem Becomes Idle
A good approach to unmounting a filesystem is to wait for it to become idle and then unmount it. We recommend the “lazy unmount” method that uses the –lazy flag. The syntax of the command is:
# unmount --lazy [Device]
Force Unmount a Device
The unmount command also supports the force stopping a filesystem. However, this is an extreme option that often results in data corruption. The syntax of this command is:
# umount -f [mount directory]
Let’s move on to how you can use the mount command to make external filesystems available on your system.
6 Use Cases of the Linux Mount Command
Now that you have a good idea of how the mount command works and how you can modify its impact on the system, it is time to look at the popular use cases of the command. But before that, it is important to understand the prerequisites for using the command:
Prerequisites
Before trying out the following use cases, make sure you have the following:
- A system running a mainstream Linux distribution.
- A user account with administrator privileges.
Note that we recommend you log into the system with a user account with sudo privileges to avoid access-related issues.
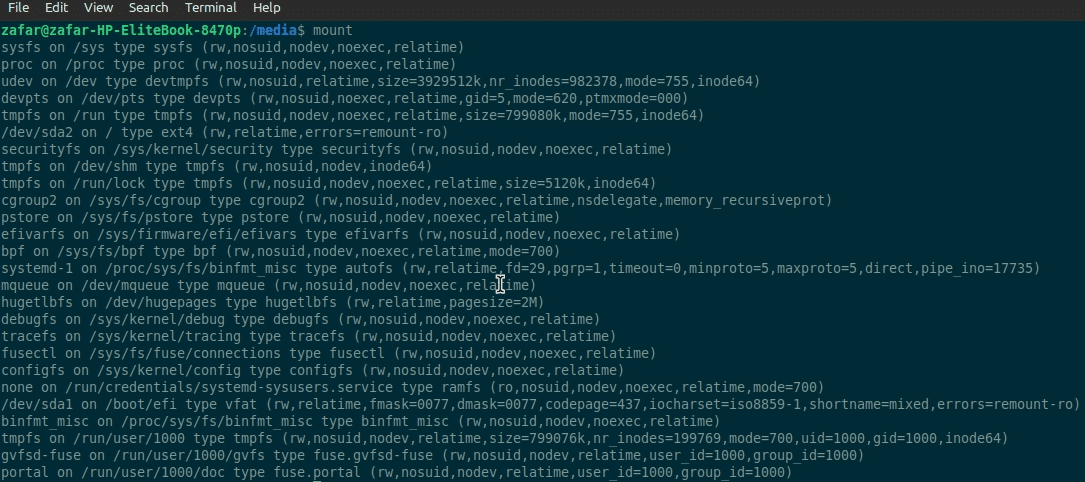
Use Case #1: View Currently Mounted Filesystems
When used with any arguments or options, the mount command prints out information about the available and mounted filesystems. The output includes all critical data, such as permissions, main mount points, and options.
# mount
Use Case #2: View Specific Filesystem
While the mount command in the previous example presented a lot of details, you need information about the specific filesystem you have on the system for practical purposes. In the Linux environment, the most prevalent filesystem is ext4.
Use the following command to list information about the ext4 filesystem on the system:
#mount -t ext4

Use Case #3: Mount a Filesystem
Now that you know how to view filesystem information, let’s see how you can use the command to add a filesystem to your system.
In technical terms, this requires attaching the filesystem to a system directory. This incorporates the new filesystem into the system’s filesystem hierarchy and makes it accessible to the users.
Use the following syntax to mount a filesystem to your system:
# mount [Device] [Directory]
Note that in this command:
Device can be a physical device such as a USB, a virtual device such as a partition, or a network storage option such as an NFS shared resource.
Directory is a local directory at the location where you want to add the filesystem. The contents of the Device will be available in this directory.
For instance, run the following command to attach a device to a local directory:
# mount /dev/sdb1 /mount/hd1/
Pass Additional Options to the mount Command
You can further optimize the mount operation by using the -o flag to pass additional instructions to the command. The syntax of using this flag is as follows:
# mount -o [Options] [Device] [Directory]
For instance, you can use the following command to mount a device in the read/write mode.
# mount -o rw /dev/sdb1 /mount/hd1/
This overrides the standard mount functionality of mounting devices in read-only mode.
Use Case #4: Edit /etc/fstab to Directly Mount Filesystems
Most Linux distributions use the /etc/fstab file to maintain information about internal devices and network storage resources. Here is how the contents of the file look on a typical Linux system
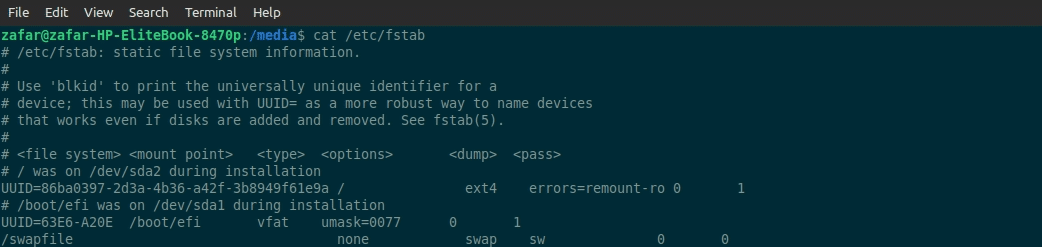
As you can see, the file mentions the following format for entries about the filesystems:
<file system> <mount point> <type> <options> <dump> <pass>
When you use the mount command with just one parameter (either Device or Directory), it checks the /etc/fstab for the missing value and uses the information to execute the mount operation.
If you wish to use the information in the /etc/fstab file, you can use one of the following commands that extract the missing information from the file and execute the operation:
Extract the mount point from the /etc/fstab file:
# mount [options] [Device]
Extract the device information from the /etc/fstab file:
# mount [options] [Directory]
Use Case #5: Mount External Storage Devices
You can use the mount command to mount external storage devices. We will now cover the two scenarios where we will show you how to mount a USB device and a CD-ROM.
Mount a USB Storage Device
Note: In most Linux distributions, the system automatically detects a USB storage device and mounts it for use. You can see the USB device in the file and devices sections if you have a GUI on the system.
However, in some cases, you have to manually mount the USB storage before you can access it. This process has two the following two steps:
Step #1: Create a Mount Directory
The first step is to create a directory that the system will use to mount the USB device’s filesystem. Usually, this directory is created in the /media directory.
We recommend the mkdir to create the directory with the following command:
# sudo mkdir /media/usb1

Step #2: Mount the USB Device
Insert the device and run the following command to get the device identifier:
# fdisk -l
Next, use the information to run the mount command that uses the directory you created in the previous step:
# sudo mount [USB Device Identifier] /media/usb1
Mount a CD-ROM Device
You might need to attack a CD-ROM device if you wish to access information stored on a CD or DVD. Like USB devices, Linux systems can automatically mount a CD-ROM. However, if your system doesn’t, you can follow these steps to mount the device.
Step #1: Check That a Mount Directory Exists
The traditional location of the CD-ROM mount directory is /dev/cdrom. Run the following command to check if this directory exists by running the following command:
# cd /dev/cdrom
Here’s the output indicating that the directory doesn’t exist on our test system.

If this is the case with you, use the mkdir command to create the directory.
# sudo mkdir /dev/cdrom/cd1
Step #2: Mount the CD-ROM Device
Linux supports the standard iso9660 filesystem for optical media. We will use the following command to mount the filesystem for the CD-ROM device:
# mount -t iso9660 -o ro /dev/cdrom /mnt
Here, the -t iso9660 flag instructs the mount command to mount the iso9660 filesystem, and the -o ro option mounts the CD-ROM device as read-only.
Alternatively, you can use this process to mount ISO files. Note that the traditional mount directory for ISO files is /media/iso-file. Additionally, you also need to make sure that the filesystem is mounted to a loop device (a virtual device that helps you access a file as a block device).
Here’s the command to mount an ISO file to your system:
# sudo mount /image.iso /media/iso-file -o loop
Use Case #6: Mount Virtual Storage Options
mount is a very flexible command that you can use to add virtual storage options such as network storage and virtual filesystem to your filesystem hierarchy. We will discuss two scenarios where we will use the command to add a Network File Share and a Virtual File System.
Mount a Network File Share (NFS)
NFS is a popular choice for sharing directories over a network, allowing you to work with these remote resources from your local computer.
Important: Before trying out the following commands, make sure you have the NFS client package installed on your Linux machine. If you don’t have it on your system, install it with the following command:
# sudo apt install nfs-kernel-server
Step #1: Create the Mount Directory
The traditional location of mounting NFS is /mnt/nfs. If it doesn’t exist on your machine, we recommend creating it with the mkdir command:
# mkdir /mnt/nfs/nfs1
Step #2: Mount the NFS
Next, run the following command to mount the NFS:
# sudo mount -t nfs [server:/path/to/share] /mnt/nfs/nfs1
In this command, the -t nfs instructs the mount command to install the nfs filesystem, and insert server information in the form of hostname/IP address : path to the shared directory.
Automatically Mount NFS Share
In most practical cases, you need to make sure the remote shared directories are available at system boot. This requires editing the /etc/fstab file.
Start by opening the file in your preferred file editor. We will use Nano to edit the file:
# nano /etc/fstab
Add the following line to the file:
server:/dir /media/nfs/nfs1 nfs defaults 0 0
Note that you need to add server information in the form of the hostname/IP address: path to the shared directory. Similarly, we have used the /media/nfs/nfs1 as the mount directory.
Mount a Virtual File System
You can also use the mount command to mount virtual file systems and access them like any other physically connected system. We will now show you how to mount tmpfs using the mount command.
Step #1: Create the Mount Directory
Many Linux distributions use /mnt/ramdisk as the traditional mount directory for virtual filesystems. You should check if this directory exists on your system. If not, you can create it with the following command:
# sudo mkdir /mnt/ramdisk/tmpfs1
Step #2: Mount the tmpfs
Now, run the following command to mount the file system:
# sudo mount -t tmpfs tmpfs /mnt/ramdisk/tmpfs1
Also Read: Linux Mount CIFS: Mounting Windows Shares on Linux
Conclusion
In this tutorial, we discussed how to mount a filesystem to your Linux system. This allows you to leverage external physical and virtual storage devices and options for your operations. We showed six use cases where we used the mount command to demonstrate attaching physical devices, virtual filesystems, and NFS.
FAQs
Q. What is the Linux mount command used for?
The Linux mount command is used to mount a file system onto the system’s directory tree. This allows the files on that file system to be accessed.
Q. What are the different ways to use the Linux mount command?
The Linux mount command can be used to mount a file system, unmount a file system, remount a file system, display mounted file systems, and control how file systems are mounted.
Q. What are mount options in Linux?
Mount options in Linux are parameters used with the mount command to specify how a file system should be mounted, such as read-only or read-write access, enabling or disabling file permissions, and setting up other file system-specific options.
Q. How do I specify a mount point in the Linux mount command?
When using the Linux mount command, you specify the mount point, which is the directory within the system’s directory tree where the file system will be mounted.
Q. What are some common file system types used in Linux?
Common file system types used in Linux include ext4, xfs, btrfs, and vfat, among others.
Q. Can I use the Linux mount command from the command line?
Yes, the Linux mount command is primarily used from the command line to mount file systems onto the system’s directory tree.
Q. What are the key considerations when mounting a file system?
When mounting a file system, it’s important to consider the file system type, the mount point, and any specific mount options needed for that file system.
Q. How do I unmount a file system using the Linux mount command?
To unmount a file system using the Linux mount command, you use the “umount” command followed by the mount point to detach the file system from the directory tree.
Q. What is the syntax for the mount command in Linux?
The syntax for the mount command in Linux is “mount [options] device|file dir”, where “options” are the mount options, “device|file” is the device or file containing the file system, and “dir” is the mount point.
Q. Can I mount multiple file systems using a single command?
Yes, you can use the Linux mount command to mount multiple file systems by specifying multiple mount points and their corresponding devices or files within a single command.
