
For many developers, Docker is the platform for creating and deploying applications in self-sufficient containers. It is an OS-level virtualization platform that helps users build and manage applications without worrying about dependencies and underlying OS.
In this guide, we will see how to install Docker desktop on Windows 10 or Windows 11. We’ll also mention the benefits of Docker on Windows and how you can uninstall it from the Windows environment.
Let’s start with the benefits of Docker on Windows.
Table Of Content
- What are the Benefits of Working with Docker on Windows?
- Install Docker on Windows 10 & 11
- Conclusion
What are the Benefits of Working with Docker on Windows?
Docker on Windows brings a range of benefits to the development process and application deployment, including:
- The simple user interface allows you to view and monitor all Docker containers from one location.
- Docker takes care of allocating the required resources and memory space for the containers.
- Supports HTTP proxy settings
- Docker allows developers to create containerized applications that can run in a Windows environment. This makes it easy to build and test applications on Windows and then deploy them to other platforms without compatibility issues.
- Docker images can be easily moved between development, testing, and production environments, which makes it easier to maintain consistency and reduce the risk of errors or bugs caused by differences between environments
Like all environments, you need the following elements to run Docker containers in a Windows environment:
- Docker Engine: This runs on the host machine to build and run containers.
- Docker Client: This receives the commands from the users, translates them into REST API, and delivers them to the Docker Daemon.
- Docker Daemon: This manages Docker containers
- Docker Compose: This runs multiple container applications.
Now that you know what you need, we’ll explain the installation process of Docker on the Windows operating system.
Install Docker on Windows 10 & 11
Before we discuss the installation process, we should go into the details of prerequisites and related information so that you have a solid foundation on installing Docker on Windows 10 & 11, especially if using it with a dedicated server.
Prerequisites
- Windows 10 64-bit or Windows 11 64-bit (version 2004 or higher for Pro edition; version 1909 or higher for Enterprise and Education editions)
- The target machine should have a 64-bit processor with support for Second Level Address Translation (SLAT).
Minimum 4 GB RAM. - BIOS settings and hardware virtualization support must be enabled.
- Support for Windows Hyper-V enabled.
- Support for Older Windows versions
Install Docker Desktop on Windows 11
Let’s start with the process of installing Docker Desktop on Windows 11. The process involves several steps that are detailed below.
- Visit the Docker Desktop For Windows download page and download the Docker Desktop installation file.
Note: The target machine should have a 64-bit processor and 4GB system RAM to run Docker successfully on Windows 10.
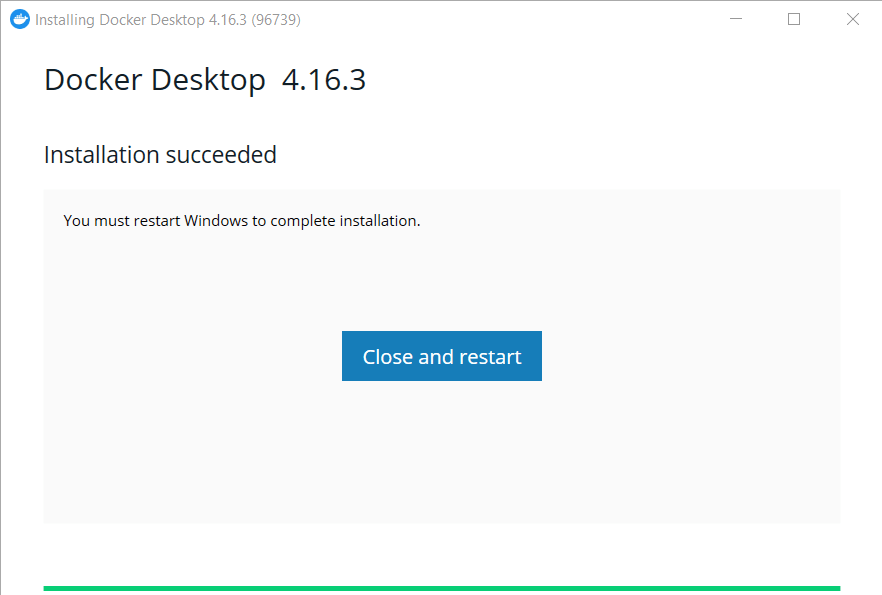
- Run the installer and remember to enable the Hyper-V Windows feature on the Configuration page.
- Complete the installation process and restart the computer once the process finishes.
Start Docker Desktop Tool
After completing the installation, you’ll need to start the Docker tool manually. For this, locate or search for “Docker Desktop” in the desktop search bar.
Before you can get started with Docker, you’ll need to go through the onboarding tutorial. This will help you learn how to build a Docker image and run a container.
Once you’ve completed the tutorial, you’ll be up and running with Docker Desktop on Windows. To verify if everything is working correctly, go to the Docker CLI and run the “docker version” command. This will tell you the Docker version installed on your system.
At this point, Docker has been installed on your Windows 11 machine and is ready for running containers and Docker images.
How To Install Docker on Windows 10?
The process of installing Docker on Windows 10 is similar to installing Docker on Windows 11. Let’s see the major steps of the process.
Start by downloading the installer from the official Docker for Windows page.
Once the download finishes, locate the downloaded file and run it.
On the setup page, you must choose the options, such as the Hyper-V and WSL 2 features. Then, click “OK” and follow the instructions of the wizard. Close the wizard when it finishes.
When using Docker, it’s important to know that the administrator account and Docker user accounts are often the same. If you don’t have a Docker user group, you will need to create one and add your user account to it.
Initially, run the admin panel as computer management.
You can add new users to the Docker group by going to the Local Users and Groups and, from there, find Docker user groups.
After you’ve completed all these steps, restart your computer to update and start Docker Desktop on Windows 10.
Once the system comes back online, start Docker Desktop.
It will prompt you to review and accept the Subscription Services Agreement for Docker Desktop. Once you accept and agree to the terms and conditions, the Docker Desktop window will appear, and you’re ready to work!
Remember to go through the Quick Start guide included with Docker Desktop for a better experience.

Resolving the WSL Kernel Version Error
Some Windows 10 systems can show the following error about Docker Desktop requiring a newer version of the WSL kernel.
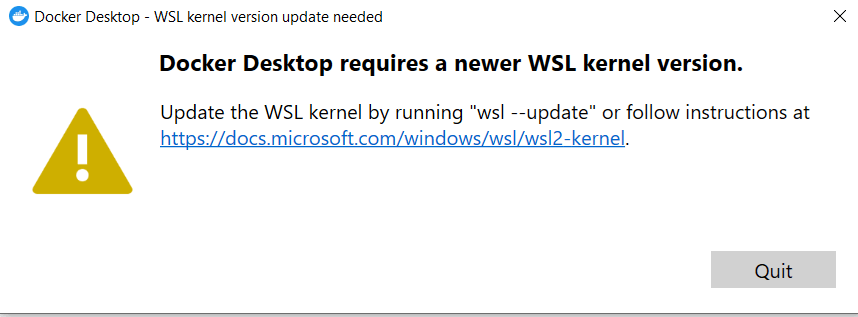
To resolve this error, launch the Command Prompt and run the following command:
wsl --update

How to Install Docker From the Command Prompt
If you wish, you can install Docker Desktop from the Command Prompt. This is a simple process where you enter a simple command to initiate the installation process. But first, you need to download the Docker Desktop installer from the official site.
Here are the commands you’ll need to run:
If you’re in a terminal window, run the following command:
"Docker Desktop Installer.exe" install
If you’re in the PowerShell, run the following command:
Start-Process '.\win\build\Docker Desktop Installer.exe' -Wait install
Finally, if you’re at the Command Prompt, run the following command:
start /w "" "Docker Desktop Installer.exe" install
When the process finishes, don’t forget to add your user account to the Docker user group, especially if your admin account and user account are not the same. To do that, run this command:
net localgroup docker-users <users>/add
How do I Know if Docker is Installed on my Windows 10/ Windows 11 Machine?
After the installation finishes, it is always a good idea to verify if everything is working as intended. For this, you can try the following ideas:
- If you’re using a Windows terminal, you can use the following command line to launch Docker:
docker-run
- From Powershell, you can verify the Docker version and installation by entering the following command:
docker --version
- You can also check the latest version of the Docker desktop from the Docker option.
- Alternatively, you can check for a web server by running the Docker desktop.
Uninstall the Docker Desktop Tool
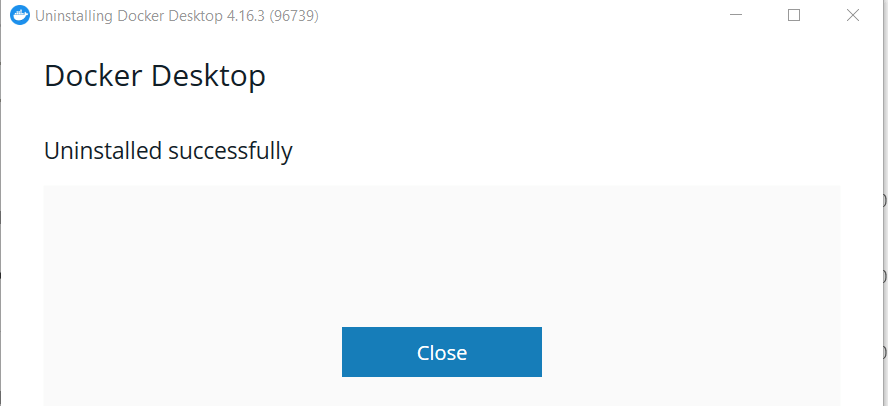
There are times when you might want to remove Docker from the Windows machine. Like the installation process, the uninstallation process is straightforward.
1. Go to the Windows Start menu.
2. Choose Settings > Apps > Apps & features.
3. Docker Desktop should be present in the Apps & features list.
4. Click Uninstall.
Conclusion
Docker on Windows is a quick and easy way to run applications in containers on Windows operating systems. Developers can build, package, and deploy applications more efficiently and consistently across different environments using containers. This improved productivity and reduced complexity help organizations save time and money.
Docker on Windows is the perfect way to utilize the features of both Windows and Linux-based containers. However, it is important to note that Docker on Windows does have some limitations and requirements, such as minimum hardware specifications and the use of Windows 10 Professional or Enterprise editions with the Hyper-V feature enabled.
