How to Install Etcher on Ubuntu In 2 Easy Methods
Learn how to install and flash OS Images to the USB drive on Linux with balenaEtcher on ubuntu. Click this blog to explore everything you need to know.
balenaEtcher, a free and open-source utility, simplifies preparing bootable USB drives and SD cards. This tool stands out for its user-friendly interface and robust performance, making it a popular choice for users seeking to install or try out different operating systems.
Installing balenaEtcher on Ubuntu provides a streamlined and efficient way to flash operating system images onto USB drives. Whether you are a seasoned professional or a beginner, creating bootable media on Ubuntu systems via balenaEtcher is straightforward.
In this comprehensive tutorial, we will learn how to install balenaEtcher on Ubuntu to flash the OS image to the USB drive.
Two Methods of Installing balenaEtcher on Ubuntu
There are two primary methods you can use to install balenaEtcheron Linux distributions, such as Ubuntu.
The Prerequisites
Before you continue with this tutorial, we recommend you have the following:
- A system running Ubuntu 18.04 LTS or a later version.
- A user account with root or sudo privileges
Method #1: Install balenaEtcher on Ubuntu via AppImage
balenaEtcher can be downloaded as an AppImage file. This format eliminates the need for a complex installation process based on multiple files. As a result, you can avoid installation problems caused by missing or corrupted dependencies.
We recommend the following steps to installbalenaEtcherFlash image on Ubuntu using the AppImagefile:
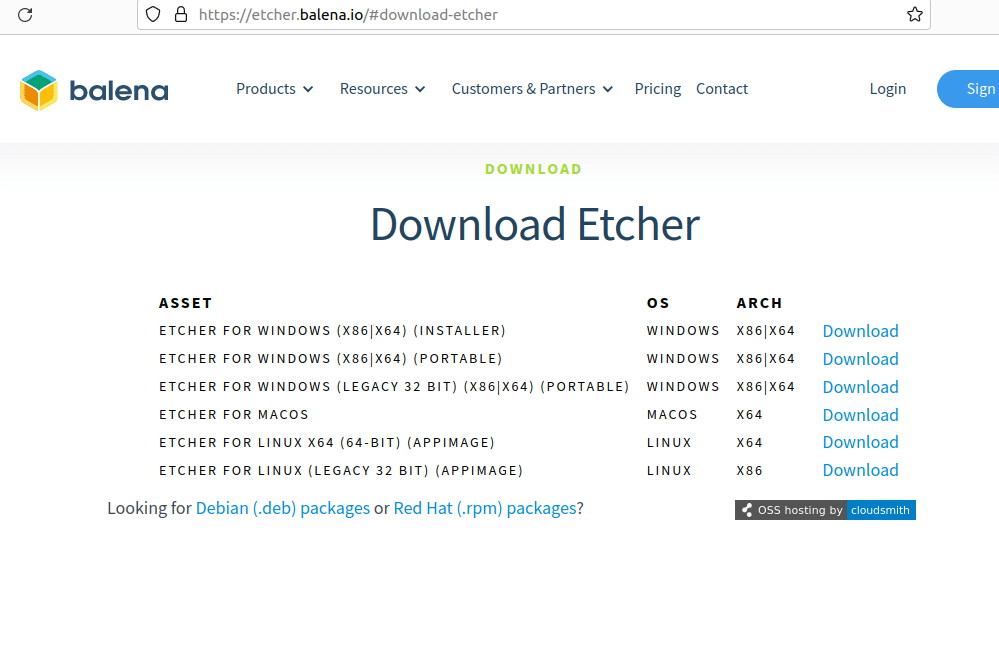
Step #1: Obtain the AppImage from balena’s Official Site
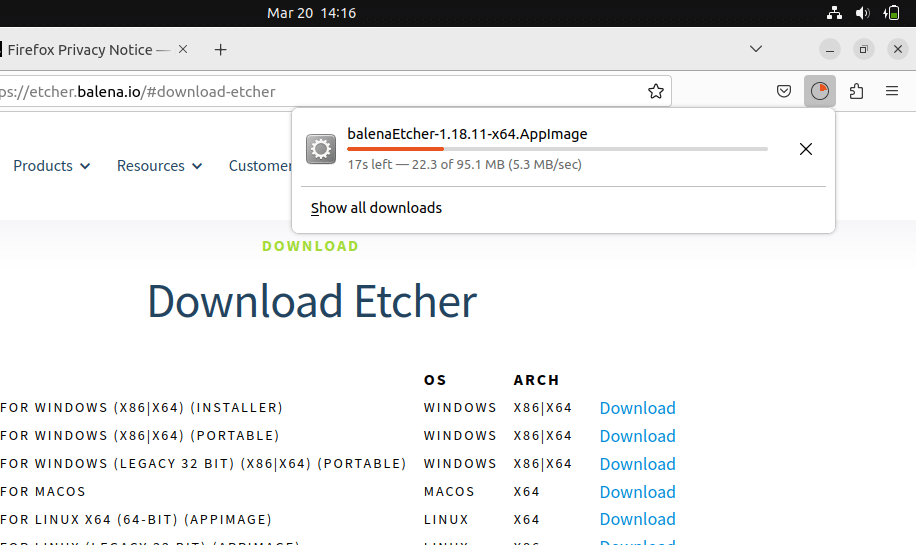
Go to the Downloads section of the official website ofbalenaEtcher and download the appropriate AppImage file for Linux. Given that Ubuntu 18.04 and later versions support only 64-bit architecture, ensure you select the x64 variant of the AppImagefile.
Step #2: Unzip the Downloaded File
Right-click on the downloaded file and choose the Extract Here option to unpack the contents.
Step #3: Set Execution Rights for the AppImage File
Right-click on the AppImagefile and choose Properties from the context menu.
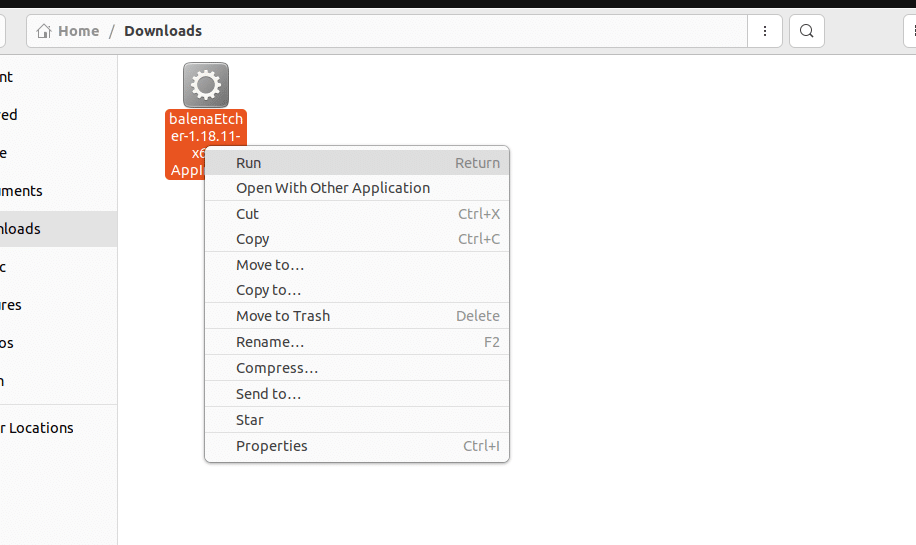
Within the Properties window, navigate to the Permissions tab.
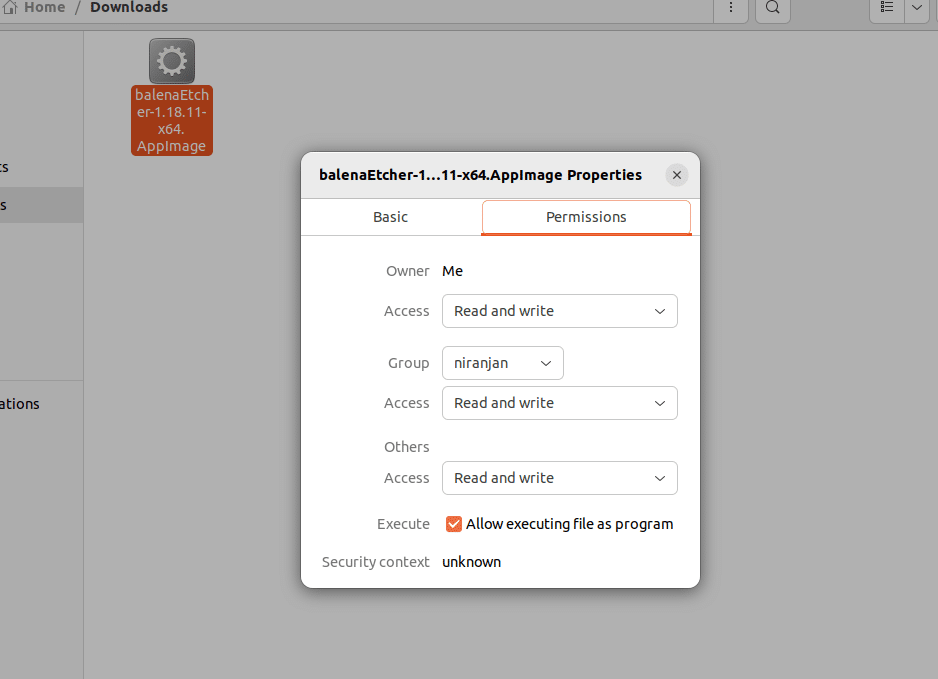
Under the Execute section within the Permissions tab, tick the box labeled Allow executing file as a program.
Close the Properties dialog box.
Step #4: Launch Etcher
Once the AppImagehas been granted execution permissions, double-click the application icon to startbalenaEtcher on Ubuntu. Alternatively, you can choose Run from the context menu.

Method #2: Install balenaEtcher on Ubuntu via Apt
If you wish to install balenaEtcherlike a standard Linux package and benefit from automatic updates, we recommend the aptpackage manager for the installation process.
Step #1: Include Etcher’s Debian Repository
Start by adding the Etcher Debian repository to your system’s software sources. For this, open the terminal and enter the following command:
# echo "deb https://deb.etcher.io stable etcher" | sudo tee /etc/apt/sources.list.d/balena-etche*r.list*

Once completed, you will see the confirmation of the repository addition in the terminal.
Step #2: Authenticate the Package Source with the Repository Key
Before you can install balenaEtcher on Ubuntu, it’s essential to authenticate the package source by adding the repository key.
Execute the following command to add the key to your system’s trusted list:
# sudo apt-key adv --keyserver hkps://keyserver.ubuntu.com:443 --recv-keys 379CE192D401AB61
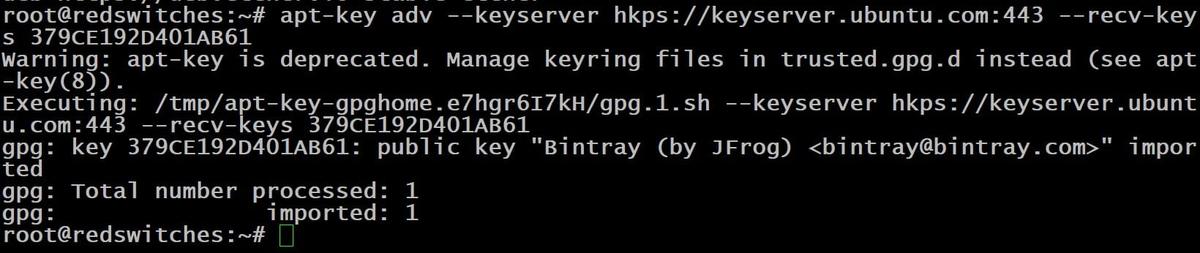
A confirmation message appears in the terminal once the key has been successfully added.
Step #3: Install balenaEtcher
At this point, you are ready to complete the installation ofbalenaEtcher on Ubuntu using apt.
Start by updating the package list to ensure you have the latest version:
# sudo apt update
InstallbalenaEtcher by executing the following command:
# sudo apt install balena-etcher-electron
Type y and press Enter to proceed with the installation.
Allow the installation process to complete. Once finished, you can launch balenaEtcher by locating it in your Ubuntu applications menu. Alternatively, initiate it from the command line by entering:
**#**balena-etcher-electron
Conclusion
Installing balenaEtcher on Ubuntu is a straightforward process that significantly simplifies the task of flashing operating system images to USB drives.
Whether using the AppImage for a quick setup or opting for a more permanent installation via the apt package manager, balenaEtcheroffers a reliable and user-friendly solution. With its intuitive interface and robust functionality, balenaEtcher on Ubuntu ensures that users can efficiently prepare bootable USB drives for various operating systems, making it an indispensable tool for system administrators, developers, and computer enthusiasts.
At RedSwitches, we take pleasure in assisting our valued customers with their unique server needs. We are your global dedicated hosting partner, offering bare metal hosting solutions tailored to enhance your Ruby development experience.
We offer the best dedicated server pricing and deliver instant dedicated servers, usually on the same day the order gets approved. Whether you need a dedicated server, a traffic-friendly 10Gbps dedicated server, or a powerful bare metal server, we are your trusted hosting partner.
FAQs
Q. What is balenaEtcher, and why should I use it on Ubuntu?
balenaEtcher is a free and open-source application for flashing operating system images to USB drives and SD cards. It is known for its simplicity and reliability on Ubuntu systems.
Q. How do I install balenaEtcher on Ubuntu?
You can install balenaEtcher on Ubuntu by downloading the AppImagefrom the official website or using the apt package manager after adding its repository.
Q. Is balenaEtcher compatible with all versions of Ubuntu?
balenaEtcheris compatible with Ubuntu 18.04 LTS and newer versions, focusing on 64-bit architecture systems.
Q. Do I need special permissions to install balenaEtcher on Ubuntu?
Yes, you need sudo privileges to install balenaEtcher on Ubuntu, as it involves administrative tasks during installation.
Q. Can I use balenaEtcher on Ubuntu to flash all operating system images?
balenaEtcher supports various image file formats, including ISO, IMG, and ZIP files, allowing you to flash various operating systems.
Q. What are the steps to install balenaEtcher on Ubuntu using the AppImage?
To install using the AppImage, download the file from Balena’s website, make it executable, and then run it directly.
Q. How do I update balenaEtcher on Ubuntu?
If installed via apt, you can update balenaEtcher through the standard system update process with sudo apt update and sudo apt upgrade. If using an AppImage, download the latest version from the official website.
Q. Is there a graphical interface for balenaEtcher on Ubuntu, or is it command line only?
balenaEtcher provides a user-friendly graphical interface, making it accessible to users who prefer a graphical approach over command-line operations.
Q. Can I use balenaEtcher on Ubuntu to flash operating systems to SD cards and USB drives?
Yes, balenaEtcher can flash operating systems to both USB drives and SD cards, providing flexibility for various media types.
Q. Where can I find support if I encounter issues installing or using balenaEtcher on Ubuntu?
Support for balenaEtcheron Ubuntu can be found through the official Balena forums, Etcher GitHub repository issue tracker, or various Ubuntu community forums and help sites.f
Sonika
Linux System Administrator
Sonika holds the position of Linux System Administrator at RedSwitches. Besides her administrative duties, she is recognized as a proficient Linux Technical Writer. Her expertise lies in addressing intricate challenges in critical server management and administration. Beyond her professional sphere, Sonika takes pleasure in playing badminton and engaging in yoga.
Ubuntu vs Linux: Key Differences Explained
Linux is the kernel, while Ubuntu is a complete operating system built on it. This guide breaks down their key differences, use cases, and when to choose each.
Reduce Docker Image Size: Best Practices to Slim Your Images
Docker image size can become a serious issue as you add more code to the image. Learn how to reduce Docker image size and optimize Dockerfiles for production to speed up CI/CD pipelines and improve container efficiency.

Best Linux Distros 2026, Full Guide for Beginners, Developers, Gamers & Servers
Match your hardware, workflow, and skill to the right Linux distro in 2026. Compare 23 top picks, Mint, Ubuntu, Fedora, Arch, Bazzite, covering beginners, developers, gamers, and servers.
Power Your Next Project With Bare Metal
10 min delivery, zero setup fees, and 24/7/365 human engineers across 20+ global locations.