
When a computer shuts down unexpectedly because of issues like a power outage or a crash, it can leave the file system in a mess. This situation leads to problems in finding and accessing files because of data losses and corruption. Additionally, disk errors and bad sectors can also cause file system problems.
Dealing with such situations can be challenging because Linux distributions use files to store and manipulate a surprisingly high volume of data and information. As such, it is essential to address file system inconsistencies to ensure the integrity and reliability of the file system.
The fsck utility is a simple yet powerful option for checking and repairing inconsistent file systems. You can use it to resolve issues caused by improper shutdowns, file system corruption, or disk errors.
This tutorial covers how to use the fsck command for checking and repairing the filesystem on your Linux machine. We’ll explore 10+ use cases here to help you understand the scenario easily, ensuring you gain practical, hands-on knowledge for maintaining your system’s health and efficiency.
Let’s start with the most basic question users have about fsck.
Table of Contents
- When to Use fsck in Linux?
- The Basic fsck Syntax
- Command Options for fsck
- How to Identify and Work With Partitions and Disks
- How to Check and Repair Filesystem With fsck
- Essential Requirements
- Use Case #1: Error Verification
- Use Case #2: Dry Run with fsck
- Use Case #3: Auto Fixing of Detected Errors with fsck
- Use Case #4: Avoid Repair but Print fsck Errors in the Output
- Use Case #5: Force fsck to Perform a Filesystem Check
- Use Case #6: Run fsck on All Filesystems at Once
- Use Case #7: Skip fsck on a Specific Filesystem
- Use Case #8: Skip fsck on Mounted Filesystems
- Use Case #9: Execute fsck on the Linux Root Partition
- How to Deal with Interruptions in fsck
- Conclusion
- FAQs
When to Use fsck in Linux?
fsck (short for File System Consistency Check) comes pre-installed with most Linux distributions, eliminating the need for specific installation steps. With no additional setup required, you can benefit from its capabilities as soon as you launch the terminal.
The fsck command proves valuable in many real-world scenarios, including the following:
- Use fsck for preventive maintenance or when encountering file system issues on your system.
- Diagnose common boot failures.
- Address input/output errors caused by corrupted files on your system/server.
- Check the health of external drives, including SD cards or USB flash drives.
The Basic fsck Syntax
The basic syntax for the fsck utility follows this pattern:
# fsck <options> <filesystem>
In this syntax, the filesystem could be a device, a partition, or a mount point. In addition, you can add options specific to the filesystem at the end of the command.
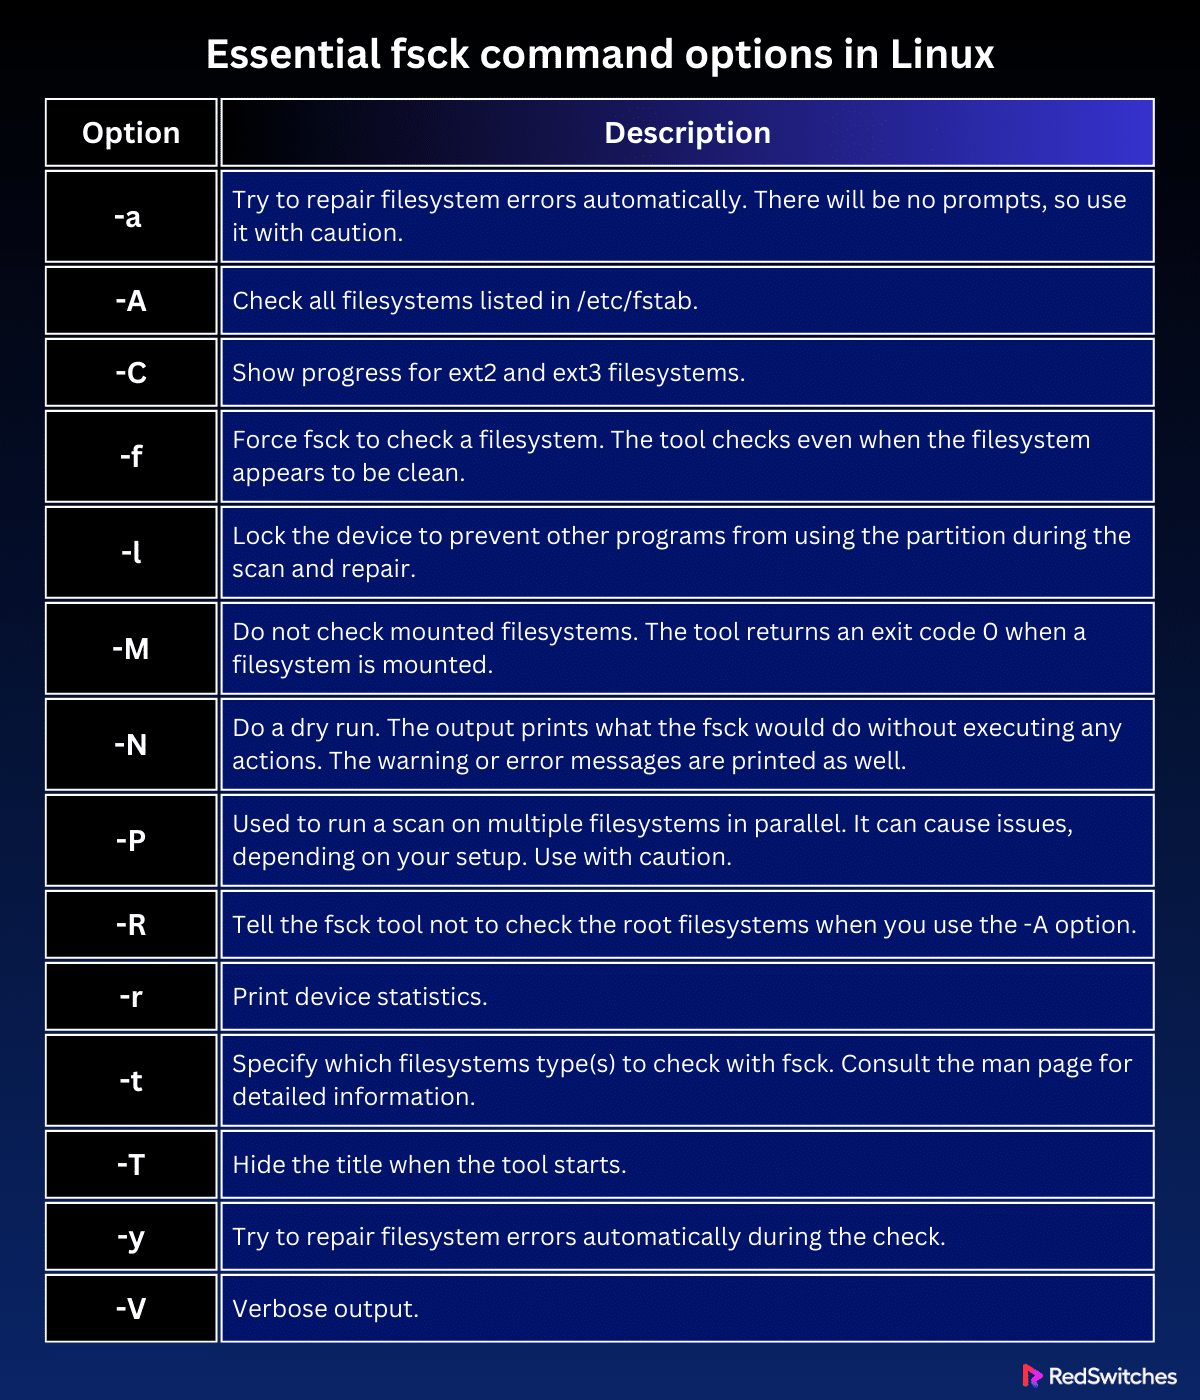
Command Options for fsck
The following table summarizes the essential fsck command options in Linux. We strongly suggest caution when combining these options for checking and fixing filesystems, especially with options that do repairs automatically or scan several systems simultaneously.
For more details about filesystem types and other tips, check the fsck manual page.
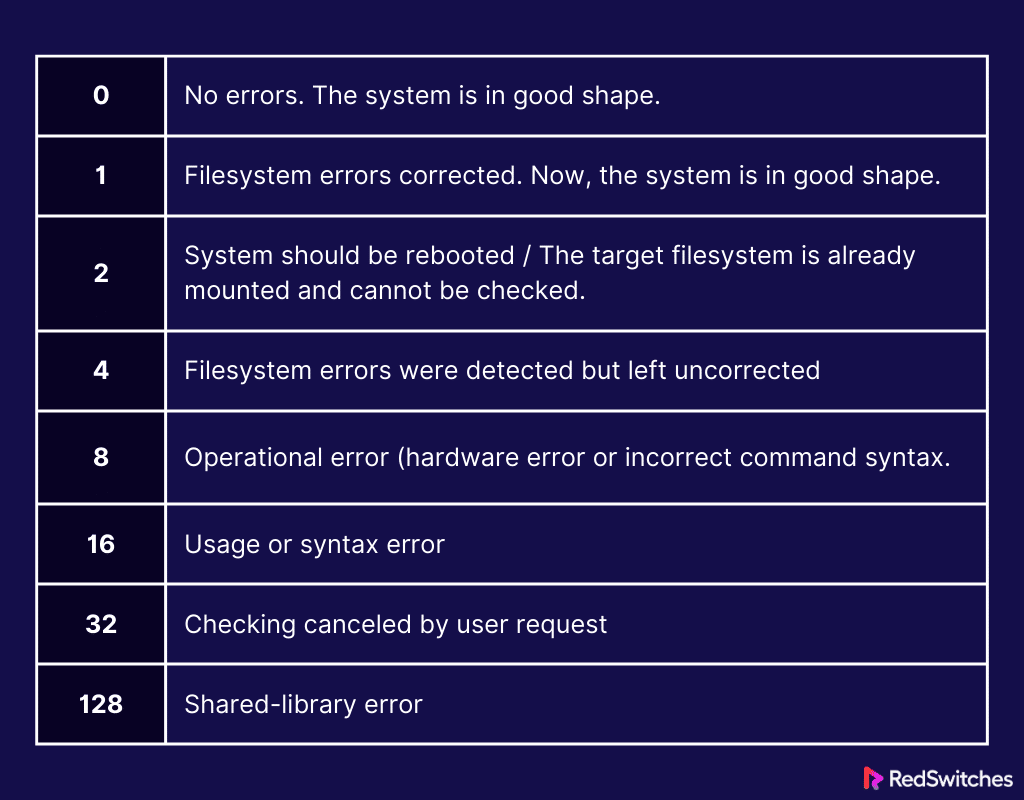
The exit code of the fsck utility is the cumulative result of these states, providing a comprehensive summary of the disk’s condition.
How to Identify and Work With Partitions and Disks
You can use several Linux commands to see all the devices mounted on your system and find out where your disks are located on these devices.
A handy way to pinpoint the disk you need to scan is by listing all the filesystem disks with the df command:
# df -h
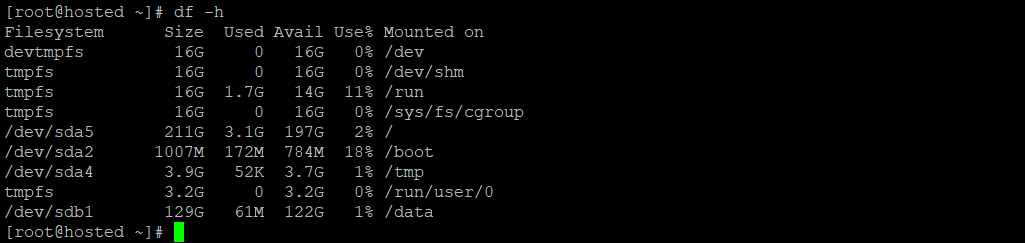
The output displays the data usage across your system and filesystems. You can use this information to identify the specific disk you wish to examine using the fsck command.
You can further inspect partitions on the target disk with the following command:
# sudo parted /dev/sdb1 'print'
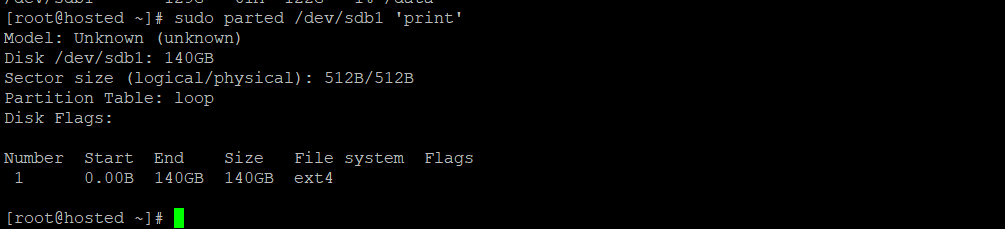
In Linux, sdb1 refers to the first SCSI disk on the system. If you have more than one disk, they would be labeled as sdc, sdd, and so on.
In our example, we’ve identified the current partitions of the disk. Remember, the results will vary based on the partitions you have available on your system.
The disk identifier in this context is /dev/sda, and the Number column reveals the count of partitions.
How to Unmount a Disk

Important: Be careful when trying to unmount a disk or partition currently in use.
It’s crucial to unmount the disk or partition before running a check with fsck. Running fsck on a mounted disk or partition will trigger a warning.
Use the following command to safely unmount a disk:
# sudo umount /dev/sdb1
Replace /dev/sda1 with the specific device you intend to unmount.
It’s important to note that root filesystems cannot be unmounted. Consequently, the utilization of fsck on a running machine is restricted.
Remount the Disk
Upon completing the inspection and repair process for a device, it’s essential to remount the disk/partition to make it operational again.
In the current scenario, let’s remount the sdb disk using the following command:
# mount /dev/sdb1 path
This command will make the specified disk/partition accessible for use once more.
How to Check and Repair Filesystem With fsck
You can use fsck to discover and fix issues with files and the disk file system.
Essential Requirements
Before you start checking and repairing your filesystem, you need the following:
- A system running a mainstream Linux distribution.
- Access to a terminal or command line.
- A user with root permissions for command execution.
Now that we’ve gone over what you need, let’s look at the use cases where you can use fsck for checking and repairing file systems.
Use Case #1: Error Verification
Verify that the disk is unmounted.
You can now proceed to run fsck for error checking. For instance, use the following command to examine the second disk/partition:
# sudo fsck /dev/sdb1

The output of the fsck command shows issues with the disks. In the following screenshot, the disk on our test system is clean without any issues. However, if your disk exhibits multiple problems, the system will pop up prompts, requiring your confirmation for further actions.
Use Case #2: Dry Run with fsck
Before initiating a live check, we advise a test run with fsck for a thorough evaluation. For this, use the -N option with the command to execute a test without making any actual changes:
# sudo fsck -N /dev/sdb1
This command shows you what actions the utility will carry out without actually making any changes. This test run helps you spot potential problems without affecting the live filesystem.
Use Case #3: Auto Fixing of Detected Errors with fsck
To address potential issues without multiple prompts, use the -y option with fsck:
# sudo fsck -y /dev/sdb1
By incorporating -y, you instruct the system to attempt to rectify all detected errors automatically without requiring your confirmation for each issue.
If no errors are identified, the output will resemble the standard “clean” outcome.
Use Case #4: Avoid Repair but Print fsck Errors in the Output
Run the fsck command with the -n option to examine potential errors on a file system without initiating repairs:
# sudo fsck -n /dev/sdb1

In the case of a second drive, such as sdb1, exhibiting journaling errors, the -n flag allows you to print the errors (if any) in the output without applying any repairs.
Use Case #5: Force fsck to Perform a Filesystem Check
By default, when you run a fsck on a clean device, the tool bypasses the filesystem check. If you want to force a filesystem check, use the -f option.
# sudo fsck -f /dev/sdb1

This forces the fsck utility to do a deep check, running all scans for possible problems, even if it first thinks the device is fine.
Use Case #6: Run fsck on All Filesystems at Once
The traditional way of using the fsck utility is to run it on individual filesystems. However, by adding the -A flag, you can save time and run it on all available filesystems in a single operation.
This option systematically processes the etc/fstab file in one pass. Since root filesystems cannot be unmounted on a live system, we strongly recommend including the -R option to skip these filesystems:
# fsck -AR
If you suspect errors, we also recommend adding the -y option (discussed earlier) for an uninterrupted process without prompts.
Use Case #7: Skip fsck on a Specific Filesystem
Add -t and no to skip checking a specific filesystem type with fsck,
For instance, if you want to leave out the ext3 filesystem, you would use this command:
# sudo fsck -AR -t noext3 -y
The inclusion of -y ensures the output isn’t interrupted by prompts.
Use Case #8: Skip fsck on Mounted Filesystems
To prevent fsck from attempting to run on mounted filesystems, add the -M option. This flag instructs the utility to skip any mounted filesystems. To illustrate the distinction, we will run fsck on the sdb disk while it is mounted and unmounted:
# sudo fsck -M /dev/sdb1
While sdb1 is mounted, the command exits without performing a check. After unmounting sdb1, running the same command leads fsck to examine the disk and report its status as either clean or containing errors.
Use Case #9: Execute fsck on the Linux Root Partition
As previously mentioned, fsck cannot scrutinize root partitions on a running Linux machine as they are actively mounted and in use.
Nevertheless, you can assess and rectify issues on Linux root partitions by booting into recovery mode and running fsck. The steps of this process are generally as follows:
- Power on or reboot your machine using the GUI or the terminal:
# sudo reboot
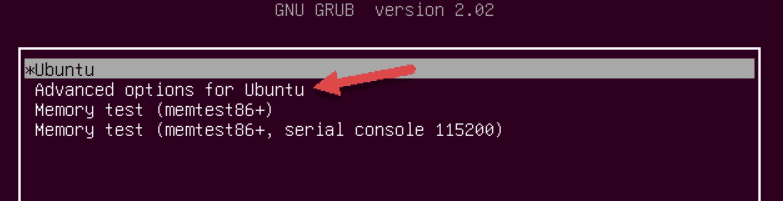
- Hold down the Shift key during the boot-up process to reveal the GNU GRUB menu. Opt for Advanced options for Ubuntu.
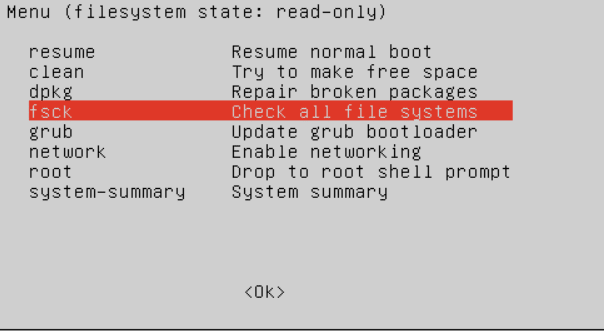
- Choose the entry with recovery mode at the end. Allow the system to load into the Recovery Menu. Go to the menu and find the fsck option.
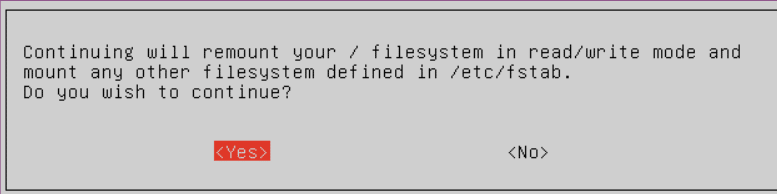
- Confirm your selection by choosing <Yes> at the prompt.
- Once the check is complete, select the resume option from the recovery menu to initiate the machine’s normal boot-up process.
How to Deal with Interruptions in fsck
We strongly recommend not to interrupt fsck during its operation. However, if the process is unexpectedly halted, fsck will complete any checks in progress but will not attempt to repair any errors it finds.
To deal with interruptions in fsck, you can resume the check, examine the output, monitor the process, and consider the potential impact on data. By following these steps, you can minimize the risk of data loss or corruption and ensure the file system remains consistent and functional.
Conclusion
You now know how to inspect and rectify filesystem issues in Linux using fsck effectively. This command is essential for checking and repairing file system errors, ensuring the health and stability of your filesystem. By understanding the various options and usage of the fsck command, you are empowered to manage and maintain the integrity of your Linux filesystem proactively, ultimately contributing to a more reliable and robust computing environment.
For a seamless experience and to meet the demands of high-performance computing, consider exploring instant delivery bare metal servers from RedSwitches, a trusted provider in the industry. With RedSwitches, you can benefit from reliable and robust server solutions catering to your needs.
We offer the best dedicated server pricing and deliver instant dedicated servers, usually on the same day the order gets approved. Whether you need a dedicated server, a traffic-friendly 10Gbps dedicated server, or a powerful bare metal server, we are your trusted hosting partner.
FAQs
Q. What is fsck, and why is it essential for Linux systems?
fsck, short for File System Consistency Check or file system check, is a utility in Linux used to examine and repair filesystem inconsistencies. It ensures the integrity and reliability of the filesystem, identifying and correcting errors that may compromise data integrity.
Q. When should I run fsck on my Linux system?
Run fsck when you suspect or encounter filesystem errors, such as unexpected shutdowns, system crashes, or disk-related issues. It is also advisable to run fsck after an improper system shutdown to prevent potential data corruption.
Q. How do I run fsck on a specific disk or partition?
To do so, utilize the following command, replacing “/dev/sdX” with the appropriate disk or partition identifier:
# sudo fsck /dev/sdX
Q. Can I automate the process of fixing filesystem errors with fsck?
Yes, you can use the -y option with fsck to automatically attempt to fix detected errors without user prompts. Exercise caution when using this option, as it may result in changes without manual confirmation.
Q. Is it possible to perform a dry run with fsck before making actual changes?
Yes, you can execute a dry run using the -N option with fsck. This allows you to preview potential actions without modifying the filesystem.
Q. How can I check all filesystems listed in /etc/fstab at once?
Deploy the -A option with fsck to check all filesystems listed in the /etc/fstab file simultaneously:
# sudo fsck -A
Q. Can I skip fsck on specific filesystems or mounted partitions?
Yes, you can skip fsck on specific filesystems using the -t option, such as:
# sudo fsck -AR -t noext3 -y
Additionally, the -M option skips checking mounted filesystems.
Q. What precautions should I take before running fsck commands?
Ensure you have root permissions before executing fsck commands, as many operations require elevated privileges. Moreover, take necessary backups to prevent data loss in case unexpected issues arise during the filesystem check.
Q. How can I force fsck to check a seemingly clean filesystem?
Use the -f option with fsck to force a check on a filesystem, even if it appears to be clean. For instance:
# sudo fsck -f /dev/sdX
Q. Can I run fsck on the root partition of a running Linux machine?
No, fsck cannot check root partitions on a running system. Boot into recovery mode to perform a filesystem check on the root partition. Follow the provided steps in the guide for detailed instructions.
