The idea of Floating IPs is critical for efficient server management. These flexible internet addresses help streamline operations as they quickly move between servers, reducing downtime and making your network operations more resilient.
In this comprehensive guide, you’ll learn about Floating IPs in Linux dedicated servers. We’ll discuss how they work and how you can use them to ensure uninterrupted online services.
Table Of Contents
- What is a Floating IP?
- How Does It Work?
- Benefits of Using Floating IPs for Dedicated Servers
- How to Use Floating IPs
- How to Delete Floating IPs
- Conclusion
- FAQs
Let’s start with a short introduction to Floating IPs.
What is a Floating IP?
Floating IPs are unique internet addresses that connect your device to other computers or servers. It’s called “floating” because you can quickly shift it between different machines.
This flexibility is helpful for online platforms that need to stay online even if one server goes down or they want to switch their services to a different server without causing disruptions and downtime. Even when operations are going smoothly, Floating IPs are very helpful when taking down a server for maintenance or upgrades. As such, using this class of IP addresses, system admins can ensure an uninterrupted online presence without any issues.
How Does It Work?
Think of Floating IPs as a quick fix for the internet.
Say you have two servers, A and B. Server A has a fixed IP, and Server B has a Floating IP. Since Server A has a public IP address, every user can access it. Now, if server A goes down for any reason, what can you do to ensure continuity of operations?
Since server B has a Floating IP, you can quickly shift it to server A almost instantly. Now, people can still find you online, and it’s like nothing happened – thanks to the great backup plan!
Businesses use this trick to avoid disappearing from the internet, even if the main server hosting the customer-facing websites is acting up.
Dynamic Routing – The Basic Concept in Floating IPs
Floating IPs allow you to dynamically route traffic to any server in your network. Multiple servers can share the same Floating IP, but it can only be active on one server at a time.
This dynamic relationship between the Floating IP and the primary IP (basic IP address) is like having a special number (1.1.1.1) to visit a website.
Initially set to Server A, you can swiftly switch this special number to a new one (2.2.2.3), directing visitors to Server B. The change happens so fast that users won’t notice it. For the visitors, the website keeps running smoothly without any breaks.
Benefits of Using Floating IPs for Dedicated Servers
We’ll now discuss the benefits of using Floating IPs for dedicated servers:
- High Availability Websites: Floating IPs ensure your website stays online even if the main server has issues. You can seamlessly switch between servers, providing continuous service.
- Disaster Recovery: These IP addresses facilitate quick recovery during server failures, reducing downtime and data loss.
- Smooth Server Updates: Floating IPs let you redirect traffic to another server without downtime when upgrading or maintaining servers.
- Load Balancing: Distribute incoming traffic across multiple servers for better performance. Floating IPs enable easy redirection, optimizing server loads.
- Flexible Application Testing: You can easily test new applications on different servers using the same Floating IP. This allows you to easily switch back to the original setup if needed.
- Data Center Migration: Floating IPs simplify transitions during data center movements. Admins can move the IP address to servers in the new location without disrupting services.
- Minimal Failover Time: When transitioning between primary and secondary servers, Floating IPs can help achieve fast failover times.
How to Use Floating IPs
Now that you know the “why” of using Floating IPs, let’s examine how you can use them. In most cases, you can get them from your hosting provider and add them to your server as an extra internet address.
Let’s run this through a scenario where we have two servers, Server A and Server B.
- Server A has the address 212.32.xx.x5 and uses CentOS 8.
- Server B has the address 212.32.2xx.x6 and uses Ubuntu 20.04.
Now, we have a special floating address, 89.149.192.0. Think of it as a switch to reach the websites on Server A or Server B.
Set up the Floating IP Address in the Leaseweb Customer Portal
To set up the Floating IP Address in the Leaseweb customer portal, visit the portal and follow these steps:
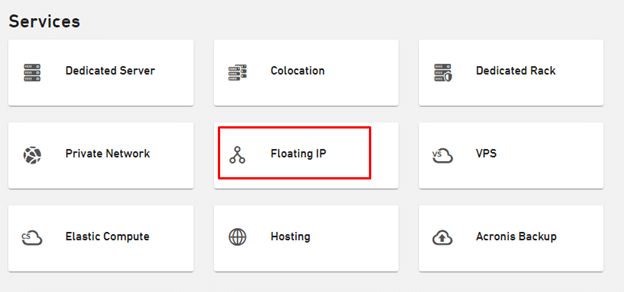
Step #1: Click Floating IP” in the Dashboard.
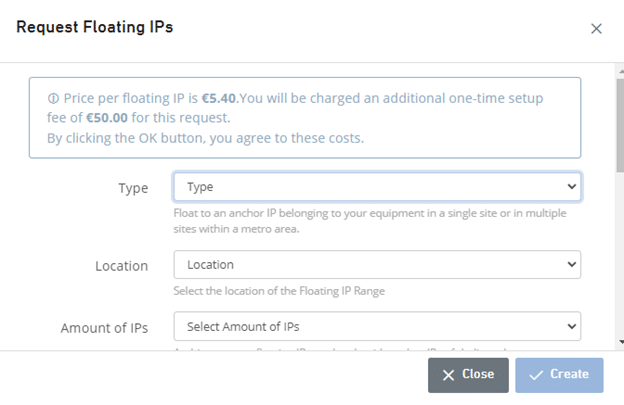
Step #2: Now, click the Request Floating IPs button on the Floating IPs page.

Step #3: On the Request Floating IPs page, choose the Type (Metro/Site), pick the location, decide how many IP addresses you need, check the Terms and Conditions box, and click Create.
Step #4: You will receive a confirmation message when the transaction is finalized:
![]()
Note: If you click the Add Floating IP Definition icon next to a Floating IP, you can connect the Floating IP and another IP address called the Anchor (primary) IP. This connection is called a Floating IP Definition.
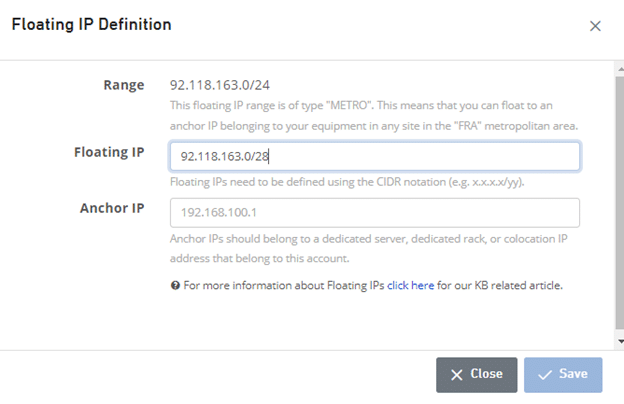
Step #5: Once Floating IP Definition is assigned, save and close it.
Congratulations, you’ve successfully set up the Floating IP Address in the Leaseweb Customer Portal.
Set up the Floating IP Address on the Servers
Setting up a Floating IP on a server is as simple as adding an extra internet address. Unlike regular setups, you don’t need a gateway address, and the subnet mask is always a specific 255.255.255.255, which makes it uniquely reachable.
Start by viewing the IP address of the server with the following command:
# sudo ip -4 address show
Next, add a Floating IP without making a permanent change:
# sudo ip address add <Floating IP address>/32 dev <Device>
Now, you can ping this Floating IP address to see that it is active.
Next, add the same Floating IP address to server B.
Adding Floating IP to Server A (CentOS)
Use the following commands to add the Floating IP to Server A and set up a basic webpage:
# Check which device to add the IP address to
ip -4 address show
ip address add 89.149.192.0/32 dev eno1
# The Floating IP address should now be visible on the device
ip -4 address show
# Install a web server and create a basic default webpage
yum install -y httpd
systemctl start httpd
# Content for the web page
cat <<EOF > /var/www/html/index.html
<!DOCTYPE html>
<html>
<head><title>This is test server A</title></head>
<body><h1>This is test server A</h1></body>
</html>
EOF
Adding Floating IP to Server B (Ubuntu)
Use the following commands to add the Floating IP to Server B and set up a basic webpage:
# Check which device to add the IP address to
ip -4 address show
ip address add 89.149.192.0/32 dev ens3
# The Floating IP address should now be visible on the device
ip -4 address show
# Install a web server and create a basic default webpage
apt update
apt install -y apache2
systemctl start apache2
# Content for the web page
cat <<EOF > /var/www/html/index.html
<!DOCTYPE html>
<html>
<head><title>This is test server B</title></head>
<body><h1>This is test server B</h1></body>
</html>
EOF
Testing the Floating IP
Now, when you enter the Floating IP 89.149.192.0 in your browser, you will easily be able to access web content from either Server A or Server B.
How to Delete Floating IPs
When working with Floating IPs, remember that you can only assign them to one server at a time. So, if you want to use the Floating IP on a different server, you need to first unassign it from the current server and then assign it to the new one.
If you do not need a specific Floating IP anymore, you can delete it. However, remember that deleting a Floating IP can’t be undone. If you plan to use the same IP address in the future, you should consider keeping the Floating IP and don’t use it.
To delete a Floating IP, follow these easy steps:
- Log in to your server management interface.
- Locate the Floating IP settings.
- Choose the Floating IP you want to delete.
- Look for the Delete’ or ‘Remove’ option and confirm.
- Remember, the Floating IP is gone for good once deleted.
Conclusion
So, in a nutshell, Floating IPs are a smart way to ensure you’re always reachable on the internet, no matter what happens to your computers. Whether setting up backup servers, preparing for unexpected hiccups, or making your applications smooth, they are a must-have tool.
They act as a connection between your main and backup servers, ensuring everything runs seamlessly. This helps your servers talk to each other quickly and ensures your services keep going without interruptions.
Understanding how Floating IPs work and following the setup steps lets you make the most of this powerful tool, guaranteeing your systems stay reliable and adaptable in all situations.
If you’re looking for a reliable hosting provider to help you with Floating IPs and dedicated servers, consider RedSwitches. We can assist you in making the most of this technology to ensure your website or application stays accessible, even when changes are needed. So, don’t hesitate to contact RedSwitches and enhance your server’s capabilities with Floating IPs.
Explore our bare metal server, instant dedicated server, 10 Gbps dedicated server, and dedicated server hosting solutions to upgrade your hosting experience. Your online presence will thank you for it!
FAQs
Q. What is a Floating IP?
A Floating IP is a flexible internet address that can be moved between servers within a network. It is a dynamic tool for rerouting traffic, enabling seamless transitions between servers. It ensures continuous online accessibility even during server maintenance, upgrades, or hardware failures.
Q. How do I create a new Floating IP?
To create a new Floating IP for your server in the cloud or on a dedicated host, you can use the floating IPs API provided by your hosting provider. Alternatively, you can manually configure it on your server’s operating system. Following are the steps to do so:
- Access your server management interface.
- Locate the Floating IP settings.
- Choose the option to create a new Floating IP.
- Specify the server to associate with the Floating IP.
- Confirm and save the changes.
Now, you have a new Floating IP ready to be used with your designated server.
Q. How do I manage Floating IPs for load balancing?
To manage Floating IPs for load balancing, access your server management interface, assign the Floating IP to the designated load balancer, and configure rules for optimal traffic distribution across servers.
Q. What is a failover scenario in server management?
A failover scenario is like having a backup server ready to take over if the central server has a problem, ensuring continuous online service without interruptions. It is crucial in server management because it minimizes downtime. If one server faces issues, the failover ensures a quick switch to another, maintaining a smooth and uninterrupted online experience for users.
Q. Can I use a Floating IP as a virtual IP address for failover scenarios?
You can use a Floating IP as a virtual IP address, particularly in failover scenarios. It plays a critical role in maintaining network address translation and automatically routing incoming traffic to the appropriate server.
Q. What is the relationship between a Floating IP and a primary IP in load balancing?
The relationship between a Floating IP and a primary IP in load balancing is like having a dynamic address (Floating IP) that can quickly switch between different servers, including the primary one. It allows for flexible traffic distribution, ensuring optimal performance and reliability across multiple servers.
Q. Can I use a single Floating IP address for multiple servers using a load balancer?
No, a single Floating IP address can be assigned to only one server at a time. If you need to distribute incoming traffic to multiple servers, you should configure a load balancer to manage a pool of IP addresses for load balancing and high availability.
Q. How do I configure a Floating IP in Linux and route incoming traffic?
To configure a Floating IP in Linux and route incoming traffic, you can use the operating system’s network configuration commands like “ip” or “ifconfig.” This is crucial for managing external IP addresses and load balancing.
Q. What is a Floating IP range, and how does it relate to additional IP addresses?
A Floating IP range refers to a pool of IP addresses that can be dynamically assigned, making it helpful in managing additional IP addresses in your network. These IP addresses can be utilized for various purposes, including failover setups and routing incoming traffic.
Q. Can I use a Floating IP address for secure remote access to my server in a public cloud environment?
You can use a Floating IP address to ensure secure and reliable remote access to your server, particularly in a public cloud environment. This static IP address simplifies incoming traffic management and allows easy external access to your server’s resources.
