If you look closely, the Docker file lies at the heart of the Docker platform. It defines the blueprint for the containerized applications that the platform uses to build the containers. Given their importance, working with Dockerfiles is a critical aspect of ensuring that the container hosting the application is able to perform as intended.
When working with these files, you often encounter ADD and COPY, two similar-sounding commands. These instructions may seem interchangeable at first glance. However, as you dig deeper, you’ll see significant differences between them and how these commands can significantly impact the effectiveness of your Docker builds.
In this comprehensive discussion on Docker ADD vs COPY, we will delve deep into the nuances of the ADD and COPY docker commands. We will first discuss these commands individually and then sign off with a short discussion on which command to pick in a specific scenario.
Table Of Contents
- Prerequisites
- What is the Docker ADD Command?
- What is the Docker COPY Command?
- Docker ADD vs. COPY
- Docker ADD vs COPY: How to Pick the Right Command
- Conclusion
- FAQs
Let’s start with a look at the prerequisites of Docker ADD and COPY commands.
Prerequisites
Before diving into the Docker ADD vs COPY debate, it’s essential to have:
- A basic understanding of Docker and containerization concepts.
- Docker on the system.
- Familiarity with Dockerfile (the script containing commands to assemble a Docker container image) syntax.
What is the Docker ADD Command?
The ADD command in Docker is used to copy files from a specified source location to a destination in the Docker image. It serves two primary functions:
- Copy local files from the host machine into the Docker image.
- Download files from a remote URL and add them to the Docker image.
How to use Docker ADD
The ADD command in Docker is pretty straightforward. You use ADD to copy files from one place (the source) to another (the destination) in your Docker image.
The basic command syntax is:
ADD [source] [destination]
Here, [source] is where your file is right now, and [destination] is where you want to put it in the Docker image.
Remember that if your source is a folder, ADD will copy everything inside it, including all the file details.
Here are the most common use cases for the Docker ADD command:
The Standard Syntax
ADD /source/file/path /destination/path
This command takes a file from /source/file/path on your computer and adds it to /destination/path in the Docker image.
Getting Files from the Internet
Docker ADD is used to grab files from the Internet. The command syntax is:
ADD http://source.file/url /destination/path
Working with Compressed Files
ADD has a neat trick with compressed files. If you have a .tar.gz file (or other recognized compressed formats like gzip, bzip, and xz), ADD will not only copy it but also unpack it for you.
The following syntax will copy the TAR archive and extract all its contents into the /tmp directory in the Docker image:
ADD source.file.tar.gz /tmp
Note that you can’t use Docker ADD to download and unpack a compressed file directly from the Internet. It only unpacks files that are already on the local machine.
As you can see, Docker ADD is a versatile command that helps you copy files from your computer or the web into your Docker image and can even handle unpacking of supported compressed local files in the Docker image.
What is the Docker COPY Command?
The Docker COPY command addresses some limitations of the Docker ADD command and simplifies copying content into a Docker image.
In practical terms, the Docker COPY command is simpler than Docker ADD. It takes files and directories from one place (like the local system ) and duplicates them into a specified location in your Docker image.
However, unlike the Docker ADD command, Docker COPY doesn’t do anything special with the files and directories. For instance, if you give it a compressed file, it won’t unpack it. Instead, it will copy it to the destination exactly as it is.
Similarly, the Docker COPY command only works with the local files and directories and doesn’t download anything from the Internet.
How to use Docker COPY
Let’s see the Docker COPY command in action.
The Standard Syntax
The basic syntax of the Docker COPY is pretty simple:
COPY [source] [destination]
When the command is executed, it takes the files or directories from the [source] and puts them into the [destination] inside the Docker image.
Copy a File From the Local System to a Docker Image
Use the following command syntax to take a file located at /source/file/path on the local system and copy it to /destination/path in your Docker image.
COPY /source/file/path /destination/path
Copy a Local Directory to a Docker Image
As mentioned above, the Docker COPY command takes everything in a local directory and copies them to the Docker image. For instance, the following command will copy the contents of the local directory to the /application directory inside the Docker image.
COPY . /application
The Docker COPY is the standard command for copying files from the local system to the target Docker image without any extra steps like unpacking archives or downloading from online sources.
Docker ADD vs. COPY
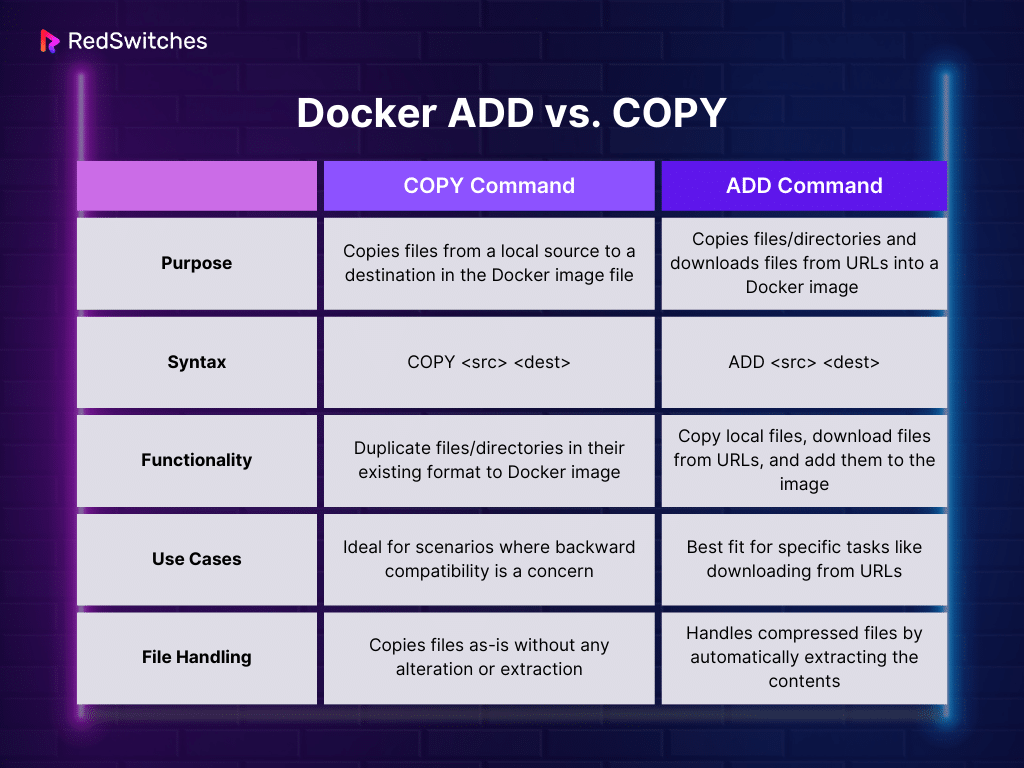
The Docker ADD vs COPY is essentially a comparison between two commands used to move and add content to the Docker image file. On the surface, both commands seem to move content to the Docker image file. However, there are subtle differences in how these commands work.
Docker ADD
This command is used for copying files and folders from a specific location into a Docker image. It has some additional functionalities, like accessing and downloading external files from the Internet and automatically unpacking supported compressed files.
Docker COPY
This command has a much narrower focus than the Docker ADD command. It’s used for copying directories (and all their contents) from the local system into a Docker image.
Unlike Docker ADD, it doesn’t unpack compressed packages or access/download files from URLs. It simply copies the files exactly as they are.
So, the Docker ADD vs COPY debate is all about understanding the differences between these two commands and picking the right fit for a particular requirement for adding files to the Docker image file.
Docker ADD vs COPY: How to Pick the Right Command
When Docker first introduced the COPY command, it was clear they wanted to keep the ADD command for specific use cases. Docker’s guidelines suggest using COPY over ADD in most cases.
COPY Over ADD
Docker recommends using COPY because it’s simpler and has a narrow focus that prevents the introduction of errors in the Docker image file. It’s like choosing a basic tool over a complex one when the basic tool does the job well.
COPY is the way to go if you’re just moving files from your computer into a Docker image file. It does this job without any additional fuss.
Docker advises not to use ADD to download files from the internet. If you need to download something, it’s better to use commands like wget or curl inside a RUN command. This approach is more efficient and keeps your Docker image size smaller.
Let’s run through an example scenario where you want to download an archive file, extract it, and clean it up afterward.
You might start by using Docker ADD in the following syntax:
ADD http://source.file/package.file.tar.gz /temp
RUN tar -xjf /temp/package.file.tar.gz \
&& make -C /tmp/package.file \
&& rm /tmp/package.file.tar.gz
A much better way to accomplish this scenario is to use RUN and curl:
RUN curl http://source.file/package.file.tar.gz \
| tar -xjC /tmp/ package.file.tar.gz \
&& make -C /tmp/package.file.tar.gz
When to Use ADD
The only time you really need ADD is if you have a local compressed file that you want to extract directly into your Docker image.
Conclusion
Understanding the main points in the Docker ADD vs COPY is crucial for writing efficient Docker image files. While ADD offers more features, COPY is often the better choice for its simplicity and predictability.
When working with containerized applications, choosing a reliable hosting provider like RedSwitches Bare Metal Hosting can significantly enhance performance and reliability. We offer the best dedicated server pricing and deliver instant dedicated servers, usually on the same day the order gets approved. Whether you need a dedicated server, a traffic-friendly 10Gbps dedicated server, or a powerful bare metal server, we are your trusted hosting partner.
FAQs
Q. Is ADD better than COPY because it has additional features?
Not necessarily. The best choice depends on the specific needs of your Dockerfile. COPY is often preferable for its simplicity.
Q. What is the difference between Docker COPY and ADD commands in a Dockerfile?
The main difference lies in their functionality and best practices. The ADD command can handle URLs and automatically download and extract files, while the COPY command only deals with files and directories from the host machine. Additionally, using the ADD command introduces a layer in the Docker image, whereas the COPY command does not.
Q. When should I use the COPY command in a Dockerfile?
You should use the COPY command when you need to copy files or directories from the host system into the Docker image. We also recommend using it when you want to add locally stored files to the image without introducing an additional layer.
Q. In what scenarios is it best to use the ADD command in a Dockerfile?
The ADD command is suitable for copying files from a URL, downloading and extracting compressed files, or recognizing and accommodating recognized compression formats. The ADD command is also recommended when creating a new layer in the Docker image.
Q. How do I use the COPY command within a Dockerfile?
To utilize the COPY command within a Dockerfile, you should use the syntax “COPY “. This will copy files or directories from the specified source on the host machine to the destination in the Docker image.
Q. When should I use the ADD command instead of the COPY command?
It is advisable to use the ADD command when you want to add files from a URL, unpack them as a directory within the image, or when working with compressed files that need to be extracted during the image build process.
Q. What is the impact of using the ADD command on the number of layers in a Docker image?
When using the ADD command, it introduces a new layer in the Docker image for each run of the command. Therefore, it may impact the overall size and complexity of the image due to the creation of additional layers.
Q. Can the COPY command be used to copy files from a URL?
No, the COPY command is specifically designed to copy files or directories from the host machine into the Docker image and does not support copying files from a URL.
Q. What are the best practices for using the ADD and COPY commands in a Dockerfile?
It is considered a best practice to use the COPY command when working with local files and to avoid introducing unnecessary layers in the image. On the other hand, the ADD command should be used judiciously for specific scenarios, such as downloading and extracting files from URLs or dealing with compressed files.
Q. How does the ADD command handle files and directories from a URL?
The ADD command has the capability to copy files from a URL, download and extract them, and even recognize and deal with recognized compression formats, thereby enabling a more versatile approach compared to the COPY command.
Q. Can I use the ADD and COPY commands interchangeably in a Dockerfile?
While both commands serve the purpose of copying files or directories into a Docker image, it is essential to understand their distinct functionalities and choose the appropriate command based on the specific requirements. It is recommended to use the COPY command for local files and directories and the ADD command for scenarios involving URLs, downloads, and extraction of files.
