
Ask any Ubuntu server administrator, and you’ll find that adding users to the Ubuntu server and managing their access rights is an integral part of the job.
Another critical aspect of user management is that each server can have only one root user. This user account is created when the server OS is first installed. This account is also known as the superuser because it can do anything and access all areas of the server.
In this short tutorial, we’ll walk you through adding users to your Ubuntu server. Next, we’ll discuss how you can manage user privileges. Finally, we’ll discuss how to remove users from the Ubuntu server.
But let’s start the discussion with the need for adding non-root users and the dangers of the super user account.
Table Of Content
- Why Do You Need Non-root Users on Your Ubuntu Server
- Prerequisites
- How to Add Users to Ubuntu
- How to Add New User To the Sudo Group
- Explicit User Privileges Configuration in /etc/sudoers
- Testing a User’s Sudo Privileges
- How to Delete Users From The Ubuntu Server
- Conclusion
- FAQs
Why Do You Need Non-root Users on Your Ubuntu Server
Although the root user has unrestricted access to a server and its users, relying solely on it can pose risks and potentially lead to unintended damage.
That’s because if this account gets compromised, the hackers will have unrestricted access to everything on the server.
Security experts suggest you create a non-root user and assign it superuser privileges to perform server administration tasks. This adds a layer of security because the hackers now have to work hard to guess the username and password for this non-root account.
Fortunately, Adding a user in Ubuntu is a simple process that involves creating a new user account with specific privileges and access rights.
On Ubuntu servers, sudo is a simple yet powerful tool for managing operations that require administrator rights. It allows non-admin users to execute a command that requires admin rights.
Prerequisites
To add users to the Ubuntu server or create new users, you’ll need an Ubuntu 20.04 Server and an account with root access.
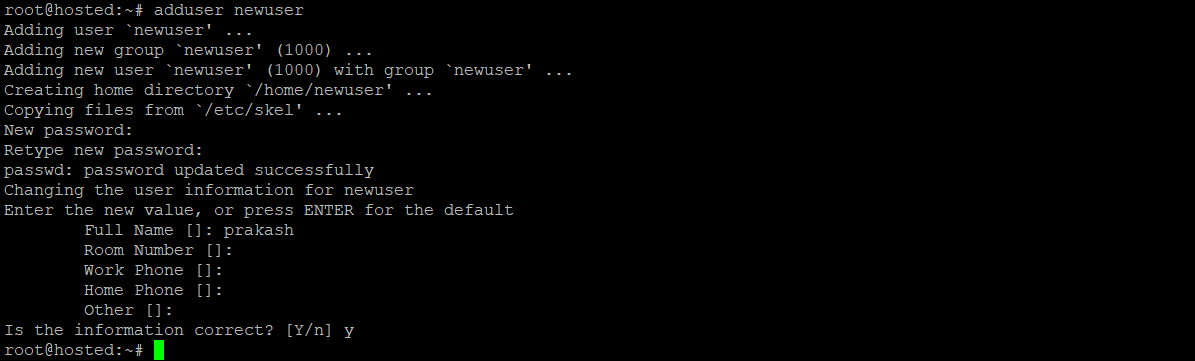
How to Add Users to Ubuntu
Important: Before adding and assigning users privileges, you should be logged in as the super user or a user with sudo privileges.
Now that you’re logged in with the proper credentials, you can create a user with the help of the following command.
$ adduser newuser
Alternatively, if you have non-root access with sudo rights, run the following command to add a new user:
$ sudo add user newuser
Creating users is an interactive process, and you’ll be asked for the below details.
- Assign and confirm the new user’s password you are trying to add.
- Enter the required details about the new user. If you wish, you can skip the unwanted field by pressing ENTER.
- At the final step, verify the details, and continue by pressing Y if the details are correct.
Your new Ubuntu user is ready to use and can be accessed using the newly added password.
Granting Sudo Privileges to the New User
If you wish to grant administrative rights to this new user, you can carry out the additional steps.
You might need to grant sudo access to the newly added user so that the user can run commands that require root privileges.
You can assign root privileges in the following two ways:
- By adding the new user to a predefined sudo user group
- By specifying root privileges in sudo’s set up on a per-user basis.
How to Add New User To the Sudo Group
By default, on a Ubuntu server, sudo grants full permission to any user in the sudo group.
For starters, use the groups command to discover the new user’s group.
$ groups <newuser>
Often any new user is assigned to the newuser group.
Output

newuser : newuser
This happens because, by default, the adduser command assigns a new user to their group. That’s why you see the same username and the groupname.
To add the user to another group (sudo group in this example), we will use the usermod command:
$ usermod -aG sudo newuser
The -aG flag instructs the usermod command to add the user to the listed groups.
The usermod command can only be used if you have sudo access. This means you can only add users to the sudo group if you have logged in as the root user or with the user with sudo access.
So if you’re not logged in as the root user, use the following command:
$ sudo usermod -aG sudo newuser
Explicit User Privileges Configuration in /etc/sudoers
Rather than adding your recently created user directly to the sudo group, we highly recommend using the “visudo” command.
This command opens a config file called /etc/sudoers in the server’s default editor and allows you to define permission for each user specifically.
Visudo is the recommended method for modifying the “/etc/sudoers” file. It ensures exclusive access during editing and performs a validity check before saving the changes you made.
By utilizing visudo, you prevent multiple simultaneous edits and minimize the risk of misconfigurations that could result in the loss of sudo privileges.
Let’s see this command in action.
Make sure you have root access, and then execute the following command:
$ visudo
As always, if you are logged in as a non-root user with sudo rights, add the sudo prefix to the command:
$ sudo visudo
Visudo traditionally opens /etc/sudoers in the standard vi editor, which can perplex inexperienced users. However, the command opens up the Nano editor on the new Ubuntu versions. This provides a more comfortable and easy-to-edit experience.
In the editor, look for the line similar to the following:
root ALL=(ALL:ALL) ALL.
And add the following line right underneath. Be very careful and remember to replace newuser with the actual username of the new account. Now, the line will look like this:
root ALL=(ALL:ALL) ALL

newuser ALL=(ALL:ALL) ALL
Continue to add a new line (similar to the one with newuser) for each user that should have full sudo access.
When you’re done, save and close the file by clicking CTRL + x + y, and finally, ENTER to confirm.
Testing a User’s Sudo Privileges
At this point, the new user has sudo privileges and can now run commands with root privileges.
When you log in as the new user, you can run commands that don’t require sudo rights by typing commands in the following format:
$ some_command
However, if you need to run commands that require root privileges, you can run the commands in the following format:
$ sudo some_command
When you enter commands with sudo prefix, you will be requested to enter the password for the user account you are currently logged in.
How to Delete Users From The Ubuntu Server
From a security point of view, you should always delete old and inactive accounts. When removing users, remember that it is possible to remove a user account without removing their files. So, if you wish to delete a user completely, you should remove the account and the home directory.
Use the following command to delete a user without removing any of their files:
$ deluser newuser

If you’re logged in as a non-root user, remember to add sudo before the command:
$ sudo deluser newuser
Continuing the process, if you wish completely remove the user’s home directory after the user is deleted, run the following command as root:
$ deluser --remove-home newuser
For non-root users with sudo rights, the command should be as follows:
$ sudo deluser --remove-home newuser
The final step of the process is to remove the sudo privileges for the deleted user. This step requires removing the appropriate line using the visudo command:
$ visudo
root ALL=(ALL:ALL) ALL

newuser ALL=(ALL:ALL) ALL # DELETE THIS LINE
This will prevent any new user with an identical name from getting sudo access by mistake.
Conclusion
As you saw, you can easily add users and create new accounts on an Ubuntu 20.04 server. By implementing efficient user management practices, you can allocate specific access levels to users, ensuring they have the necessary privileges to carry out their tasks while maintaining security.
At RedSwitches, we help Ubuntu server admins set up their servers to manage users efficiently. Contact our support engineers and see how our bare metal dedicated servers can help add to your operations.
FAQs
Q: How can I list all users in Ubuntu?
A: To list all users in Ubuntu, you can use the cut and grep commands together.
Here’s the command you can use:
# cut -d: -f1 /etc/passwd | grep -vE “^(root|halt|sync|shutdown)”
This command will display a list of all non-system users on your Ubuntu system.
Q: How to create an Ubuntu server user without a home directory?
A: Using the no-create-home option, you can create a user without a home directory. This is useful when creating system users or service accounts that do not require a home directory.
Q: What is the sudo command?
A: The sudo command is a utility used in Linux and Unix operating systems to allow users to run programs with the security privileges of another user, such as the root (superuser). It’s typically used to elevate permissions so that a user can perform tasks that require root access. This can be extremely helpful when attempting to carry out administrative tasks without logging into the root account. This makes it a powerful tool for system administrators, allowing them to grant or restrict access to certain system functions and files.
