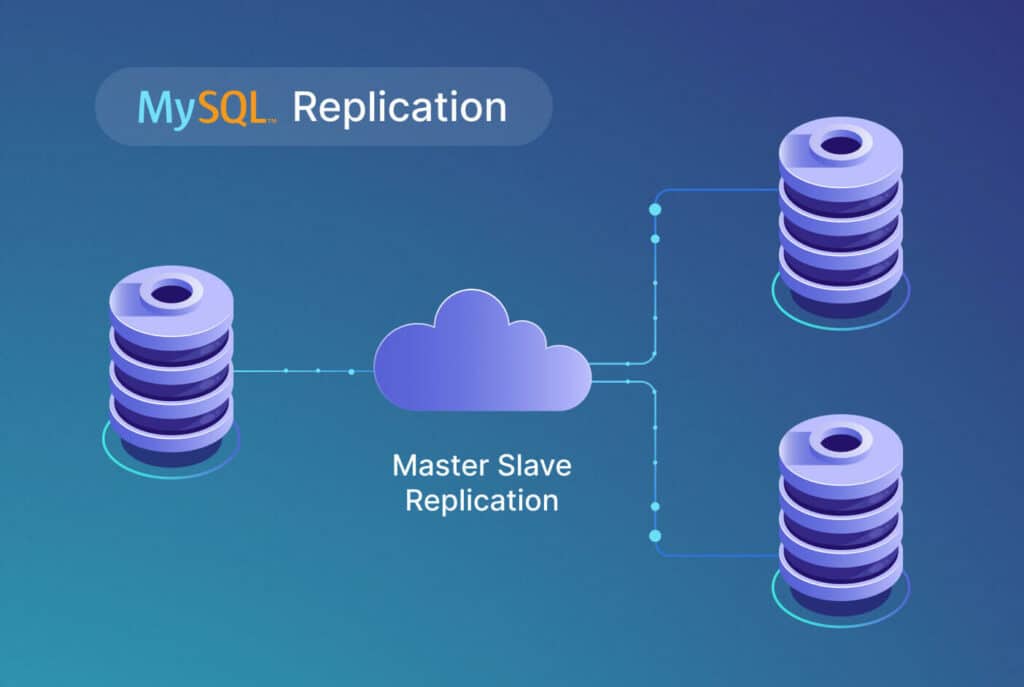
MySQL Master-Master replication is the process in which a data set stored on a server is copied to another server. During the process, data is generally copied between servers.
The whole point of MySQL Master-Master replication is to add redundancy and increase efficiency when accessing data. Database clustering is particularly useful for building high availability solutions for web apps and SaaS products.
What is MySQL Master-Master Replication?
MySQL Master-Master replication is also known as “mirror” because both servers update the data in real-time to ensure that both servers have the latest version of the data. While this set up could be costly to set up, the benefits it brings in terms of redundancy, availability, and application uptime.
Since both servers are Master, they can have slave nodes that you can use to support various aspects of the application set up. For instance, you can connect different services to each Master (and the associated slave nodes) to better optimize project set up and optimization.
Benefits of Data Replication
Data Replication is an important concept in database administration because it is directly tied to data security. In this context it is important to understand that data replication is simply the process of maintaining multiple copies of the data at separate locations.
This practice comes with several important benefits such as better performance, enhanced data security, and data durability (an important concept when it comes to data warehousing).
Additional benefits that data replication brings to the table are:
- Increased reliability on data so that you have a higher degree of confidence in using the data in your applications
- Improved performance of transactional commits
- Better data access and read performance
- Greater degree of data stability
- Data replication is a great help in data recovery
Now that you have a clear idea of what MySQL Master-Master replication is and its benefits, it’s time to show how you can set up MySQL Master-Master replication. Let’s begin with the process prerequisites.
Prerequisites
The process of MySQL Master-Master replication requires two servers.
You don’t have to be very specific about these servers. In fact, you can opt for any configuration from VPS, bare metal servers, or managed hosting. You simply need to make sure that the servers have different IP addresses. Another important requirement is that the servers should support the same version of MySQL Server (we highly recommend version 5.1 and above).
You can name these servers anything. For the purpose of this article, we’ll call them Server A and Server B.
The Process of MySQL Master-Master Replication
We’ll now go into the major details of the process of setting up MySQL Master-Master replication.
Blazing Fast Speed and Fully Managed Server Like Never BeforeGet a Pre-Optimized Dedicated Server
Step 1. Edit MySQL Configuration
Start by editing the MYSQL configuration file /etc/mysql/my.cnf or /etc/my.cnf.
We’ll enter the following settings for the both servers. You might also need to replace the existing lines if you find them in the file.
Server A
[mysqld]
server-id=1
log-bin="mysql-bin"
auto-increment-offset = 1
Server B
[root@mysqlb ~]# vi /etc/my.cnf
[mysqld]
server-id=2
log-bin="mysql-bin"
auto-increment-offset = 2
Once you have edited the files, save them.
Next, restart the MySQL services on both the servers with the following command:
# sudo systemctl restart mysqld
Step 2. Create the Replicator User(s)
The next step is about creating a user with the name replicator on both servers. We’ll use the MySQL shell for the commands.
Start by logging into the MySQL shell on both servers with the following command:
# mysql -u root -p
After the login, we’ll create the user.
Important: Remember to replace x.x.x.x with the IP address of the other server and use a strong password.
The commands for creating the user are different for MySQL versions.
MySQL8 and Above
> CREATE USER 'replicator'@'x.x.x.x' IDENTIFIED BY 'password';
> GRANT REPLICATION SLAVE ON *.* TO 'replicator'@'x.x.x.x';
Below MySQL8
> GRANT REPLICATION SLAVE ON *.* TO 'replicator'@'x.x.x.x' IDENTIFIED BY 'password';
Once you’ve run the commands on both the servers, the user Replicator would be created on the servers.
Next, test the configuration with the following command. Remember to replace x.x.x.x with the IP address of the opposing server:
mysql -u replicator -p -h x.x.x.x -P 3306
This command will connect the current server with the MySQL instance on the other server.
Step 3. Configure Replication from Server A to Server B
Now that we’ve set up everything, we can proceed with the replication process.
We’ll now start by replicating all the commands on Server A to Server B.
On Server A, run the following command to get the status of the master MySQL node.
# mysql> SHOW MASTER STATUS
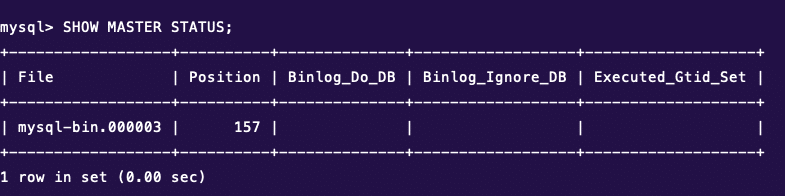
In the status, you should make note of the file and position.
Now on Server B, we’ll set up the master to master replication. Note that before running the command, we’ll stop all slave nodes attached to Server B.
In the MySQL shell on Server B, run the following commands:
mysql> STOP SLAVE;
mysql> CHANGE MASTER TO MASTER_HOST = 'IP ADDRESS OF SERVER A', MASTER_USER = 'replicator', MASTER_PASSWORD = 'password', MASTER_LOG_FILE = 'mysql-bin.000003', MASTER_LOG_POS = 157, GET_MASTER_PUBLIC_KEY=1;
mysql> START SLAVE;
Important: In the second command, remember to replace the IP address of Server A, add the password for the user Replicator, and the file name and position you got from the Server A status command.
Step 4. Configure replication from Server B to Server A
Now that the replication from Server A to Server B is complete, we’ll set up the other side of the process.
The process would be similar to the previous step where we got the status of the server and then ran the commands on the other server to complete the two-way replication.
On Server B, run the following command to get the status of the master MySQL node, and note the file name and position.
# mysql> SHOW MASTER STATUS
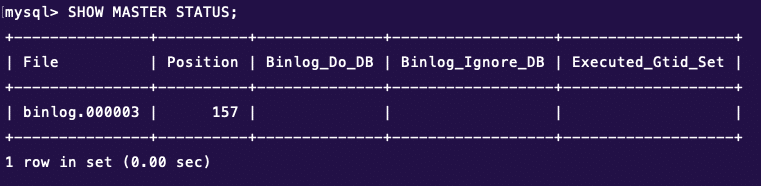
Now on Server A, run the following commands. Remember to place the values for Server B’s IP address, password for the user replicator, and the values for position and file name.
mysql> STOP SLAVE;
mysql> CHANGE MASTER TO MASTER_HOST = 'IP ADDRESS OF SERVER B', MASTER_USER = 'replicator', MASTER_PASSWORD = 'password', MASTER_LOG_FILE = 'binlog.000003', MASTER_LOG_POS = 157, GET_MASTER_PUBLIC_KEY=1;
mysql> START SLAVE;
Run the following command to get the status of the master MySQL node.
# mysql> SHOW MASTER STATUS
Step 5: Restart The Services
In the final step, we’ll restart the services on both servers to make sure the latest version of configuration files are in use.
Test the Replication
At this point, we’ve set up the MySQL Master-Master replication. Now, we’ll test the process by creating a database and inserting a row.
In this process, we’ll create the database on Server A and then create a table. Next, we’ll add a row.
On Server A, run the following commands:
create database test;
create table test.flowers (`id` varchar(10));
Now to test if the MySQL Master-Master replication is successfully in place, check the database on Server B. with the following command Server B:
show tables in test;
If the process has been successful, you’ll see the table and the row you inserted in the database on Server A on Server B.
Conclusion
RedSwitches offers the best dedicated server pricing and deliver instant dedicated servers, usually on the same day the order gets approved. Whether you need a dedicated server, a traffic-friendly 10Gbps dedicated server, or a powerful bare metal server, we are your trusted hosting partner.
This guide presented the process of MySQL master master replication. With this process, you can achieve better reliability and redundancy for your projects. The process of implementing MySQL Master Master replication we described here is pretty standard and you can optimize it for your particular scenario. Let us know how you implemented this process and how was your experience?
