
MySQL is a popular open-source relational database management system (RDBMS) for storing, managing, and manipulating data.
MySQL allocates users various rights that control how they interact with the database. For instance, users can execute multiple actions (creating tables, editing data, and performing queries) depending on their degree of permission.
However, before users may access a MySQL database, the standard procedure in MySQL is to create a user. That’s the topic of this short tutorial. First, we’ll cover the MySQL create user process with an in-depth discussion of the MySQL CREATE USER statement. Then, we will also go through several examples of the CREATE USER statement.
Let’s start with the prerequisites.
Table Of Content
The Prerequisites of MySQL Create User
Creating new users in MySQL is a simple process that has the following prerequisites:
Access to a MySQL Server
You must have access to a MySQL server, either locally or remotely, and the necessary administrator rights.
Use a MySQL Client
You must install a MySQL client on your device to connect to the MySQL server and execute the appropriate commands. Popular MySQL clients include the command-line interface (CLI), MySQL Workbench, and phpMyAdmin.
Credentials for the User
You’ll need a username and password for the new user you wish to create. You should always select a strong password that satisfies the MySQL password requirements.
Basic Understanding of MySQL Operations
You need a basic understanding of how MySQL user privileges function. This will assist you in deciding what degree of access to provide the new user. In addition, you should also finalize whether the user can access the entire database or just specific tables.
Also Read: 3 Simple Methods to Delete Duplicate Rows in MySQL Database
How to Create a User in MySQL
Now that you have fulfilled the list of prerequisites let’s dive into the process of creating a new user in MySQL.
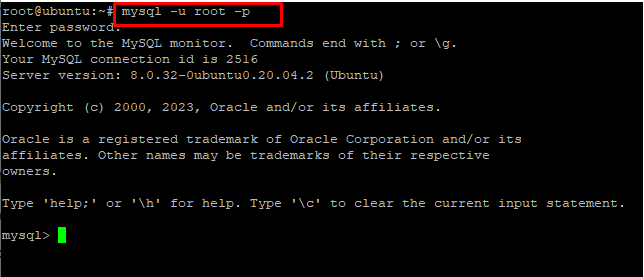
Step # 1: Connect to the MySQL Server
Use the following command to connect to the MySQL server. You’ll see the mysql> prompt that indicates that you’ve successfully logged into the MySQL server.
mysql -u root -p
Step # 2: Create a New User
After logging in to the server, we’ll use the CREATE USER command to create a new user. Note that you must provide the username and password for the user. Here’s the syntax of the command:
CREATE USER 'username'@'localhost' IDENTIFIED BY 'password';
Remember to replace “username” and “password” with the actual credentials.
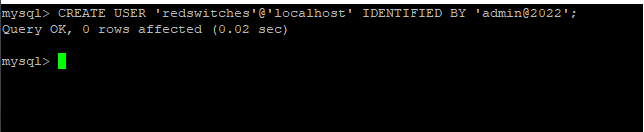
For instance, you can use the command to create a user with the username “redswitches” and the password “admin@2022”.
As you can see, you’ll get the OK response if the command has been successfully executed.
CREATE USER 'redswitches'@'localhost' IDENTIFIED BY 'admin@2022';
Step # 3: Grant Privileges to the User
After creating a user, you must provide appropriate permissions to access and administer MySQL databases.
We’ll use the GRANT command to give privileges to a user. This command also includes the rights the user has for a specific database.
Here’s the syntax of the command:
GRANT [privileges] ON [database].[table] TO 'username'@'localhost';
Remember to replace [privileges], [database], and [table] with the proper values in this command.
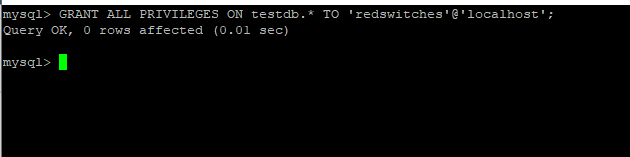
For example, you may use the following command to grant all rights on the “testdb” database to the user “redswitches”:
GRANT ALL PRIVILEGES ON testdb.* TO 'redswitches'@'localhost';
Step # 4: Flush Privileges
After providing appropriate rights, you must flush the privileges to ensure the changes take effect. To flush the privileges, use the FLUSH PRIVILEGES command:
FLUSH PRIVILEGES;

This command ensures that all previous privileges are removed and the latest privileges are in effect.
Step # 5: Check User Privileges
After creating a user and assigning them access privileges, we highly recommend using the SHOW GRANTS command to verify everything.
Here’s the syntax of the command:
SHOW GRANTS FOR 'username'@'localhost';
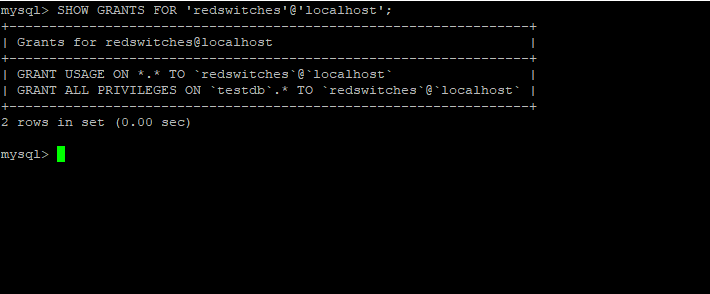
For instance, here’s how you can use the command to verify the rights of the user “redswitches”:
SHOW GRANTS FOR 'redswitches'@'localhost';
As you can see in the following screenshot, the user “redswitches” has the following privileges:
Also Read: How To Rename a Database in MySQL: 3 Easy Methods
Conclusion
In short, creating users in MySQL is a simple but crucial activity for database administrators. This post covered the fundamentals of MySQL create user process and how you can assign privileges using simple MySQL commands. When creating users, you should always be mindful of the security perspective. This includes assigning a strong password and only granting necessary privileges. These two are critical steps in preventing unauthorized database access.
FAQs:
Q: Can I use MySQL create user process to create an account without a password?
A: No. Every user account must be assigned a password.
Q: Can I assign multiple hostnames to a user?
A: Yes, you may assign a user account to numerous hostnames. For instance:
Create the account "username" at "hostname1,hostname2" with the password "password";
Q: Do I have the option to create a user with full access?
A: You can use the following command to create an account with all rights
CREATE USER 'username'@'hostname' IDENTIFIED BY 'password'; GRANT ALL PRIVILEGES ON . TO 'username'@'hostname';
Q: Can a user account be created with restricted access?
A: The “GRANT” command can be used to indicate the permissions you want to provide a user account. For instance:
CREATE USER 'username'@'hostname' IDENTIFIED BY 'password'; GRANT SELECT, INSERT, UPDATE ON database.table TO 'username'@'hostname';
Q: How do I remove a user account?
A: Use the DROP command to remove/delete a user account
DROP USER 'username'@'hostname';
Q: Can I make changes to an existing user account?
A: You can change the details of an existing user account with the ALTER USER command.
ALTER USER 'username'@'hostname' IDENTIFIED BY 'new_password';
