
Popular websites receive considerable traffic.
While this is good for business, the influx of traffic and visitor requests can potentially collapse your applications and servers.
There’s a simple solution to this challenge – load balancing.
As the name suggests, load balancing is a technique for building a network infrastructure that distributes incoming traffic across several backend servers. An immediate outcome is an increase in available server resources. This means your business apps can now handle many more requests faster, even when running on CentOS 8 alternatives.
In practical terms, load balancing provides high availability at the network (TCP – layer 4) and application (HTTP – layer 7) layers. The result is a noticeable improvement in the application speed and performance when comparing operating systems like CentOS vs Debian, by distributing the workload across multiple servers. Because of this boost, you’ll find load balancing in almost all high-traffic websites, such as social media networks and public email platforms.
The good thing is that you can easily set up load balancing using several software components such as HAProxy.
The principal use case for HAProxy is to distribute incoming HTTP(S) and TCP requests from the internet to front-end services that can handle these requests. This tutorial will discuss the idea of load balancing in detail and then demonstrate how to use HAProxy as a load balancer for a typical web application, whether you’re using Rocky Linux vs CentOS as your server operating system.
Let’s start with a detailed look at the idea of load balancing.
Table of Contents
-
- How Load Balancing Works
- Types of Load Balancing
- Load Balancing Algorithms
- Some Fundamental HAProxy Terms
- High Availability
- Health Checks
- Prerequisites to install haproxy on Centos 7
- Installation and Configuration of HAProxy on CentOS 7
- HAProxy Status Dashboard
- Set Up the Logs
- Test the Load Balancer
- Conclusion
- FAQs
How Load Balancing Works
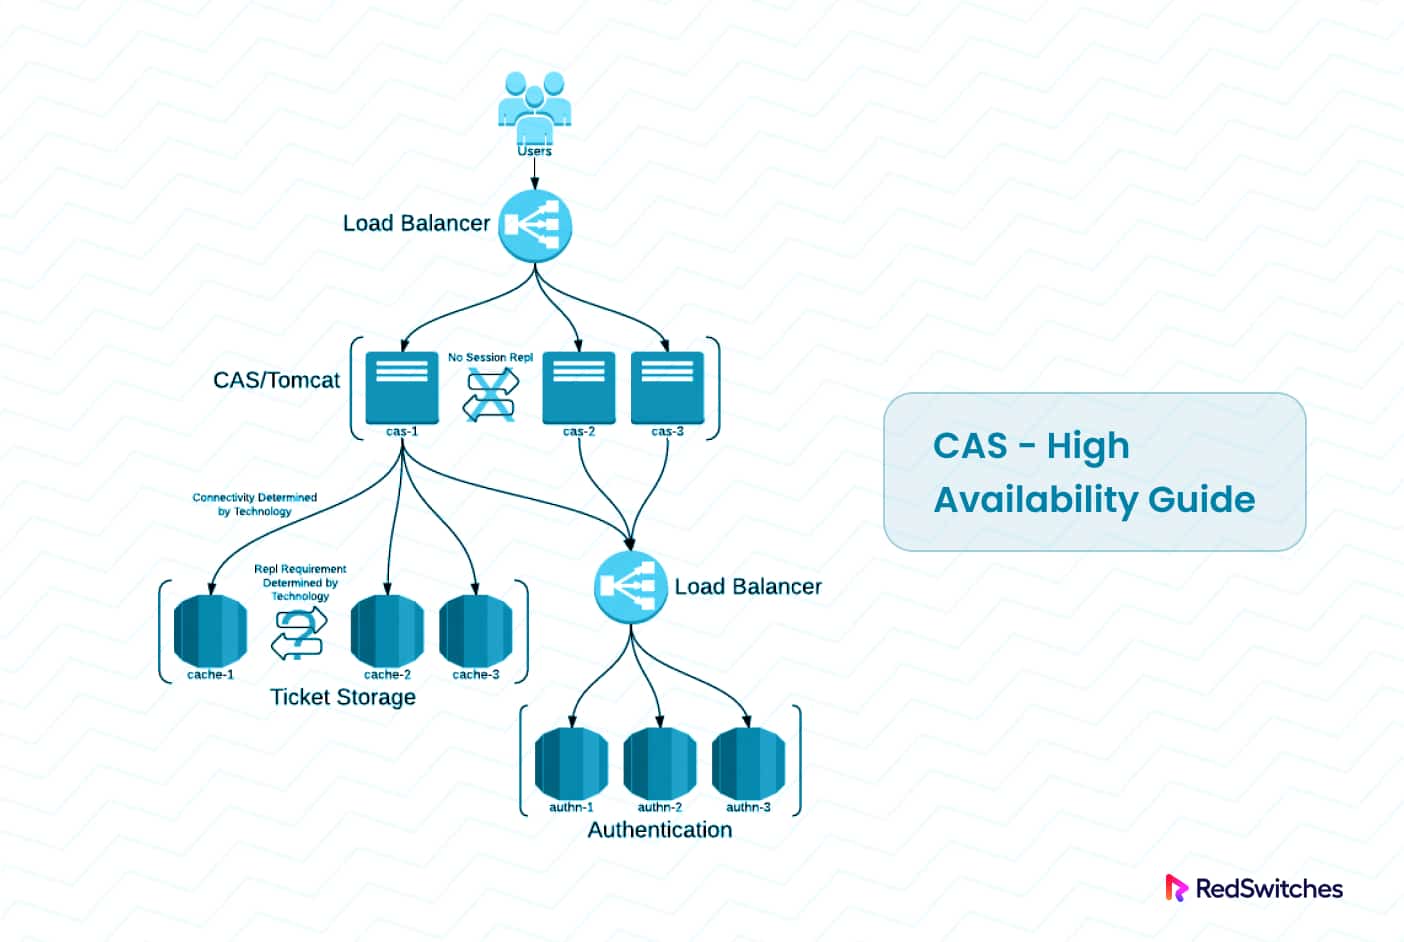
The concept of load balancing is highly adaptable, allowing you to combine various components to suit your specific needs. The following diagram illustrates a typical implementation of this concept, whether you’re working with AlmaLinux or CentOS as your preferred server operating system.
Now that you know the theory behind load balancing solutions, it is time to discuss using High Availability Proxy (HAProxy). This popular load-balancing solution works great with all popular Linux distros, including CentOS 7.
Types of Load Balancing
The idea of load balancing can be implemented in several ways, including the following:
No Load Balancing
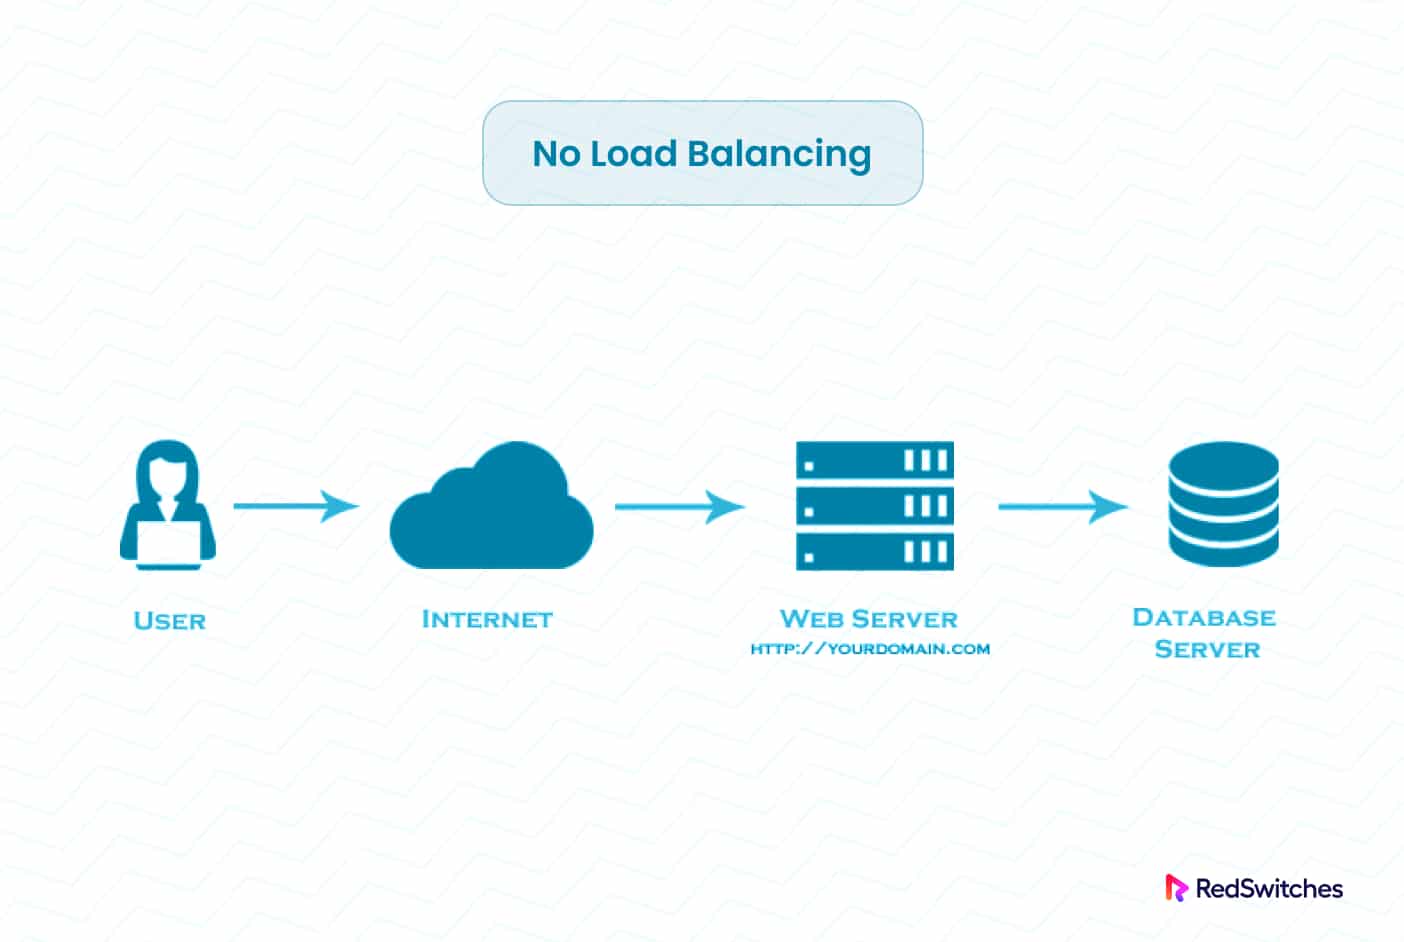
“No load balancing” refers to a situation in which incoming network traffic, requests, or computing burden is not spread equitably among the servers and resources.
Instead, all incoming traffic is sent to a single server or resource without any distribution mechanism.
In this case, the server receiving all the traffic may become overburdened, resulting in performance degradation, longer response times, and an outage, especially when the server is not properly configured on CentOS 7 to handle the strain.
This lack of load balancing can lead to inconsistent resource utilization and decreased overall system resilience.
Layer 4 Load Balancing
Layer 4 load balancing, also known as Transport layer load balancing, occurs at the OSI model’s fourth layer.
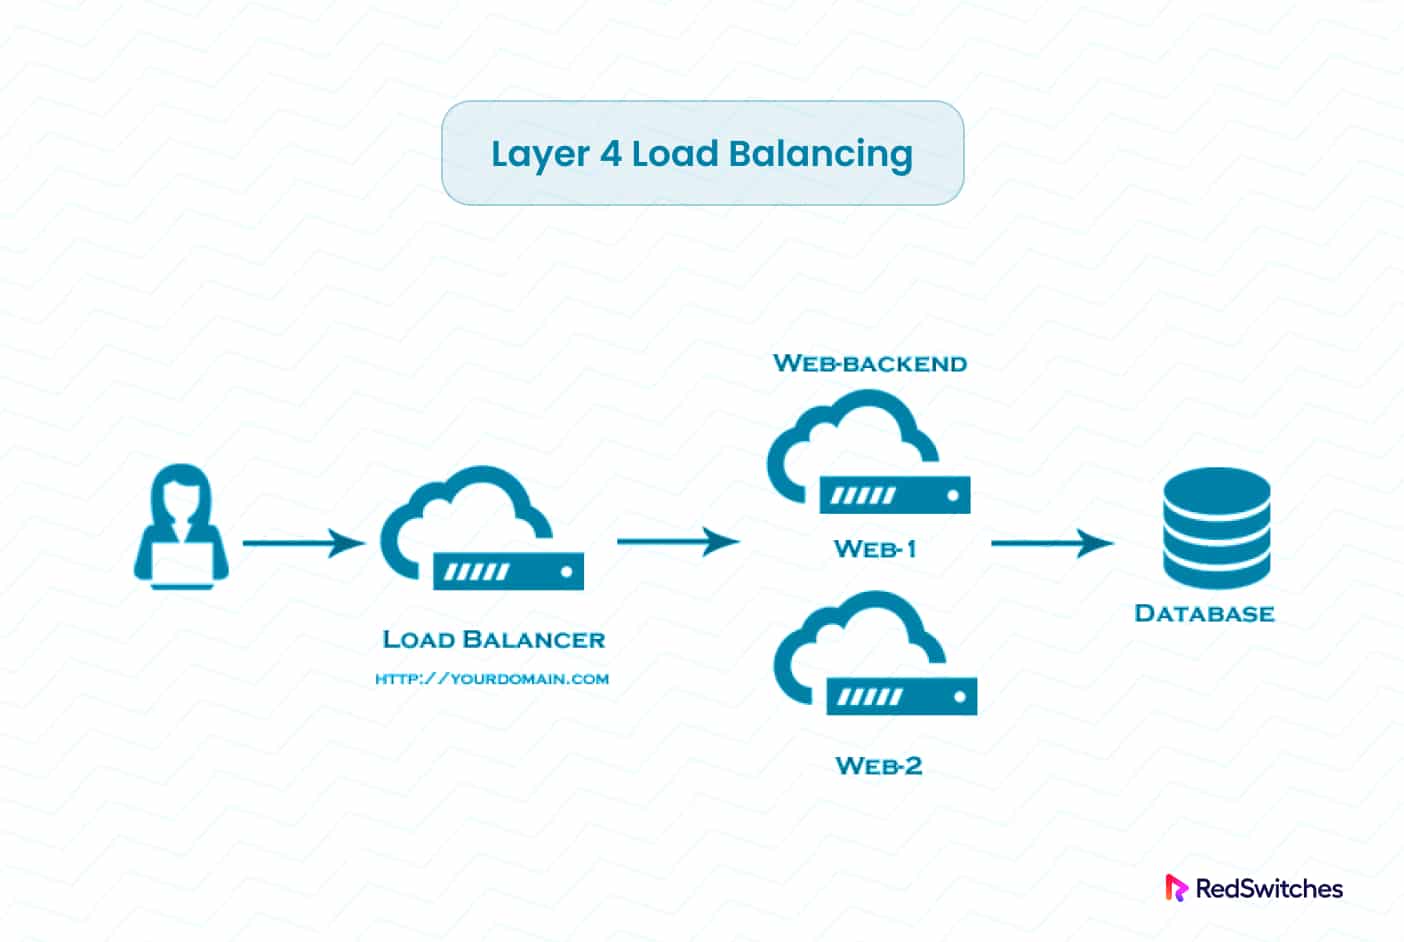
It disperses incoming network traffic based on information accessible in the network protocol stack’s transport layer, such as IP addresses and port numbers. Layer 4 load balancing is widely used, whether you’re using Ubuntu or CentOS, to distribute traffic over different servers or resources, enhancing performance, ensuring high availability, and preventing server overload.
Layer 7 Load Balancing
Layer 7 load balancing, also known as Application layer load balancing, operates at the Application layer of the OSI model. This load balancing type, even when setting up Samba on CentOS, focuses on the transferred data and makes routing decisions based on URLs, HTTP headers, cookies, and other application-specific data
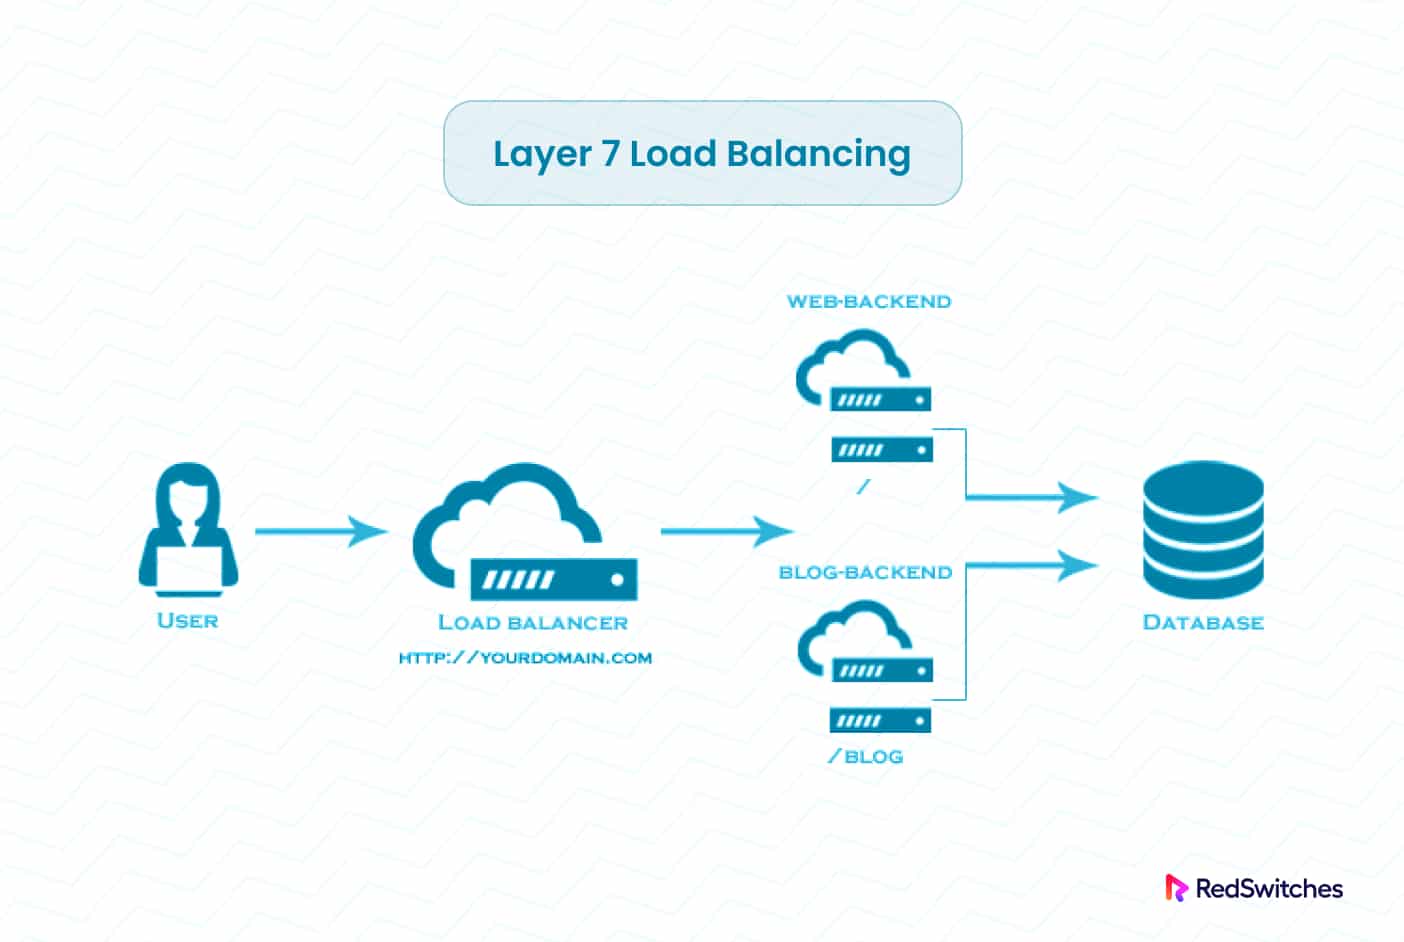
This load balancing process optimizes the allocation of incoming network traffic while considering the peculiarities of the applications.
By utilizing layer 7, the load balancer can route requests to multiple backend servers based on the content of the user’s request. Using this load balancing technique, whether you’re running PostgreSQL on CentOS or another database system, you can operate numerous web application servers under the same domain and port.
Load Balancing Algorithms
HAProxy provides different load balancing algorithms to distribute incoming traffic over the backend servers. Each algorithm has unique properties and is thus a good fit for a specific set of conditions, whether you’re running Docker on CentOS or other containerization solutions.
Here’s a brief overview of several popular HAProxy load balancing algorithms:
Round Robin (default)
This algorithm distributes the requests equally circularly to each backend server in sequential order. Being a dynamic algorithm, Round Robin allows server weights to be modified in real time.
Static Round Robin
Like Round Robin, Static Round Robin utilizes each server in the backend infrastructure according to its server weights.
In contrast to Round Robin, however, adjusting server weight on the fly is not allowed. The good thing is that the algorithm doesn’t place any architectural constraints regarding the number of servers. When a server comes online, it is instantly reintroduced into the farm once the entire map is recomputed.
Least Connections
In this configuration, incoming requests are routed to the backend server with the fewest active connections. This algorithm helps distribute traffic more evenly when backend servers have varying capacities or during high-traffic periods.
Source IP
Here, requests from the same source IP address are consistently routed to the same backend server. This algorithm ensures session persistence, which can be useful for applications that require maintaining the state between requests.
URI or URL-hash
The URI or URL of the request is hashed, and the request is routed to a backend server based on the resulting hash value. This algorithm ensures that requests for the same URI are always handled by the same backend server, allowing efficient caching and session handling.
Least Time
Requests are routed to the backend server with the lowest average response time. This algorithm dynamically adjusts and redirects requests to the fastest server, which is beneficial for applications where response time is crucial.
These load balancing algorithms can be configured in HAProxy to suit your requirements. By carefully selecting the appropriate algorithm, you can optimize performance, maximize resource utilization, and ensure a seamless user experience.
Some Fundamental HAProxy Terms
Before setting up a load balancing solution using HAProxy, you should understand the following terms you’ll encounter in the tutorials and documentation.
Frontend
The frontend component exposes a website or application to the internet. This node takes inbound connection requests and routes them to a pool of backend servers. The frontend delivers the requests specified in the HAProxy configuration’s frontend section to the backend. A typical request has the following components:
- ACLs
- Port
- A collection of IP addresses
- The use_backend rule
This use_backend rule specifies which backends to use based on the specific ACL requirements. A default_backend rule is also available to cater to any additional cases.
Backend
The backend is a pool of servers, including instant dedicated servers, that complete and resolve client requests. Backends are configured in the HAProxy configuration’s backend section. A backend can be defined in its most basic form as the load balancing algorithm for a list of servers and ports.
A backend can have one or many servers. Adding extra servers to your backend will generally boost your available load capacity by distributing the demand over more servers. This method also improves dependability if one or more backend servers go down.
The configuration settings determine the performance of a backend node. You can refer to the following example of backend configuration, which we have implemented in the next section:
backend web-servers
mode http
balance round-robin
server webserver-01 192.168.1.1:80 check
server webserver-02 192.168.1.2:80 check
The Defaults Settings
The defaults section provides information shared by all nodes. These settings are usually used to set the operational mode and timeouts. A typical example is as follows:
defaults
mode http
timeout client 5s
timeout connect 5s
timeout server 5s
timeout http-request 5s
The above snippet has the following elements:
- Mode sets the load balancer’s operational mode (HTTP or TCP). HAProxy’s mode controls how it handles incoming requests.
- The timeouts section is used to avoid ordinary connection and data transfer issues. You can increase or reduce the default values to fit your requirements.
Timeout client specifies how long HAProxy waits for the client to submit data.
Timeout connect is the time required to connect to the backend.
Timeout server is the amount of time it takes for the server to transmit data.
Timeout http-request specifies how long the client must wait before sending a full HTTP request.
Access Control List(ACLs)
When it comes to load balancing, ACLs are used to test a specific condition and then take action depending on the outcome. This enables optimum traffic forwarding depending on criteria such as backend connections and pattern matching.
Sticky Sessions
Sticky sessions, also known as session persistence or session affinity, in HAProxy, refer to a mechanism used in load balancing to ensure that incoming requests from a particular client are consistently directed to the same backend server during that client’s session.
This is achieved by binding a client’s session to a specific server based on certain criteria, such as the client’s IP address or a particular attribute in the request.
Sticky sessions are beneficial in scenarios where maintaining a session state is essential for the proper functioning of an application.
Without sticky sessions, each request from a client could be directed to different backend servers in a roundrobin fashion, potentially causing issues if the application relies on maintaining a certain state or session data on a specific server.
High Availability
HAProxy provides high availability by employing multiple instances of HAProxy configured in an active-passive setup or a cluster.
In this active-passive configuration, one HAProxy instance is the active load balancer, while another acts as a backup or standby. If the active instance fails, the passive instance takes over and continues handling the traffic. This arrangement ensures continuous service availability and minimizes downtime.
Health Checks
Health checks are used to monitor the status and availability of backend servers.
HAProxy periodically sends requests to each server and checks for valid responses (such as HTTP 200 status). If a server fails to respond or returns an error, HAProxy marks it as “unhealthy” and stops sending traffic.
Health checks help detect and automatically remove faulty or unresponsive servers from the load balancing pool, improving the system’s overall reliability.
Prerequisites to install haproxy on Centos 7
HAProxy is often used to set up load balancing solutions because of its flexibility. You can set it up to cater to your project’s requirements and create a solution that ensures the high availability of your business applications.
Let’s start with the prerequisites. Note that the following are not absolute requirements. We have picked these requirements to demonstrate the flexibility of HAProxy and the idea of load balancing.
For this test scenario, we have three servers with CentOS 7. One server is set up as the HAProxy Load balancer server, and the other is the backend web server.
These servers have the following hostname and IP addresses for better identification.
192.168.1.1: web1.test.com
192.168.1.2: web2.test.com
192.168.1.3: Loadbalancer.test.com
Installation and Configuration of HAProxy on CentOS 7
Let’s start installing server software and HAProxy on the CentOS 7 servers.
Step 1: Install HAProxy on CentOS 7 Load Balancing Server
The first step is the installation of HAProxy on the server, acting as the load balancer in our test configuration. Use the following commands to install HAProxy on the load balancer server.
On RedHat/CentOS 7-based systems:
# yum install haproxy
On Ubuntu/Debian-based systems:
# apt-get install haproxy
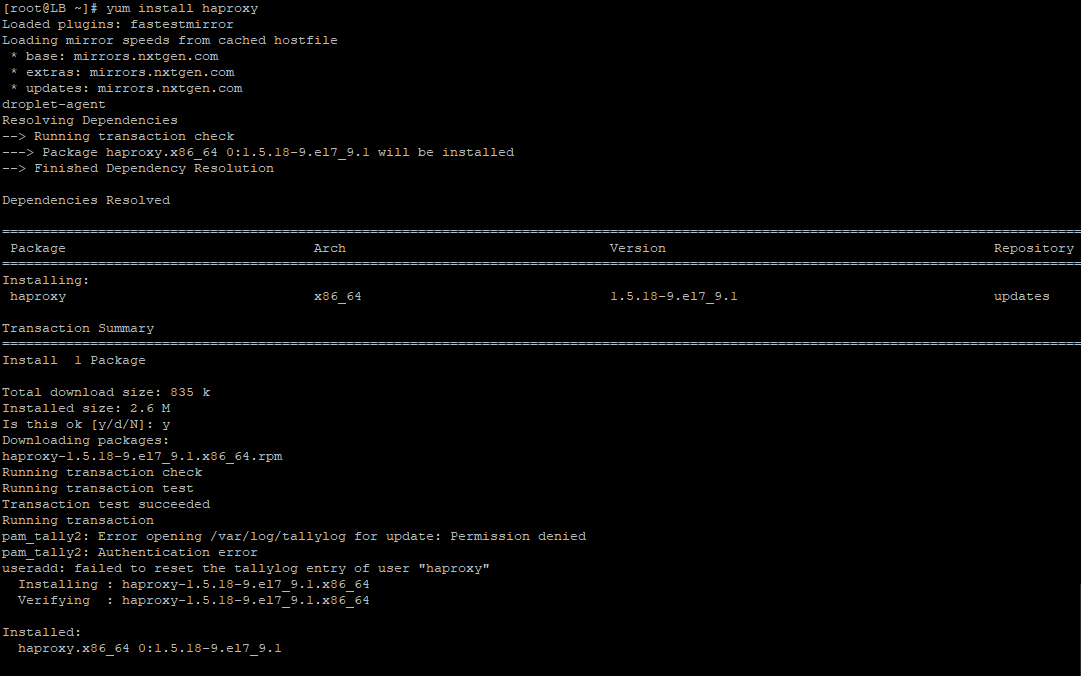
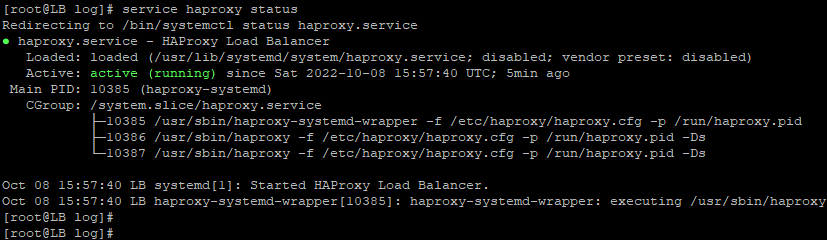
Once the installation finishes, start the HAProxy service with the following command:
#systemctl start haproxy
This will start HAProxy on the load balancer.
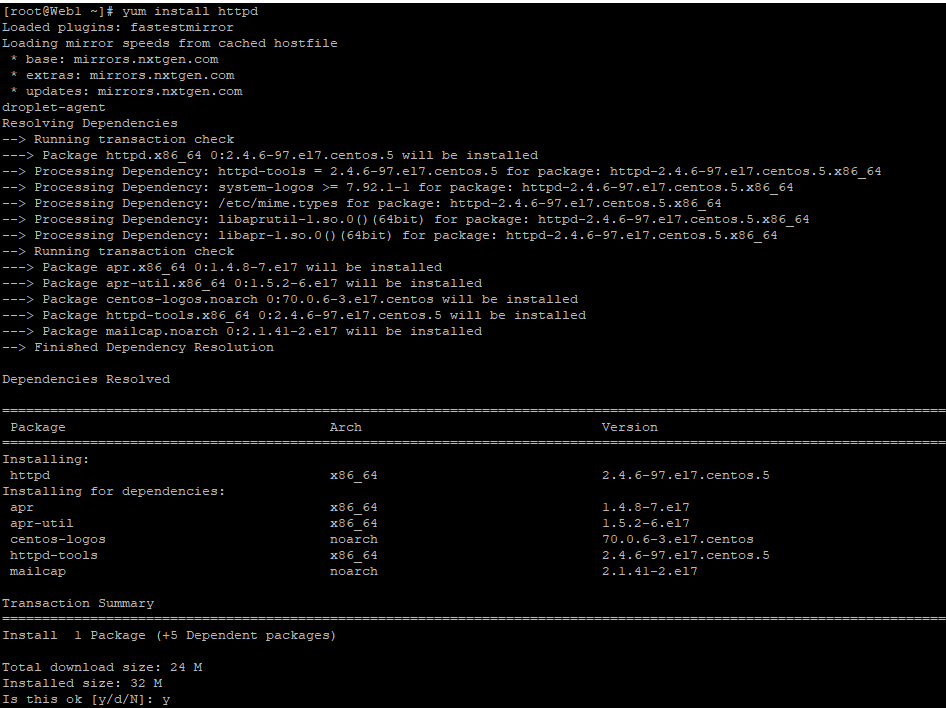
Step 2: Install the Web Server on the Backend Servers.
The other two servers would act as the backend servers. For this, we’ll set up Apache as the webserver to service requests that the HAProxy server would redirect.
We chose Apache because it’s perhaps the most widely used web server today. It is open source and has been a popular choice for setting up servers for web apps.
On web servers 1 & 2, use the following commands to install Apache:
On RedHat/CentOS 7-based systems:
# yum install httpd
On Ubuntu/Debian-based systems:
# apt-get install apache2
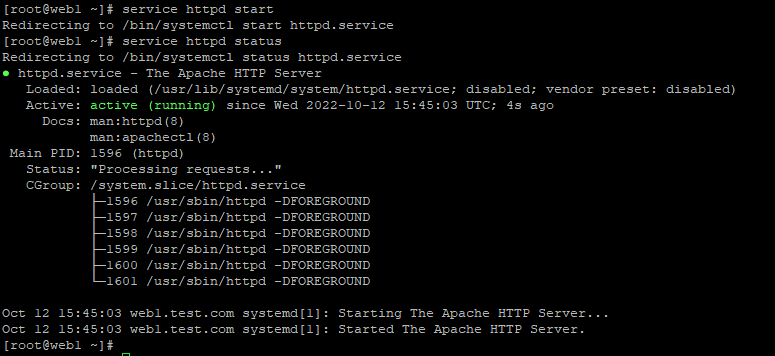
Once the installation finishes, you’ll notice that the Apache service doesn’t start automatically. You need to enter the following command to start the service.
# systemctl start httpd
You won’t get any indication that the service has been started successfully. To confirm this, you can get the status of the service with the following command:
# systemctl status httpd.
You will see an active status if the service is running:
Step 3: Configure Firewall Settings on Apache Servers
Once the installation is completed, we must configure the firewall settings to allow HTTP traffic.
We need to allow HTTP service by whitelisting port 80 on both web servers. For this, use the following commands:
# firewall-cmd –permanent –add-service=http
# firewall-cmd –permanent –add-service=https

Now, to make sure that the firewall rules are in effect, reload the firewall rules with the following command:
# firewall-cmd –reload

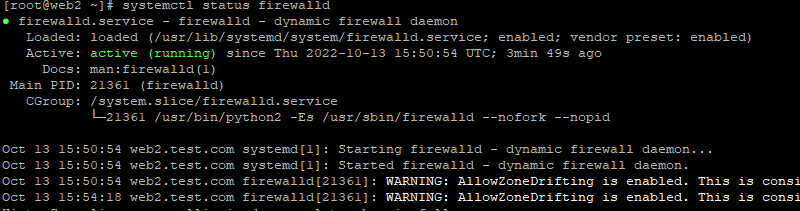
Finally, check the firewall status to see if everything works as intended.
# systemctl status firewalld
After the firewall reloads, you can start the service and check the web server.
Step 4: Add Backend Servers to the HAProxy Configuration File or configure haproxy in Centos 7
At this point, we have installed HAProxy and Apache servers on the test servers.
To connect these components, we need to make changes to the haproxy.cfg (the HAProxy configuration file). You can see that we’ve commented out the existing content of the file and added our rules.
Start by entering the following command in the terminal of the HAProxy server.
# vi /etc/haproxy/haproxy.cfg
Comment out the current rules and add the following to the file.
# HAProxy Load Balancer for Apache Web Server
frontend http-balancer
bind 192.168.1.3:80
stats enable
stats auth admin:123
stats uri /stats
stats refresh 10s
stats admin if LOCALHOST
default_backend web-servers
backend web-servers
mode http
balance roundrobin
server webserver-01 192.168.1.1:80 check
server webserver-02 192.168.1.2:80 check
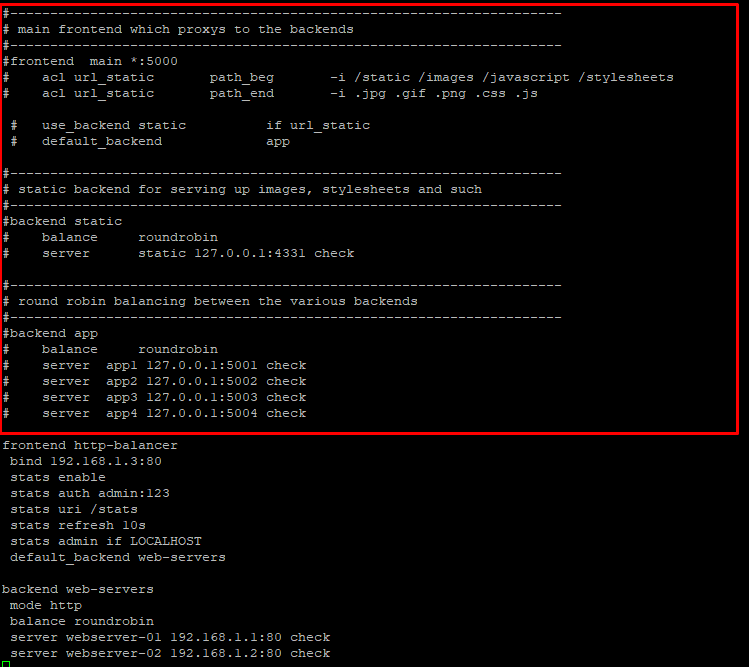
Save the file and restart the HAProxy service to ensure the new rules are loaded and in use.
You should note that you can use other custom ports instead of the default ports 80 and 443. Another essential fact to remember is that the default algorithm is Round Robin.
Also, note that the check option (at the end of the server directives) forces health checks before the backend server is used.
HAProxy Status Dashboard
HAProxy also offers a dashboard called the HAProxy Status page. Here, you can see the essential metrics that present server health, current request rates, response times, and more.
You must enable a directive in the HAproxy configuration file to add a metric. For instance, in the following screenshot, you can see that you need to provide credentials to access the Status page. The authentication directive we added to the HAProxy config file requires users to enter credentials before accessing the page.
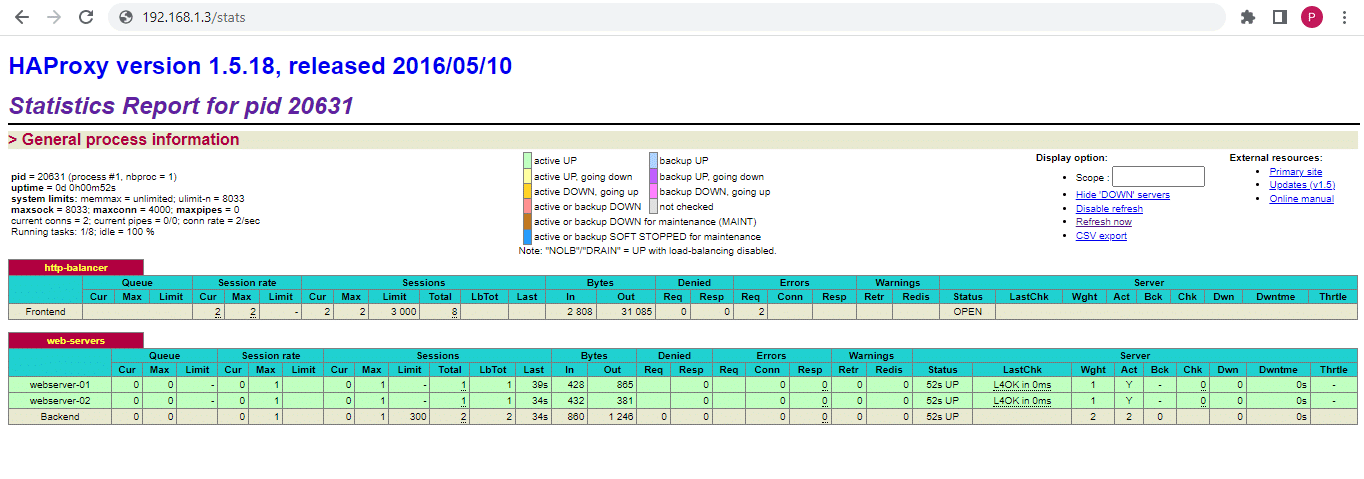
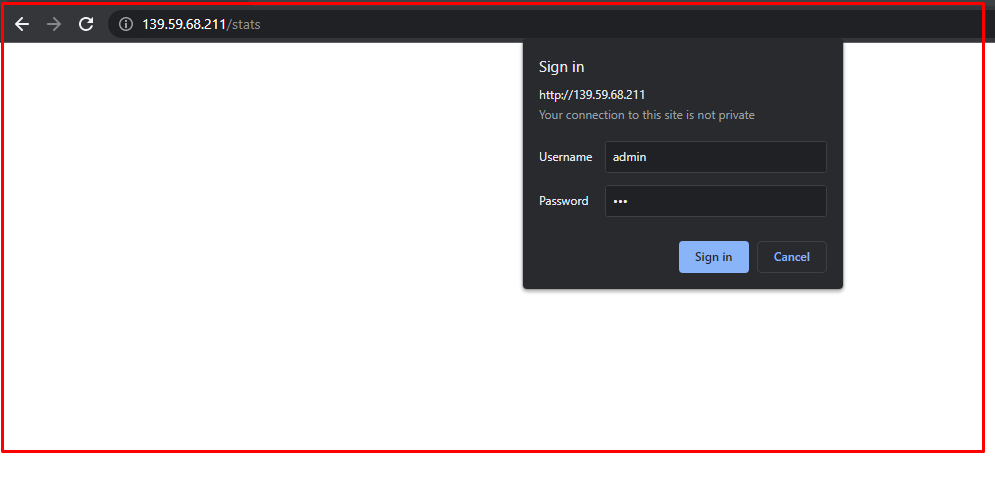 Once you provide the proper credentials, you can access the HAProxy Status page to access vital statistics about the load balancer.
Set Up the Logs
We’ll now configure the rsyslog to confirm the location of the HAProxy logs. For this, use the following command:
vi /etc/rsyslog.conf
While editing, uncomment the following lines:
# Provides UDP syslog reception
$ModLoad imudp
$UDPServerRun 514
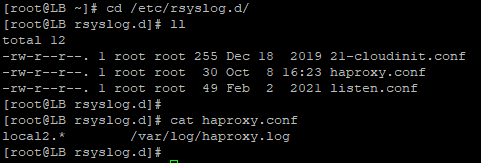
Next, add the following lines to the /etc/rsyslog.d/haproxy.conf
# HAProxy Logging
local2.* /var/log/haproxy.log
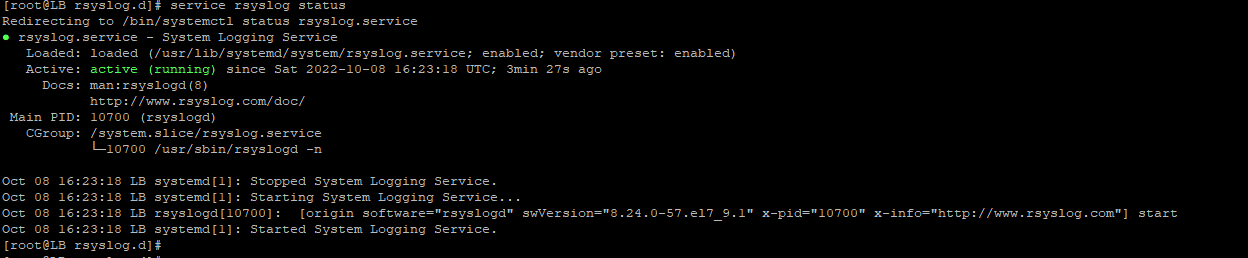
Now, restart rsyslog and HAProxy service to ensure the changes are in use.
Test the Load Balancer
Our test HAProxy load balancer is in place, and we can now test to see if the load balancer is working properly.
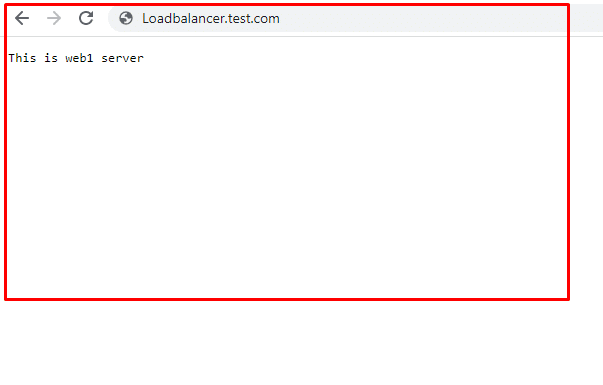
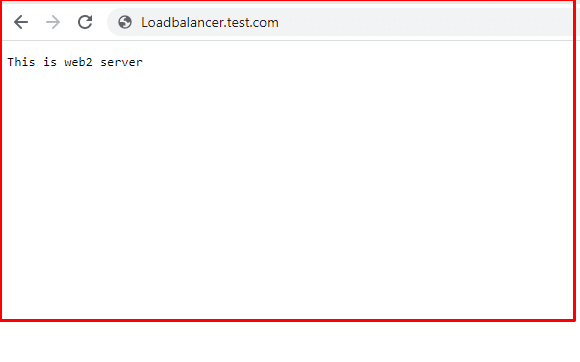
Start by adding the index.php pages on both test servers. When you load these pages in the browser, you’ll see something like this:
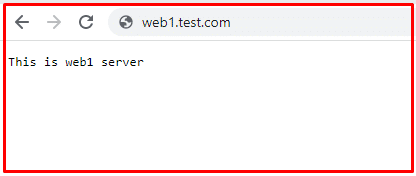
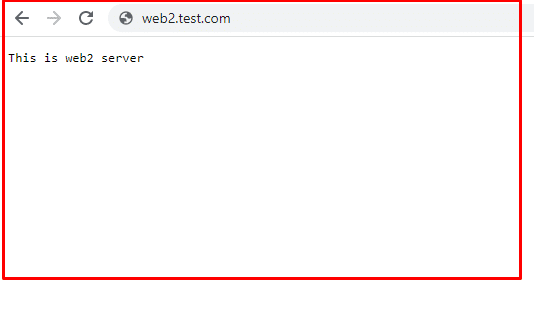
Now access the URL of the load balancer for testing the request forwarding on web1 & web2. When you refresh the HAProxy load balancer URL, it will prompt different messages every time, like ‘This is web1 page’ or ‘This is web2 page’.
You can also check the logs to see the responses of the servers.

Conclusion
With the right configuration, HAProxy can effectively balance the load, optimize resource utilization, and contribute to the overall success of your web application. So, take the time to craft a well-thought-out HAProxy configuration and unlock the full potential of your application’s performance.
This article explored various aspects of HAProxy configuration, including backend server setup and HAproxy status checks. By understanding and implementing these configuration options effectively, you can optimize the traffic flow and maximize the utilization of your backend resources. We sincerely hope this post has helped you learn more about HAproxy load balancing and HAproxy setups.
If you’re seeking powerful GPU dedicated servers to enhance your web application’s performance, RedSwitches is here to meet your needs. We are one of the best providers for Miami dedicated servers, offering competitive pricing and instant dedicated server delivery, often within the same day of order approval. Whether you require a dedicated server, a traffic-friendly 10Gbps dedicated server, or a robust bare metal server, we are your trusted hosting partner specializing in Linux hosting for your projects.
FAQs
Q: How do I configure the load balancer in HAProxy?
A: You can configure the load balancer in HAProxy by following these steps: 1. Open the HAProxy configuration file using a text editor: “` sudo nano /etc/haproxy/haproxy.cfg “` 2. Add your backend servers to the configuration file: “` backend my_backend server server1 192.168.0.1:80 server server2 192.168.0.2:80 “` 3. Save the changes and exit the editor. 4. Restart HAProxy for the changes to take effect: “` sudo service haproxy restart “` 5. Your load balancer is now configured in HAProxy.
Q: What are the different load balancing algorithms supported by HAProxy?
A: HAProxy supports various load balancing algorithms, including: – Round robin: Requests are distributed evenly across the servers. – Least connections: Requests are sent to the server with the fewest active connections. – Source IP: Requests from the same IP address are always directed to the same server. – URI hashing: Requests with the same URI are sent to the same server. – Custom algorithms: HAProxy allows you to define custom load balancing algorithms.
Q: How can I achieve high availability with HAProxy?
A: To achieve high availability with HAProxy, you can set up multiple load balancers in a failover configuration. This ensures that if one load balancer goes down, the other takes over and routes requests to the backend servers. A virtual IP (VIP) can facilitate seamless failover between the load balancers. You can also use IP failover techniques provided by your infrastructure provider or a cloud load-balancing service.
Q: Which Linux distributions are supported by HAProxy?
A: HAProxy is supported on various Linux distributions, including CentOS, Ubuntu, Debian, Red Hat Enterprise Linux (RHEL), Fedora, and more. The installation steps and configuration are generally similar across these distributions.
Q: How can I use HAProxy for load balancing?
A: To use HAProxy for load balancing, follow these steps: 1. Install and configure HAProxy on your server(s). 2. Set up the backend servers for your application or service in the HAProxy configuration file. 3. Specify the load balancing algorithm you want to use (e.g., round robin, least connections) in the configuration file. 4. Save the changes and restart HAProxy. 5. Configure your DNS or load balancer’s IP as the entry point for client requests. 6. HAProxy will now distribute incoming requests to the backend servers based on your load-balancing configuration.
Q: How do I restart HAProxy?
A: To restart HAProxy, you can use the following command: “` sudo service haproxy restart “` This will stop and start the HAProxy service, applying any configuration changes you might have made.
Q: How can I set up HAProxy for layer 4 load balancing?
A: To set up HAProxy for layer 4 load balancing, you need to configure it to work with TCP traffic. By default, HAProxy is configured for HTTP load balancing (layer 7). To enable layer 4 load balancing, you need to modify your HAProxy configuration file by specifying the `mode tcp` directive for the backend servers. This allows HAProxy to route TCP traffic without inspecting its content.
Q: What are the basic load-balancing concepts?
A: Load balancing is a common solution for distributing incoming network traffic across multiple servers. It aims to improve performance, increase reliability, and ensure high availability of applications or services. Load balancing algorithms determine how traffic is distributed, and it can be done at layer 4 (transport layer) or layer 7 (application layer). HAProxy is a popular load balancing software that offers extensive configuration options and supports various load balancing algorithms.
Q: How can I open the HAProxy load balancer for external access?
A: To open your HAProxy load balancer for external access, you need to configure your network firewall to allow incoming traffic on the appropriate ports. By default, HAProxy listens on port 80 for HTTP traffic and port 443 for HTTPS traffic. You may also need to configure port forwarding on your router or network gateway to ensure incoming requests are forwarded to the HAProxy load balancer’s IP address.
Q: What user and group does HAProxy use?
A: HAProxy runs as the user `haproxy` and the group `haproxy.` HAProxy uses these default user and group identities for security and process management purposes. It is recommended to ensure that the HAProxy configuration files and log files are owned by the `haproxy` user and group and have the appropriate permissions set.
